Monday, March 28, 2016

Monogram burlap rose wreath

monogram burlap rose wreath


With all the cool burlap ribbon in the stores these days and monogram letters of all kinds, I thought it would awesome to create a monogram rose burlap wreath for my front door. 

Since I put my wreath on a glass storm door with a suction hook, it was hard to photograph without a reflection so I took the photograph on an indoor wall so you can better see how gorgeous it turned out.  When you attach it to a glass door it’s even more beautiful!

Supplies:       

Flat wreath form 12” diameter
2 ½” wide wired natural color burlap ribbon
Green burlap ribbon
Monogram wooden letter of choice ½” thick
Self stick cork sheet
Eye screw
18 ml wire
7 Daisy artificial flowers in choice of color
Drill with small drill bit
Hot glue gun and hot glue sticks
Lighter
Pencil
Scissors
Ruler

Instructions:

1.     On the self-stick cork sheet, trace around your letter, cut out. Remove the backing attach to the letter.  Do this on the front of the letter and then turn over and repeat on the back of the letter.


2.     Using a drill and small drill bit, drill a hole in the top center of the letter. Attach an eye screw in the hole you drilled.


3.     Wrap the green burlap all around the wreath form and attach with some hot glue.  Make sure you mark an area on the wreath from where there is a hole (There are holes all around this flat wreath form) Thread a piece of wire through the hole in the burlap covered wreath from, form a loop at the top and twist to secure. (This will be the top hanger of your wreath)


4.     Attach another piece of wire through the eyehook on the top of your letter; thread the ends through the same hole you used for the hanger and twist to secure.


5.     Make your burlap roses.  Cut a piece of 2 ½” natural colored burlap ribbon 24 inches long.  Begin by burning both ends with a lighter to stop any fraying.  Next, twist the ends around for the center of your rose and put a dab of hot glue to secure.  Continue twisting and turning, and occasionally adding a dab of glue. Always twist and turn in the same direction. Continue until you reach the end.  Secure with a dab of glue.  Make 6 more so you have seven burlap roses. 


6.     Starting at the top, attach a burlap rose with an ample amount of hot glue to the front of the wreath.  Add a daisy next and continue around alternating, rose and daisy till you reach the end. 


Tuesday, March 22, 2016

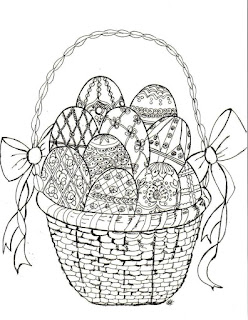
Easter Faberge Egg Coloring Page

Easter Faberge Egg Coloring Page

Download and print this free Easter Faberge Egg coloring page and relieve your stress as you color. Walk into any bookstore these days and you will find hundreds of coloring books for adults. There is every genre available from television shows, wild animals, mandalas and more. In addition many experts are touting the benefits of coloring as a way to unwind from a stressful day.
You can use colored pencils, fine line markers to decorate this coloring page however you would like.
You won’t find this hand drawn Easter Faberge Egg Coloring page anywhere except on Bowdabra blog and Make it easy Crafts. We hope you enjoy your coloring fun and relieve your stress in the process.  Click on the link to download the coloring page.


Monday, March 21, 2016

Easter Egg from Space


I never think inside that box.  My slightly loopy mind always looks to shake things up so I came up with an Easter egg from space.  Ancient mariners were surprised to discover that the world was not flat. So I started thinking of shapes the earth could be…in different solar systems of course. My eyes spied some undecorated Easter eggs and I thought that it might be fun to make my egg look like my dear mother earth…from space!  I know it sounds weird but wouldn’t it be a really cool conversation starter?  

If you want to make some Easter egg from space worlds yourself, it’s easy peasy.


You will need:

A wooden egg 

Decoupage glue (Mod Podge gloss is my favorite)

Computer and printer

Scissors

Small paintbrush

1.     Search on your computer clip art program for pictures of earth from space and print two or three versions.  


2.     Cut out the motifs and then cut in smaller pieces.  This earth is definitely not flat so you need to just layer and add small pieces to the egg.  The only rule is to make sure that you put the predominately white pieces on the top and bottom of the egg (North and south poles)

3.     Spread some decoupage glue on small sections of the egg, add a piece of clip art and smooth with your fingers (its gets messy but it all washes off!)  Smoothing with your fingers helps remove some of the wrinkles.  It doesn’t matter if there still are some wrinkles as it give the piece added dimension.  Once the piece is stuck add more glue on the top.

4.     Continue working around the egg until the entire egg is covered.  Let dry.  When it is dry you may brush another coat of decoupage glue on the top for added shine.


If you have time why not create a whole solar system display, Venus, Jupiter, and more?

Tuesday, March 15, 2016

Revisiting Coffee Filter carnation pens

Coffee filter carnation pens

The flowers are starting to bloom around these parts and these cute coffee filter carnation pens will brighten up your desk or office space.  Today I am revisiting and older and very popular project that is super inexpensive and fun to make.  Spring is in the air and these carnations are so real all that is missing is the flowery aroma!  These pens are a great group and Girl scout swap craft!

If you work in an office or a business where people are using pens sometime the pens just seem to walk away, and you never have a pen when you need one.  So it’s fun to have decorative pens in a flowerpot filled with beans or rice.  It brightens up the space and they stick around a bit longer.  This project cost practically nothing.  I bought both the coffee filters and a pack of pens for a around a dollar each!  Add some floral tape and acrylic paint and you can make a whole bouquet of cute carnation pens.

You will need:

Stick pen for each carnation

Coffee filters

Roll of green floral tape

Transparent tape

Paper plates

Acrylic paint in desired color (I used red and burgundy)

Small paintbrush

Scissors

1.     Fold the coffee filter in half and cut along the pleat lines towards the center just to the fold line that marks the edge of the pleats.  Repeat this all around.  Repeat this step with two more coffee filters for a total of three


2.     Using the scissors round out the tips of each petal on all three coffee filters.


3.     Open the filters up and mark the center and cut out a small opening in the center of each prepared filter. (This will be where you insert the pen top)


Coffee filter carnation pens

4.     Layer all three filters together and insert the pen top into the holes you made.  Using your fingers, gather together on the pen top.  Use some transparent tape to attach the base to the pen making sure you attach some tape to the pen itself.  It is ok if you add a generous amount of tape here since carnations have a thickness at the base.

Coffee filter carnation pens

Coffee filter carnation pens

Coffee filter carnation pens

Coffee filter carnation pens


5.     Cut a piece of green floral tape and begin wrapping around starting from the top and working down the pen.  Stop just before the pointed tip.  Floral tape sticks to itself and it helps if you press on the tape with your fingers.

Coffee filter carnation pens

Coffee filter carnation pens


6.     Color the carnation.  Add a tiny bit of water to a paper plate. In another section of the paper plate add your main color and thin some of it with the water.  Use the brush to add the thinned color to the flower.  You do not need much since the filter draws in the liquid.  After the color has dried a bit tap the tips only with the un-diluted acrylic paint.  Let dry.

Coffee filter carnation pens

Coffee filter carnation pens


Coffee filter carnation pens


Monday, March 14, 2016

St. Patrick's Day free coloring page


Today Make it easy Crafts and Bowdabra blog are offering a St. Patrick’s Day free printable coloring page.  In this crazy world stress is a part of life.  Lately many adults are using coloring to alleviate their stress.  This St. Patrick’s Day coloring page is great for this use and kids and adults alike will love to color.  Be creative and use the many green shades of the emerald isle when you color!  Hope you enjoy this free printable St. Patrick’s Day coloring page and come back often for more coloring fun and free printable.

Simply click on the link and download the image to print on your home printer.


Happy St. Patrick's day!  


Monday, March 7, 2016

Greek Easter cookies | koulourakia

Greek Easter Cookie printable recipe


Every year I make these Greek Easter cookies called Koulourakia.  Greek Easter is on May 1st this year and quite a bit later than regular Easter but these cookies are delicious any time of the year.   When we were kids, we got to celebrate two Easters.  My parents would make our Easter baskets on regular Easter and then we'd get a re-run on Greek Easter, although the second one was more focused on celebrating with church and food.  Since Greek Easter is often a week later my parents would be able to buy up all the leftover Easter candies.  Then when Greek Easter came around we'd dye our eggs.

Now traditionally Greeks only dye their eggs red.  There are many theories about why red and only red.  One story credits it to Mary Magdalene going to the Roman emperor to tell him of the miracle of resurrection and he told her he would believe her if the eggs in her basket turned red, which they did.  Another is that the color red is in memory of the blood of Jesus.  A red egg is also baked into an Easter sweet bread called Tsoureki.

When I was a kid we would gather in the kitchen and make these Easter butter cookies called Koulorakia. They are delicious with coffee or as a treat any time. Not too sweet, buttery and crispy good. The rolling is fun and although I’ve just made them in twists you can make all sorts of shapes, so it’s fun to bake these with your kids.

Greek Easter Cookie printable recipe

For the Greek Easter cookie recipe card, click on the photo and print at 5 x 7 size

Happy Easter and if you meet a Greek after May 1 be sure to say Christos Anesti, which means-- Christ is risen!


Thursday, March 3, 2016

Easy Easter Egg Box

Easy Easter Egg Box


Valentine's Day is history and the next holiday on the horizon is Easter.  This quick little Easter egg box is a great spring craft for kids, groups, assisted care facilities and more.  You could even set up a table outside when the weather gets nice and craft away.  Very little supplies are needed so they are very cost effective as well!


You will need:

Miniature Paper mache oval box

Acrylic paint, pink or any pastel color

Gold acrylic pant (optional)

Paintbrushes 

Flat lace scraps (You can buy bags of misc. scrap lace in fabric stores for very little money)

Scissors

Tacky glue

Easter egg box

1.     Paint the box top and sides with pastel color.  Paint the box bottom with the same pastel color.  Let dry.  

2.     Paint the inside of top and bottom in gold acrylic paint (if desired) Let dry.

Easter egg box

3.     Cut pieces of various flat lace scraps

4.     Decorate the top by gluing the scrap lace across.  Slightly arc the lace so it resembles a decorated egg.  Vary the lace strips with widths, designs and colors.  You can even add rhinestones if you like.  Let dry completely. 


Easter egg box