Thursday, May 31, 2012

Easy To Make Scrapbook With Old Horse Show Ribbons


If you show horses you know that in one show alone you can amass quite a few ribbons. Before long, there is no place left to display the fruits of your labors. Wall hangings and pillows are a great way to showcase these awards  http://charrisart.blogspot.com/2010/08/oh-what-to-do-with-horse-show-ribbons.html  ...or you can make a scrapbook to hold your photo memories as well.  All you need is a simple 1 ½” clear view binder.  Add your scrapbook items in sheet protectors and you are all set.

You will need:

One 1 ½”  3-ring clear view binder

Loose-leaf sheet protectors

Various Horse show ribbons

Art paper (sold in craft stores) which comes sized-- 9" x 12" pack of various colors or you can substitute any heavy colored paper 

Permanent glue stick

Scissors, ruler

Disappearing marker

Waxed paper to work on

1.     Cut a piece of art paper in a color of choice 9” x 11”

2.     Take apart the printed ribbon strips from the ones you intend to use for your scrapbook.  Cut the ribbons to 7 ¾” length.  Most ribbons are 2” across so your ribbon strips should be 2” x 7 ¼”.  You will need four across and one at the top for a total of five ribbons. 


3.     Line up your ribbons side by side on the art paper and mark their positions with a disappearing marker.


4.     Working on a piece of waxed paper to protect your work surface, cover the back of each ribbon strip with the glue stick and attach to the marked areas.  Smooth down with your finger.


5.     When you have attached all the ribbons strips, feed the paper with strips attached through the clear plastic of the binder.  If you would like the ribbons to be on both sides of the binder, repeat steps 1-4 for the back of the binder.

6.     If you would like to add an unprinted ribbon piece to the side. (Optional) Cut a strip of paper 1” x 11” attach a 1” x 8” ribbon piece with the glue stick and carefully feed through the clear plastic.


Create some scrapbook pages and add them to the sheet protectors for memories that last forever!


Sunday, May 27, 2012

K-Cup toothpick holder


Are you ready for crafting with a K?  K- cup crafts that is. This one is super easy and very quick to make.  It is a perfect project for kids.  I always keep some toothpicks in my kitchen for testing cakes and baked goods, don't you?

You will need:

Notched Popsicle sticks (Sometimes called skill sticks)

Black used K-Cup, washed and filter removed (Black gives a nice look peeking through the openings)

Kitchen shears or heavy-duty scissors

Tacky craft glue (I used Aleene’s Turbo Tacky glue)

Wooden circle to fit around bottom

Scraps of tiny lace trim

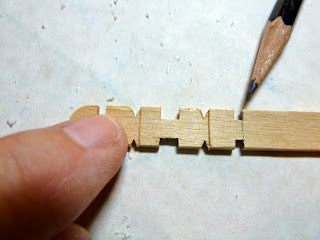
1.     Use the kitchen shears to cut 12 pieces of notched Popsicle sticks.  Cut each end at the first notch.  You will get two pieces from each stick. (One from each end)


2.     Draw a bead of glue down the side of the K-cup and attach one of the pieces of Popsicle stick. Continue adding glue and sticks around the K-cup until you have covered the entire K-cup.  Adjust the sticks if necessary and let dry.


3.     Add some tacky glue onto the bottom of the K-cup.  Center and attach the round wooden shape for the base.  Let dry.


4.     Cut a length of tiny lace to fit around the top rim of the K-cup.  Run a bead of glue around the edge and add the lace.  Cut an additional length of tiny lace to fit around the bottom edge and attach with glue.


Keurig Mini Plus Personal Coffee Brewer


Wednesday, May 23, 2012

Polymer Clay Pandora Style Bracelet


Make your own beads from polymer clay with little hearts.  These are so very easy you will want to make some in all colors, especially since you are threading them onto a bangle that opens with the twist of a screw.  Voila, presto change-O.

You will need:

Twist end bangles (they come three to a pack)

 Polymer clay in blue, green or desired color for base of bead

Polymer clay in small bits of white

Sculpey gloss glaze

Antique Metallic beads

Flat metallic spacer beads

Wooden barbecue skewer

Aluminum foil

Rolling pin (Use this only for clay, do not use for food)

Slicing blade for clay

Waxed paper

Ruler

1.     Cover your work surface with waxed paper.  Make the beads.  Measure from the end of the block of polymer clay, ½” and make a line with a pin or the tip of a pencil.  Mark this into (4) ¼” sections. One bracelet is made using three polymer beads and the other used four. Cut the pieces and roll each one into a ball in the palm of your hand. 


2.     Use the rolling pin to slightly flatten each round bead.  Center the tip of the bar-b-cue skewer in the middle of each bead and make a hole using a twisting motion.  Thread the bead on the skewer and add the hearts.


3.     Pinch off a teeny piece of white clay and roll with your finger putting more pressure on one end to make a tiny tear drop shape.  Repeat for another teardrop.  Place one tear drop shape on the side of the bead and add the other teardrop meeting the points. Repeat this three more times.  Roll the skewer with the bead attached on the work surface to adhere and define the heart shapes.  Make two more beads in the same way.


4.     Preheat your oven to 250 degrees.  Cover a pan with aluminum foil and bake the beads for 20 minutes.


5.     When the beads have cooled, brush some Sculpey gloss glaze on the beads one side at a time.  Let dry.


6.     Unscrew the end of the bangle and string the beads as follows:  start with a flat spacer bead, antique metallic bead, spacer bead, polymer bead, spacer bead and continue alternating. (See photo)


Sunday, May 20, 2012

Leather-like brown paper bag origami wallet


I think that right up there with Tacky glue, my favorite craft supply has to be one that I get for free right in my grocery store.  To what can I be referring?  Brown paper bags of course. To make this surprisingly durable origami wallet just cut a standard sized 8 ½” x 11” piece of brown paper bag, crinkle it up, stain it, and fold. It’s really quite easy, just take the origami steps slowly and follow the photos. This wallet is fantastic when I am traveling with a small purse and just want to carry some money and a credit card.


You will need:

Large brown paper bag, single layer

Ruler, pencil

Scissors

Acrylic wood stain

Mod Podge decoupage gloss finish

Small paintbrush

Paper to protect work surface

Paper towels

Bone folder (optional)

Make your brown paper leather-like:

1.     Measure and cut a piece of brown paper bag 8 ½” by 11.”  Roll it into a ball and then smooth the wrinkles out.  Brush on some acrylic wood stain and wipe off the excess with a paper towel.  Let dry.


2.     Spread some gloss decoupage finish on the stained brown paper piece and let dry.  This will give it a slight shine.

Fold the origami wallet:

3.     Fold the piece of paper in half. Unfold.


4.    Fold again to the fold line.  Repeat on the other side.


5.       Open up paper.  Turn paper and fold in half.


6.     Working horizontally measure ¾” up on each of the three fold lines and cut to that mark.  Do the same on the other side.


7.     Turn and fold to the first fold line, (The long end will be facing you) then fold in half.


8.     Fold the corner up (closed corner) and cut the triangle off with the scissors.  Open up.  There will be a triangle cut out in one section.  Fold up the 3/4"flaps in the section with the triangle on both sides.  Skip one quadrant and fold up the 3/4"flaps on both sides of this end as well.


Open paper

Turn and fold up flap

Skip one quadrant and fold up flaps


9.     Fold both sides over to the center line, and then fold again.  Fold in half with the diamond shape to the inside.  You will have two flaps on each side.  Working on one end, tuck each flap into the pocket of the opposite side.  Repeat on the other side.

Fold to center line on both sides


Fold in half

Fold in half with diamond to the inside


Tuck in flaps on both ends


These thin leather-like wallets are great to stick in small purses.