Saturday, April 29, 2017

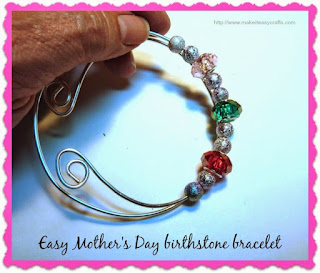
How to make a Mother's Day birthstone bracelet for Mom


birthstone bracelet

Mother’s Day is almost here and this year instead of the usual flowers or candy why not give mom a personalized gift she will treasure forever.  You can make this birthstone bracelet for mom quickly and easily with no special skills required.  Use the colors of stones for the birthdays of all her children or grandchildren. 

Your mom will want to wear her birthstone bracelet all the time! 

Materials

14-gauge silver-plated wire (available at all craft stores)
Needle nosed pliers
Wire cutters
Beads in the colors using the birthstone color chart for your birthstones
Small spacer beads in silver


Colors for Birthstones

January – Garnet (deep red)
February – Amethyst  (dark purple)
March – Aquamarine (Lt. blue)
April – Diamond (Clear glass)
May – Emerald (Green)
June – Pearl (pearl)
July – Ruby (Red)
August – Peridot (Olive green)
September – Sapphire (dark blue)
October – Opal/Pink tourmaline (pearlescent or pink)
November – Topaz (yellow)
December – Tanzanite (violet blue)

1.     Using wire cutters cut a piece of wire so that it fits around your wrist twice.  If your wire comes in a ring (Which many do) it is already the perfect shape for a bracelet.  If not, bend it to a circle shape using a can or any tubular shaped item as a mold to create the round shape.


2.     Using the needle nosed pliers curl one end of the wire.  Start to add the beads on the uncurled end of wire. Thread two small spacer beads on the wire.  The curled end will keep the beads from falling off as you work.  


3.      Next thread on your birthstone bead.  Follow with two spacer beads and continue with as many birthstone colors as you desire with two spacer beads in between each one.


4.     Curl the second end of the wire in the opposite direction as the first one.


I like to use glass beads or Swarovski crystal beads but you can substitute any beads you like.  


Monday, April 17, 2017

How to make a cute quick and easy wine cork poodle

wine cork poodle


In this tutorial we will show you how to make a cute quick and easy wine cork poodle.  You can make this adorable poodle with recycled wine corks and just a few simple craft supplies that you may already have on hand.  This wine cork poodle makes a great gift for a dog lover on your list or even a sweet Mother’s day gift. I’ve made my poodle pink but you can make one in blue, white, or any color you choose.

Be sure and check out the whole series of wine cork creations by Make it easy crafts!

So let’s get started.

You will need:

Wine corks
Pink or white bump chenille stems
Pink or white chenille stems
Scrap of trim or ribbon
Small corks
Tiny pompoms
Xacto or craft knife
Hot glue gun and hot glue sticks
Self-healing mat tor work on
Ruler
Fine 220 sandpaper
Black dimensional fabric paint

Instructions:


1.     To make the legs measure and cut a wine cork in half.  Then stand it up the cork half and slice in half vertically.  Rub the cut sides on the fine sandpaper to smooth.  Make a vertical slice on one side (this will be the side of the leg that sits on the table) and smooth on the sandpaper.  Repeat for other cork half.


2.     Now cut a piece of chenille stem that just fits around the front of the leg and attach with some hot glue.  Attach the leg with some hot glue to another whole cork. (Body)


3.     You may optionally add tiny pom poms around the leg as well if desired.


4.     Cut a ¾” piece from another cork. Save the rest for the head.


5.     Stand the ¾” cork on end and slice it in half vertically.  Lay this piece flat and slice again horizontally.  You will have two quarters (arms) Discard the other side or save for another poodle.


6.     Slice a little at the ends of each arm quarter.  This will make it glue onto the body at an angle.  Add a piece of chenille around each end of the arms like you did with the legs and attach with some hot glue.  Now glue the arms onto the body.


7.     Now attach the piece of cork you saved for the head with some hot glue onto the top of the body.


8.     Glue a tiny cork on to the front of the face (nose)


9.     To make the ears, cut a piece of matching bump chenille stem leaving the thicker part in the center and thinner parts about ½” on each end (ears) 


10. Glue a matching colored pompom on each of the ends.  Attach to the center top of head and bend ears upwards.


11. Glue on some ribbon or other trim around neck for collar.


12. Cut a one-inch piece of chenille stem and glue to the center back for tail.  Attach a pompom on the end. To finish add a brown tiny pom pom for the nose.  Use the black dimensional fabric paint to add two dots for the eyes and let dry. 


Monday, April 10, 2017

How to make a seeded flower for a fun, greeting card

greeting card


I have a friend I rarely get to see and while email and texts are nice, a personal, and fun, greeting card are a sweet touch every now and then.  I found a card that I felt summed up our 20+ year friendship that was perfect and all I had to do was to add a flower that was full of wildflower seeds that you can actually plant and grow!

I made my seed flower and after it dried I created a beautiful little Bowdabra bow in green satin ribbon. After the seed flower dried I attached it to the front of the card and it was ready to mail.  I included instructions to remove the flower, place on the ground and cover with a bit of soil.  Then water thoroughly.  That’s all there is to it. 

Materials:

Bowdabra bow maker or optionally purchased bow
Bowdabra bow wire
7 ½” 3/8” wide green ribbon
All purpose paper
Blender
Pack of wild flower seeds
Flower cookie cutter shape
Hair dryer
Greeting card
Tacky craft glue
Small bowl
Paper plate
Sponge
Food coloring and small paintbrush

Instructions:

1.     Tear the all purpose paper into small pieces and place in the blender.  Add water just enough to cover the paper and let sit for a few minutes.  Next pulse the paper in the blender to create a pulp.  Pour out excess water and remove the pulp with your hands over a sink squeeze out most of the water till it is pulpy and not soupy.


2.     Next place the pulp into a small bowl and stir in the wildflower or other seeds.  Then press the pulp/seed mixture in a cookie cutter shape on a paper plate.


3.     Now use the sponge to press on the pulp to soak up any excess water.  Keep doing this for a few minutes then remove the cookie cutter. 


4.     You will want to dry the shape as much as possible so you use a hair dryer on low.  Work to dry one side and then turn over and repeat on the other side.  It will still be slightly damp.  Set aside and dry overnight.  After it is completely dry the shape will be hard and set.


5.     Now you can use some food color to brush on some color if you choose or leave it as is. 


Make your optional Bowdabra bow or use a purchased bow

6.     Make the bow.  Cut a piece of Bowdabra bow wire 18” long, fold in half and place in the Bowdabra.


7.     Cut a piece of 3/8” wide green satin ribbon 7 ½” long.  Use a lighter to seal the ends of the ribbon. Fold in half to find the center point and insert into the Bowdabra.


8.     Make a loop to the 1” mark and insert into the Bowdabra.  Make a matching loop on the other side.  Scrunch down with the Bowdabra wand.


9.     Insert the two loose wires through the bow wire loop to make a slipknot.  Pull tight while the bow is still in the Bowdabra.  Separate the wires and tie a knot.  Cut the wires short.  Add a bit of tacky glue on the card and attach the seed flower.  Then add a bit more glue and attach the bow under the flower.  Let dry and your greeting card is ready to send…and the flower is ready for the recipient to plant and enjoy!