Showing posts with label gift. Show all posts

Monday, December 18, 2017

How to gift a book with a personalized ribbon bookmark

personalized ribbon bookmark


At Christmas, some of my friends and family are avid readers.  While they do have tablets with EBooks on them, nothing beats the turning of real pages.  So as I purchase these books I make a simple but personalized ribbon bookmark for each book.  The supplies for the ribbon bookmark are easily available and inexpensive.  And best of all they adjust to the book.  Use buttons that your friend or family will love. 

It’s so easy you will want to make several for yourself as well!

Materials:

Elastic hair tie
Grosgrain ribbon to fit snuggly around the book
Unique button, or cabochon, embellishment
Hot glue gun and hot glue sticks
Scissors
Lighter to seal ribbon

Instructions:

1.     Gather your supplies.  To begin, wrap the ribbon of your choice around the book.  Keep in mind that you will be folding the ribbon under as a seam.  Cut the piece of ribbon and run a lighter lightly across the ends to seal.


2.     Next, Add the hair tie and fold under.  Add some hot glue (or you can sew this if you desire) to attach.


3.     Now make sure the opposite end is folded to where each end meets and the seams face the same direction and hot glue or sew that ends as well. (See photo)


4.     Then, attach a button of the folded end with hot glue or sew it on.  Make sure your button or embellishment is tall enough for the elastic to attach.


5.     Add the bookmark to the book attaching the elastic around the button or embellishment to secure the place.

Tuesday, November 21, 2017

How to make amazing dimensional gift bags quick and easy

dimensional gift bags


Black Friday comes and goes.  And you’ve bought a few gifts you will want to come home to wrap them before anyone sees them.  What happens when the gifts are small and hard to wrap?  You grab a gift bag, right?  Well, you can make several dimensional gift bags in minutes that will definitely be a showstopper! 

These dimensional gift bags are quick and easy to make using some elements cut from Christmas cards and then embellished with little extra touches.

I always buy my Christmas cards through the mail and in the months that precede the holiday I receive stacks of samples with just the covers to choose from.  I would never throw them away and that is how the dimensional gift bags came about.  You just need at least two card fronts that are identical.  If you don’t get card samples just use an inexpensive pack of cards that are all the same for your dimensional gift bags.

Materials:

Two Christmas card fronts with individual elements you can cut out
Small sharp pointed scissors
Dimensional foam circles
Gift bags (I purchased a pack of 10 for under $5) or you can even use a plain recycled store bag and cover the logo with your image
Tacky craft glue
Small bows, rhinestones, jewels, pompoms or any coordinating embellishment
Dimensional fabric paint – Crystal sparkle

1.     Gather your supplies. Carefully, cut out both chosen images from the card fronts.


2.     Spread some tacky craft glue on the back of one of the images.  Center the image on the bag and attach. 


3.     Next, remove the paper from the double-sided sticky surface on the foam circle and attach to the image on the bag.  Add them all around randomly.  I like to add a second foam dot on top of the first one for extra height.  You can if you desire, use only one.


4.     Now, remove the paper from the dots and add the second image on top of the first one making sure you line it up evenly.

5.     Then, add the embellishments with some tacky glue and let dry. 


6.     Use the crystal sparkle dimensional fabric paint to accent the image.  Let dry.


7.     Add the gift to your bag and you will be sure the gifted recipient will save it and re-use it for years to come.

We would love to hear your comments and hope to see you again at Make it easy crafts.  Please follow us on Facebook 

Sunday, May 14, 2017

How to easily make a mini blackboard teacher gift

teacher gift


School will soon be coming to an end and the kids will want to come up with a unique teacher gift.  You can go out and buy something or a gift card always works, but still, your child may want to make something that come from the heart. 

This little mini blackboard teacher gift is so easy to make with a throwaway take out container.  As long as there is a number 6 in the little triangle on the container you can shrink it in a home oven to become 1/3 of the size and hard.  It makes a great little personalized gift tag, key ring, or even a brooch.  And what is best is that this teacher gift can be extra special with names, dates, and more. 

Shrinkable take out containers come in white or black but you will need the black one for this project.  So let’s get started…

look for the number [6]


Materials

Black take-out container marked with number [6]
Ruler
White gel marker
Hole punch
Scissors
Home oven
Cookie sheet lined with foil
Spatula
Optional – jump ring, key ring, and needle nosed pliers

1.     Use the top or bottom portion of the container.  Measure and cut a rectangle 4” x 3”.


2.     If you are going to use it as a tag or key ring, punch a hole in one of the corners with a hole punch


3.     Next, Have your child write a message on the rectangle.  You can write to: teacher’s name.  You can write a thank you message.  Your child can sign his or her name so the sky is the limit. 


4.     Then make some curlicues or design all around the edges. 


5.     Now, line a cookie sheet with foil.  Place your prepared piece in a 300-degree oven for about 5 minutes or until the blackboard has shrunk and is relatively flat. 

6.     Remove from the oven (be careful so an adult should do this part) and immediately use a spatula to flatten the blackboard.  Let it cool and it will be hard and thicker.


7.     To make it into a key ring, use the needle nosed pliers to open a jump ring by twisting rather than pulling apart.  Insert through the hole and then close the jump ring with the same twisting motion.  Attach a key ring. 


Saturday, April 29, 2017

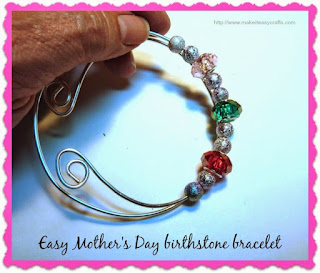
How to make a Mother's Day birthstone bracelet for Mom


birthstone bracelet

Mother’s Day is almost here and this year instead of the usual flowers or candy why not give mom a personalized gift she will treasure forever.  You can make this birthstone bracelet for mom quickly and easily with no special skills required.  Use the colors of stones for the birthdays of all her children or grandchildren. 

Your mom will want to wear her birthstone bracelet all the time! 

Materials

14-gauge silver-plated wire (available at all craft stores)
Needle nosed pliers
Wire cutters
Beads in the colors using the birthstone color chart for your birthstones
Small spacer beads in silver


Colors for Birthstones

January – Garnet (deep red)
February – Amethyst  (dark purple)
March – Aquamarine (Lt. blue)
April – Diamond (Clear glass)
May – Emerald (Green)
June – Pearl (pearl)
July – Ruby (Red)
August – Peridot (Olive green)
September – Sapphire (dark blue)
October – Opal/Pink tourmaline (pearlescent or pink)
November – Topaz (yellow)
December – Tanzanite (violet blue)

1.     Using wire cutters cut a piece of wire so that it fits around your wrist twice.  If your wire comes in a ring (Which many do) it is already the perfect shape for a bracelet.  If not, bend it to a circle shape using a can or any tubular shaped item as a mold to create the round shape.


2.     Using the needle nosed pliers curl one end of the wire.  Start to add the beads on the uncurled end of wire. Thread two small spacer beads on the wire.  The curled end will keep the beads from falling off as you work.  


3.      Next thread on your birthstone bead.  Follow with two spacer beads and continue with as many birthstone colors as you desire with two spacer beads in between each one.


4.     Curl the second end of the wire in the opposite direction as the first one.


I like to use glass beads or Swarovski crystal beads but you can substitute any beads you like.