Showing posts with label upcycled crafts. Show all posts

Wednesday, December 1, 2021

How to make an elegant, beaded, ornament hangers from a paper clip


If you’ve got a container full of paper clips you have the start of easy beaded ornament hangers. You can use the large ones for heavy-weight ornaments and the regular ones for lighter-weight ornaments. The touch of beads adds an elegant touch and is super easy to make.


beaded ornament hangers


Materials:


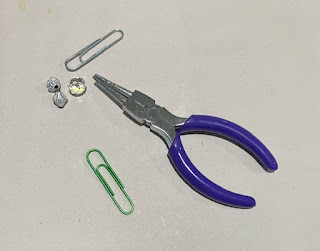
Paper clips, colors, silver, gold whichever you have on hand

Round nose pliers 

Clear and sparkle beads


Instructions:


beaded ornament hangers


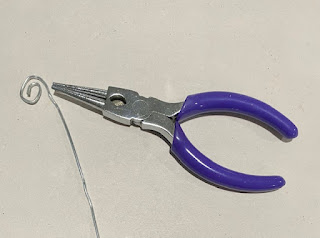
First, straighten out the paper clip using the pliers.  Try and get it as straight as you can.


beaded ornament hangers


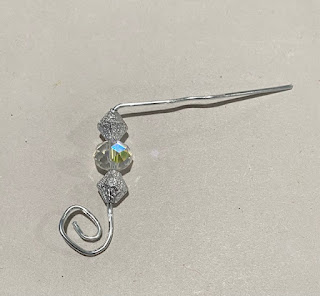
Next, using the pliers curl one end of the straightened paper clip.  Then, thread on three beads, and bend the wire to the right.


beaded ornament hangers

beaded ornament hangers


Now, curl the other end.  It is much easier with regular paper clips than the larger ones. Work on it till the curl looks right.


beaded ornament hangers

beaded ornament hangers


Attach your ornament to one curled end and then, hang it on the tree.  


beaded ornament hanger


Thursday, October 7, 2021

How to make a sweet little reindeer candy holder party favor


Kids with a little help from mom or Dad can make these little reindeer candy holder party favors quickly and easily.  With just a few supplies (some of them recycled) they are created quickly.  Make one or a few for gifts.


reindeer candy holder party favor


Materials:


  • Mini clothespins (2) 2”
  • Paper cardboard tube from an aluminum foil or paper towel roll cut to 2 ½” long
  • A thin strip of cork
  • Mini cork
  • Colored paper clip
  • Sheer white fabric bag (sold in multiples at craft stores)
  • Brown and black paint
  • Small paintbrush
  • Glue gun and glue sticks 
  • Small wiggle eyes
  • One small red pom-pm
  • Candy for filling
  • Scissors, wire cutters, Needle nosed pliers
  • X-acto for cutting paper towel roll
  • Small ribbon bow


Instructions:


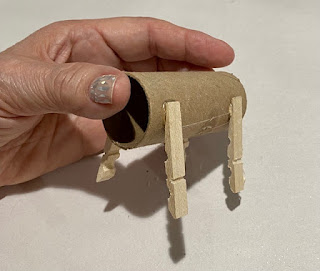
First, cut your paper towel roll to the correct length. and take apart the mini clothespins.


Next, take apart the mini clothespins, and glue them onto the prepared paper towel roll piece so that it stands up. 


reindeer candy holder party favor


Working with the small cork (head.), cut a piece of thin cork in an ear shape and glue it to the back of the cork  (The thicker end) Now, glue the cork on the top of the paper roll with the shorter end facing out. 


reindeer candy holder party favor


Cut the paper clip in half and twist each piece into a pleasing antler shape. Use a nail or pin to make a pilot hole in the top of the head and attach each antler with a little glue.


reindeer candy holder party favor


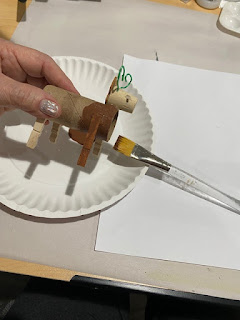
Paint the entire reindeer with brown paint.  Paint the tips of each leg black for hoofs.  Let dry.


reindeer candy holder party favor


Fill the sheer fabric bag with candy or small treats and insert it into the reindeer's body.  Let the tied end show so it resembles a white tail.


To finish, glue on two eyes, a red pompom for a nose, and add a small bow under the chin.  Your reindeer candy holder party favor is ready to bring smiles and sweetness to your guests.


reindeer candy holder party favor


Friday, August 21, 2020

How to upcycle a subscription box with decoupage


upcycle a subscription box


How to upcycle a subscription box with decoupage


Many people are enjoying internet subscription boxes whether it is for makeup, supplies, just about anything.  A lot of these subscriptions arrive in sturdy two-piece boxes that would be a shame to toss.  What can you do with them?  Well, they make wonderful gift boxes and decorative storage for small items in your home.  


Using a printed paper napkin of your choice and some ModPodge decoupage medium you can transform these boxes into amazing gift boxes and more for almost zero dollars!  Christmas is right around the corner and these would be a perfect no-wrap addition to your holiday gift-giving.


Note: Please be advised that Plaid Enterprises, Inc. has compensated Make it easy crafts by furnishing Plaid product at no charge in connection with this post.


Materials:


A subscription box with cover

Gesso or white paint

Paintbrush

ModPodge decoupage medium

Printed napkin

Ruler, scissors

Ribbon

Hot glue gun and hot glue


Instructions:


First, gather all your supplies.  Next, cover your work surface.  Then, use the paintbrush and some Gesso or white paint to cover the writing or advertising print on the top and sides of the box.  You may want to paint the entire box top and bottom.  Set aside and let dry completely.


upcycle a subscription box


Choose your napkin and then, remove the extra layer.  You may have to cut a piece to see where it can come apart.  Most napkins have a print layer and a solid layer.  Discard the solid layer.


Now measure and cut strips and pieces to fit on all sides of the box.  Cut pieces for the top, bottom, sides, etc.  Work on one section at a time taking care not to touch the wet areas with your fingers, only use the brush for placement. 


Using the ModPodge brush a thin layer of medium on each area attach the corresponding napkin pieces and then immediately brush a layer on top. Work all around the box adding pieces of the napkin.  Let dry


upcycle a subscription box

upcycle a subscription box


When the entire piece is dry, brush a thin layer of ModPodge over every area and let dry completely.


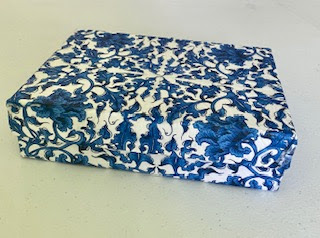
Draw a bead of hot glue over the top of the box sides and attach a strip of decorative ribbon all around.  The subscription box is now ready to enjoy anew!


upcycle a subscription box

upcycle a subscription box

Check out all the other decoupage and various craft tutorials on Make It Easy Crafts today!


Friday, April 3, 2020

Five super simple upcycled crafts to turn trash into treasure

5 simple upcycled crafts


Since the coronavirus has a lot of people self-quarantined many are looking for things to do.  If you didn’t have time to go to the craft store to stock up on supplies, don’t worry.  You can create upcycled crafts with just ordinary stuff you find around the house and turn trash into treasure.

Just be creative.  If something calls for felt, substitute construction paper.  It’s all relative.  There are so many options.  

Most of these projects are great to make with bored kids.  Great for family time while we are all staying inside and safe. 


1.     Recycle advertising magnets into magnetic pets.  You can really have fun with these magnets.  Try using photos of friends and relatives in addition to pets.  If you don’t have double-stick tape, substitute some school or tacky glue spread thinly.

5 simple upcycled crafts


2.      Paint chip photo frame.  You might have some paint chip samples leftover from a painting project.  If you do, the color chips are super cut up and applied onto a frame. You can use a paper shredder to cut the strips or just cut them with scissors to vary the sizes.  Don’t have a frame, use some corrugated cardboard cut in a frame shape and apply the strips to that.

5 simple upcycled crafts


3.     Plastic bag friendship bracelets.  If you get the newspaper delivered many times during rain they come enclosed in plastic bags.  Don’t toss those bags, use them to make cool friendship bracelets.  This one uses a rattail ribbon, but you can easily substitute extra shoelaces, ribbon, strips of fabric.  Be creative.  It’s fun and easy and kids love them!

5 simple upcycled crafts


5 simple upcycled crafts


4.     Shrink an egg carton to make charms.  Remember shrinky dinks?  Well, did you know that any plastic container that has a #6 on it you can shrink to 1/3 of its size and the thickness of about a nickel.  A lot of egg cartons are listed number 6 so if you have one of these follow the tutorial and create all sorts of charms you can use for key chains, backpack charms, hair clips and more.  Remember only number 6 will work. 

5 simple upcycled crafts


5.     Cut up an old DVD and make a shiny mosaic Easter egg.  You can use paper mache eggs, plastic eggs, even Styrofoam eggs.  The trick is for this craft is that DVD’s have two layers, when you separate the layers they super easy to cut into pieces.  The pieces can then be glued onto an egg or other surface.  


Monday, March 26, 2018

How to easily make a coffee lover happy this Easter


Updated March, 2018
Who doesn't love an Easter basket?  You can make a favorite coffee lover happy this Easter with this different take on an Easter basket. After you've picked up some coffee from the local convenience store rinse and dry the cup.  They are pretty sturdy so they can be reused, or you could just ask the clerk if you could have a new one.  Then get a corrugated sleeve you put on the cup so it won't burn your hand and you will have the makings of a great Easter basket for a coffee lover!

Follow the tutorial to decorate your basket, then add some Easter grass and small candies or mini bags of coffee or even some K-cups.  While should all the Easter fun be just for the kiddies?  

Materials:

Paper corrugated coffee cup sleeve 

Paper coffee cup, rinsed and dried

Spring printed felt

Easter felt rabbit or egg shapes (available at any craft store)

Tacky craft glue

Scissors

Pencil

Marker

Two clothespins (for holding the sleeve while the glue dries)

1.     Before taking apart the sleeve make a line with a marker on the inside where the two ends meet.  (This will help with reassembly)  Note which side is on top.


2.     Carefully take apart the sleeve and lay it on top of a piece of spring print felt.  Use the pencil to trace around the sleeve on the unprinted side of the felt making sure that the printed side will fit correctly on the outside of the sleeve. Add a ¼” extra felt on the end that will be glued to the top of the sleeve.  


 Leave 1/4" extra on the end that will be on top

3.     Cut out the felt piece.  Add a generous amount of glue on the outside of the sleeve and attach the felt piece, leaving the extra ¼” unglued.  Let dry.


4.     Use some tacky glue to add the seasonal felt shapes to the felt making sure you do not place any on any fold lines.  Let dry.

5.     Use the inside guideline to reattach the sleeve with some tacky glue.  Glue down the ¼” extra felt to cover the seam.  Use two clothespins to hold the sleeve until it is completely dry.


6.     Put the decorated coffee sleeve on the recycled coffee cup and fill with Easter grass. Add some small coffee packs or K-cups on top and maybe even a few coffee flavored jellybeans or candies if desired. It's fun to make more than one.


Visit Make it easy crafts again for more crafty DIY's, recipes, and tips!

Monday, February 5, 2018

How to make the sweetest little recycled wine cork Mardi Gras bear

Wine cork mardi gras bear


Make this sweet little wine cork Mardi gras bear.  He looks so adorable just sitting on a shelf, or if you desire you can add a wire loop for hanging. 

The upcycled cork wine cork Mardi gras bear joins other creations like the Wine cork Easter bunny.  It’s so easy and so much fun to make.  So let’s get started.

Materials:

3 wine corks
1 champagne cork
1/8” thick cork sheet available at craft stores
Small awl or pointed nail
X-acto or craft knife
Scrap of white felt
Tiny brown pompom
Black dimensional fabric paint
Small amount of 20-gauge wire
Wire cutters
Ruler
220 fine sandpaper
Piece of corrugated cardboard to cut on
Hot glue and hot glue sticks
Small cork stopper
Tacky craft glue
Purple and gold glitter
Tiny seed beads, beading needle and thread

Mardi Gras wine cork bear


1.    Protect your work surface with one or two pieces of heavy corrugated cardboard. Using two matching wine corks and the X-acto knife, slice thinly down each cork.  Rub on the fine sandpaper to smooth.  This will allow the corks to be stable. Run a bead of hot glue down the side of one cork and attach them together.  These are the legs and base of your bear.


2.    Next, add a generous amount of hot glue on the bottom of the champagne cork (Body) focusing on the areas where it attaches to the legs. Center the body on the legs and attach. (See photo)


3.    Measure and mark a line halfway across the third wine cork.  Use the X-acto knife to cut the cork in half.  Rub the cut end of one half on the sandpaper to smooth.  Turn the half cork on its end and mark in half and cut vertically.  You will have two arm pieces.  (Save the other half for another bear or discard)  Cut a small piece of wire and insert into the arm pieces.  Use a nail or all to make a hole in the side of the bear body, add some glue to the wire and insert into the bear.  Repeat for other arm.


4.    Trace and cut two ears (half moon shapes) on the flat 1/8” thick cork and use the X-acto to cut out.  Cork cuts easily but at that thickness it is simpler to cut them out using short strokes with the pointed end of the X-acto.  If there are any rough areas lightly rub against the sandpaper.  Trim to fit the head if necessary. Add some glue to the edges of the ears and attach to each side of the head.


5.    Cut the muzzle into a circle shape on a scrap of white felt. Glue to the front of the bear face. Glue a tiny brown pom pom to the muzzle for a nose. Add some dots of dimensional black fabric paint for the eyes and let dry.


6.    Now using the pattern, from a piece of cardstock cut the mask and hat brim. Attach the small cork stopper to the brim with some tacky glue.  Place the hat and the mask on a piece of cardboard; coat each piece with some thinned tacky glue and sprinkle with the glitter.  Let dry completely. 


7.    Next, add some glue to the top of the bear’s head in between the ears and attach the hat.  Add a small sparkle pompom on top of the hat with some more glue.  Poke a hole on each side of the mask with a nail or pin and insert the thin elastic, knotting on each side. For a finishing touch use some tacky glue to add tiny seed beads all around the mask. (Mask made)

8.    Finally make the beads.  Using bead thread and the seed beads make as many necklaces and in any colors as you want.  Hang some from his hands or place around the bear’s neck.