Friday, August 31, 2012

Recycled brown bag Indian corn pin


It’s no secret that I love to use recycled materials in craft projects.  Brown bags are one 
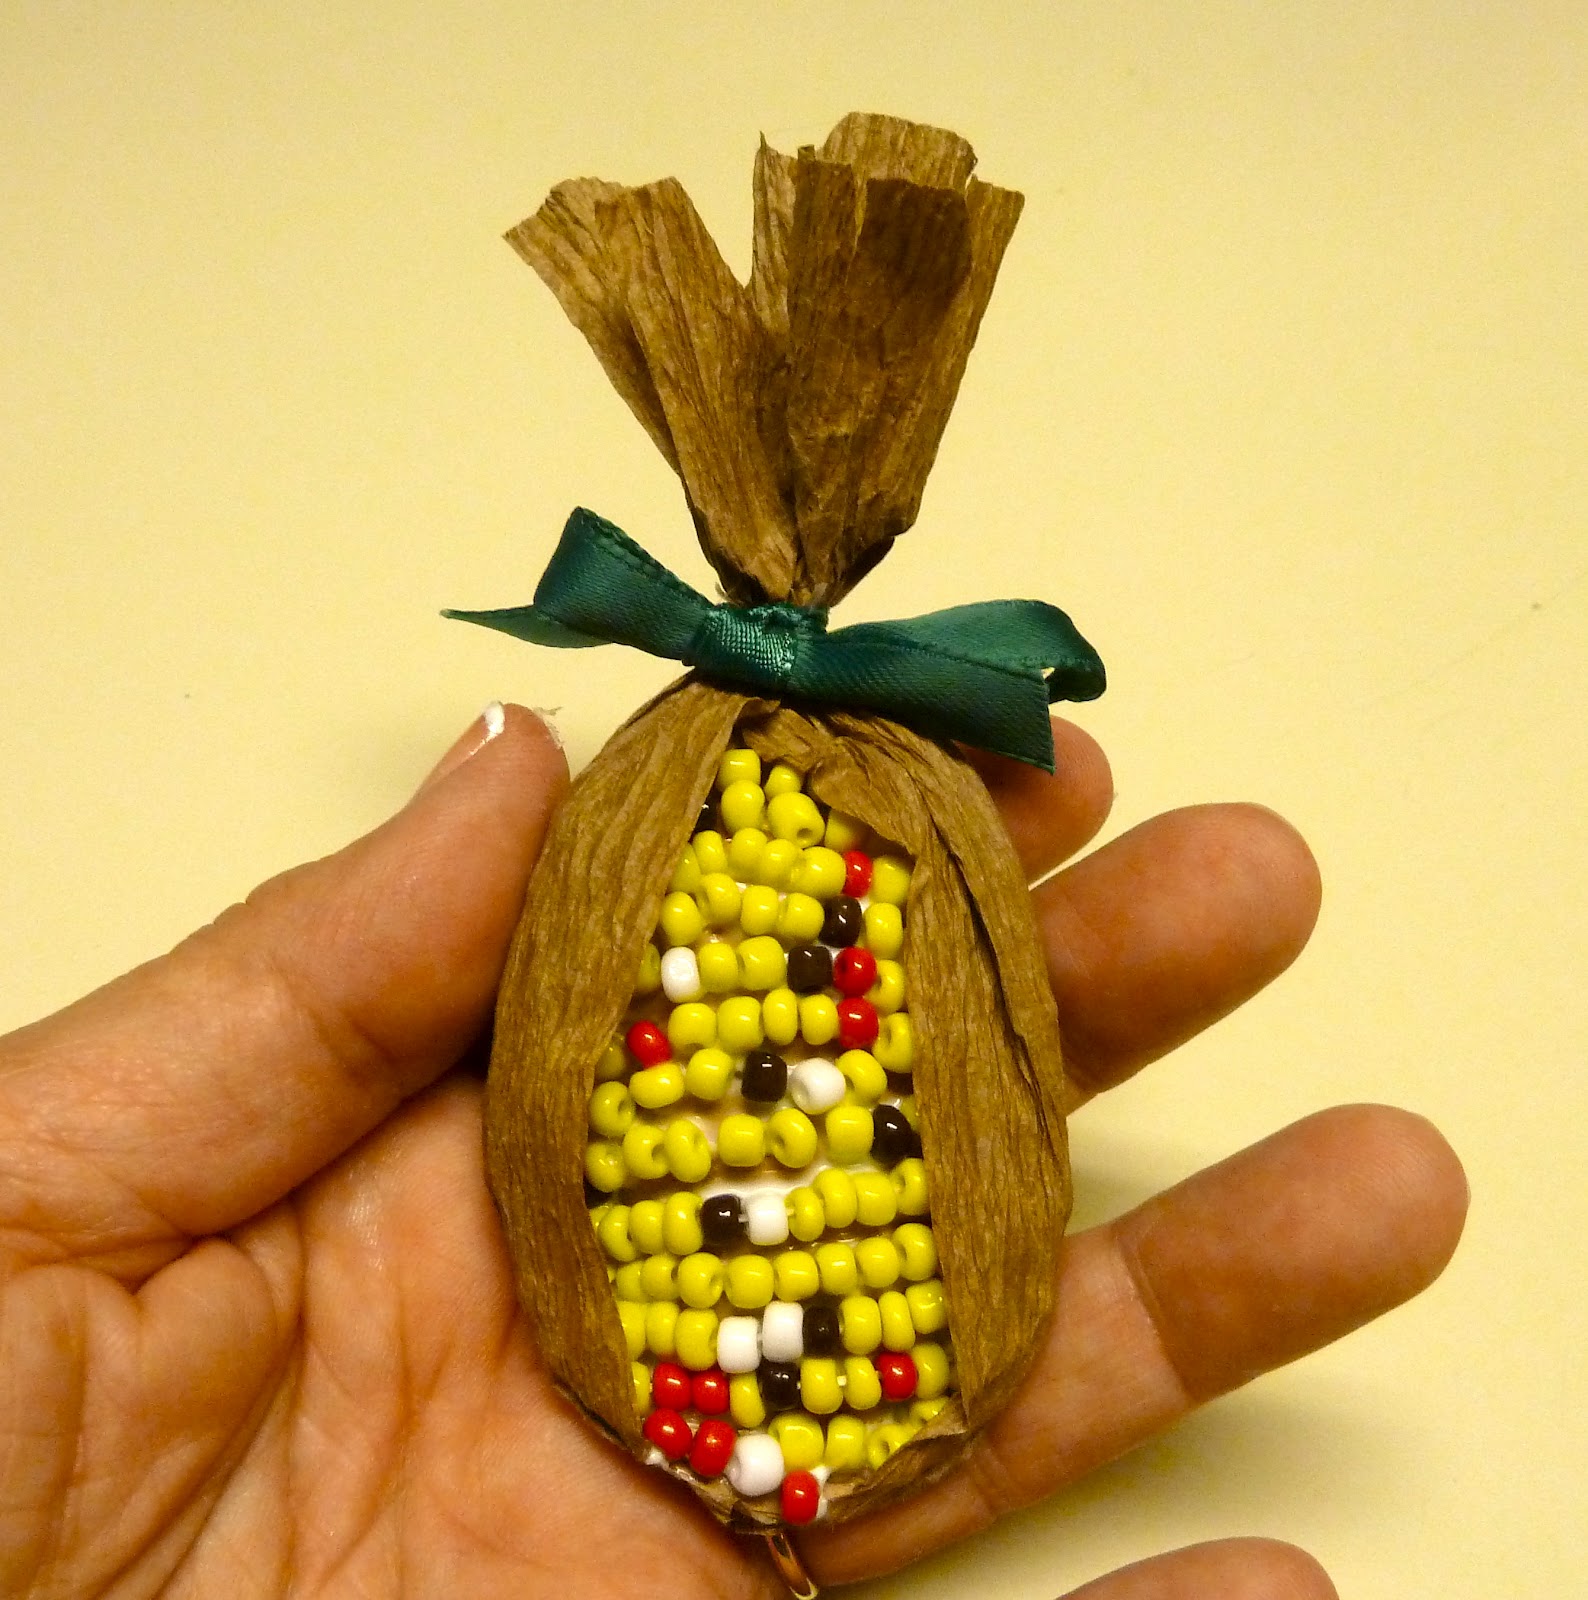
of my favorites.  Make this indian corn pin for yourself or use it for a wonderful teacher gift.  And the best part is that you create the dimensional base from a simple brown bag.

You will need:

E sized seed beads, yellow, red, white and brown

Brown bag

Tacky craft glue

Needle and thread

Small amount of tan crepe paper

9 inches of ribbon in choice of color

Pin back

Small amount of poly-fill

1.     Draw an oval shape on some lightweight cardboard to make a pattern.  (Approximately 2” x 2 ¾”) Trace and cut two of these oval shapes from brown bag. 

2.     Spread some glue all around the edges leaving the top unglued and press together.  Use a clothespin to hold together until the glue sets.  Let dry.  When it is dry use a pencil to open the inside and fill with poly-fill.  Add a bit of glue to the top area to close and press together.  Hold with the clothespin till set.


3.     Thread a needle and some thread and knot the end large enough to hold the seed beads. (It helps to lay your beads on a piece of felt to prevent rolling)  Begin adding seed beads alternating the colors, predominately yellow.  Measure across the brown bag base and when it fits, add a line of glue and attach the string of beads.  Clip ends. 


4.     Continue adding bead strings across working your way down until you reach the bottom.  Let the glue dry. 


5.     Cut a 5” x 5” piece of crepe paper.  Cut some triangular slits in one side of the crepe paper. Gather the top edge (the edge with the slits)  1 ½”down from the top and tie with a piece of thread.  Place the corn inside the crepe paper with the 1 ½” portion at the top.  Gather around the side and glue the excess to the back.  Let dry.


6.     When all the glue has dried cut a 9” piece of ribbon and tie in a bow at the top.  Attach a pin to the back\ with some tacky glue.

.


Wednesday, August 29, 2012

Duct tape pencil pouch


School is or will soon be in full swing.  If your students are still looking for that unique pencil pouch, look no further.  Just get a box of sandwich sized baggies with slider zipper tops and a roll of duct tape you will have enough to make pencil pouches for the whole class!

You will need:

Slider zipper sandwich bags

Duct tape in color of choice

Ruler

Scissors

Sharpie marker

Ruled cutting mat (optional)

1.     Use the ruler to measure 3 ½” down from the top zipper line and mark with a sharpie marker across.  Cut off this piece.


2.     Cut two pieces of duct tape 7 ¾” each. (You can use an optional cutting mat with measurements if you have one)  Apply the duct tape from the top zipper across. (See photo)  Attach the other strip of duct tape directly under the first overlapping about 1/8”.


3.     Turn over and repeat step 2 on the other side.


4.     Cut another 7 ¾” piece of duct tape.  Apply ½ to the bottom edge, fold and attach the rest to the opposite side to close the bottom and reinforce.


5.     Cut two 3 ½” pieces of duct tape and do the same as in step 4 to each side edge to reinforce.  Done!


6.     Don’t stop here though, you can even purchase duct tape in sheets with backing paper to cut out letters, shapes, and more to personalize even further. 


Friday, August 24, 2012

Easy Kids Craft Project- Autumn leaf party favors


This is a favorite project that I previously published on my other blog, but since fall is right around the corner I figured why not a re-run? When you are setting your tables for fall parties and Thanksgiving how about including a little party favor by each place setting.  This is a festive and decorative way to dress up your holiday tables.  So why not make some that are as individual and colorful as the autumn leaves that decorate your own back yard? These autumn leaf party favors are easy enough for kids and make a fun project to do as a family.


You will need:

Felt squares in autumn colors

Tacky Glue (I used clear Tacky glue, but regular Tacky Glue is fine)

Dimensional Fabric paint in a corresponding color

 Leaf from your yard

Cardboard to make a pattern (cereal boxes are great for this use)

Scissors

Pinking Shears (optional)

Optional 8-inch length of ribbon

Waxed paper or anything to cover your work surface

1.     Go outside and look for nice shaped leaves.  Collect a couple in an appropriate size.  They should be no wider than 6 inches horizontally and no taller than 6 inches vertically.


Place the leaf onto cardboard and trace around to make a pattern.  Cut out.


3.     Transfer the leaf pattern onto the felt color of choice and cut out with scissors or pinking shears. Repeat for another felt leaf.  You may use a different color for the back or use the same color for front and back as desired. 

Line up the leaf pieces to make sure they fit together and trim any excess.  Draw a bead of Tacky glue around the edges of the back leaf. If you want to have a handle, cut an 8-inch piece of ribbon and glue to the back leaf shape before you attach the front leaf shape.  Leave a section at the top of the leaf unglued to allow for a 4-inch opening.  Attach the top to the bottom and let dry. (see photo)


5.     Use the real leaf as a guide to draw vein lines with the dimensional fabric paint.  If you want these favors to act as place cards, you may write names on them instead of vein lines.  Let dry completely, overnight is best.


6.     When dry fill with candy or small treats and enjoy. 


Follow the first six steps to make as many party favors as needed.   I recommend Tacky glue because it is a thicker consistency and will not bleed through the felt.  When using dimensional fabric paints test on paper first to remove bubbles, and shake downward occasionally while using to keep lines smooth.

These also look festive hanging from a doorknob!   


Wednesday, August 22, 2012

Easy fall craft--turkey brooch or table decoration


I know its only August but I already have autumn on my brain.  This cute and super easy turkey is created quick and easy with a silk flower-- so you can make a bunch.  They are super pins but also look great decorating the holiday table.  And wouldn’t they make a great teacher gift? 

You will need:

Fall mum silk flower with brown center disc

Small scraps of bump chenille stems, yellow, and red

2-inch piece of regular brown chenille stem

Two wiggle eyes

Tacky glue or glue gun and glue sticks

2-inch pin back

Scissors, ruler

1.     Remove the silk mum from the stem.  Cut off any protruding pieces on the back so that it will be flat. 


2.     Cut the petals off of the bottom half of the mum leaving about an inch intact.


3.     Snip off the thin end a yellow bump chenille stem (about ¼ this will be the beak”) and attach to the top center of the center disc with some glue.


4.     Cut a piece of brown chenille stem 2 inches and wind into a circle.  Add a bit of glue right over where you just added the yellow beak and attach the brown chenille circle.


5.     Cut another end of a red bump chenille stem and glue to the side of the yellow beak for a waddle.   Glue on two wiggle eyes above the beak. 

6.     Cut two ½” pieces of yellow chenille stem and bend each one to form feet.  Glue on each side of the brown disc bottom. (see photo) Let all the glued areas dry completely.  When dry attach a 2” pin back to the back if you want to use it as a brooch.  Leave it alone for a table decoration.


Friday, August 17, 2012

Recycled K-Cup Halloween Widow Spider


Spiders as a rule, to me-- are rather creepy.  This one is cute though, and not creepy at all.  Its not too early to think about fall decorating and wouldn't a few of these look cute on your Halloween table? This is a perfect kid’s craft too!

For each spider you will need:

One black used K-Cup washed and filter removed

Ruler

White colored pencil

Scrap of black fun fur

Two wiggle eyes

Small pointed scissors

Tacky craft glue

Red rhinestone any shape (optional)

1.     Cut the upper lip off of the K- cup with the small scissors.  Using a ruler measure 5/8” sections around outside of K-Cup.  Make hash marks with the white colored pencil.


2.     Using the hash marks as a guide cut sections just to ¼” from the bottom with the small scissors.


3.     You will have eight spokes (legs) around.  Bend each leg back towards the base.  (See photo)


4.     Bend each leg end about ¼” the opposite direction.  Cut each leg to a triangle at the ends. (Your spider stands)


5.     Cut two circles the diameter of the bottom of the K-cup from the black fun fur.  Add a dab of tacky glue on the inside bottom and attach one of the fun fur circles.  Glue the other fun fur circle on the top.  Squirt two dots of glue on the side of the spider and add two wiggle eyes.  Let dry.  Trim any excess fun fur from the top and glue a red rhinestone in the center. (Optional)


Linking to Todays creative blog and many more...see sidebar