Tuesday, May 24, 2016

How to make a locket horse show hair bow

Locket horse show hair bow


Horse show season is in full swing and are you ready with horse show hair bows for your little exhibitors?  Horse show hair bows can be quite pricey but you can make an adorable and personalized locket horse show hair bow quickly and easily and spend very little in the process.

Don’t participate in horse shows?  You can alternately make this little locket of your horse or pet and wear it around your neck on a chain.  Simply make the locket as instructed, then add it to a ball chain with a jump ring. 

Materials:

·      15mm circle bezels
·      ModPodge dimensional magic or other clear dimensional product
·      Tiny horse photo printed on paper and cut to fit in the bezel
·      1 ½” wired ribbon
·      1” grosgrain ribbon
·      ¼” grosgrain ribbon
·      Bowdabra bow wire
·      Bowdabra Mini Bow maker
·      Bowdabra tool and ruler attachment
·      Alligator hair clip
·      Hot glue gun and hot glue sticks
·      Ruler
·      Scissors
·      Lighter

Instructions:

1.     Make the locket.  Print a small photo of your horse on your printer on computer paper, or use a photo from a magazine.  Cut the photo to fit in the bezel. 

Locket horse show hair bow


2.     Place the photo in the bezel and carefully add the dimensional clear glue on top.  Be careful not to shake the bottle, as it will cause bubbles to form.  Set aside and let dry completely.


3.     Cut a piece of Bowdabra bow wire 18 inches.  Fold in half and place in the Bowdabra.  You will have a loop on one side and two loose wires on the other.


4.     Cut the 1” wide piece grosgrain 15 Inches long in a color of your choice.  Dovetail both ends and lightly run a lighter over it to keep it from fraying.  Fold the ribbon in half to find the center and insert into the Bowdabra.

Locket horse show hair bow

Locket horse show hair bow

Locket horse show hair bow

5.     Cut a piece of ¼” grosgrain ribbon in your coordinating color 14 inches long.  Fold in half to find the center and insert into the Bowdabra

Locket horse show hair bow

6.     Cut a piece of 1 ½” wide wired ribbon 18 ½” long.  Fold in half to find the center and insert into the Bowdabra.

Locket horse show hair bow

7.     Bring the right end of the ribbon over and insert the tail end into the Bowdabra

Locket horse show hair bow

8.     Bring the other end over and under the first loop forming an X and insert the end into the Bowdabra.

Locket horse show hair bow

9.     Insert the ribbon center of both loops into the Bowdabra.

Locket horse show hair bow

10. Scrunch down with the Bowdabra wand.

Locket horse show hair bow

11. Insert the two loose wires through the loop making a slipknot and pull tight.  Remove from the Bowdabra, turn to the back, separate the ends and tie a knot.  Adjust the bow and tails.


12. Using the wires from the back bring to the front and insert it through the loop in the top of the bezel.  Bring the wires to the back and tie a knot.  Cut off any excess wires. 


13. Use the hot glue gun and hot glue sticks to attach an alligator clip to the back of the bow. 


14. Repeat all the steps for a second bow to make a perfect pair.

Locket horse show hair bow

Locket horse show hair bow

Locket horse show hair bow

Optional:  Make the locket according to step 1 -2.  Using a needle nosed pliers open a jump ring by twisting open.  Attach the locket and twist the jump ring closed.  Add to a neck chain in your desired length.  You can find Bowdabra mini bow makers at your local craft stores or online. 

Wednesday, May 18, 2016

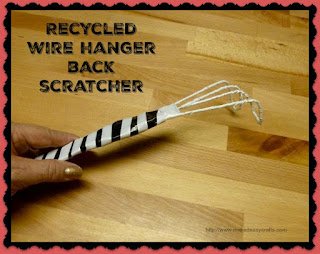
Recycled wire hanger back scratcher

Recycled wire hanger back scratcher


Do you have an itch for a back scratcher?  Before you go searching for a family member to scratch or rub against a doorframe like a bear why not make one?  And the best part is that you can make it from something your probably already have hanging right in your closet.   Who doesn’t have some of those wire coat hangers from the cleaners?  You can recycle them into cute back scratchers with simply duct tape and ribbon.  Use two wire coat hangers to make a cute, very green and useful back scratcher. 

I hang mine from the claw end right in my laundry room, but you can easily add a loop to hang from the handle.

Materials:

Two wire coat hangers
Wire cutters
Needle nosed pliers
Duct tape (I used black but you can use any one of dozens of prints available in craft stores)
¼” satin ribbon in a color of your choice
Hot glue gun and hot glue sticks

Instructions:

1.     Twist apart two wire coat hangers.  Cut off the hook end to the part where it doesn’t curl. 

Recycled wire hanger back scratcher

Recycled wire hanger back scratcher


2.     Bend each of the wire hangers to a long rectangular shape.  Place both hangers together.  Attach the two ends together at the separate ends with some duct tape.   Attach the other two ends together over the first ones going through the loops. (See photo)

Recycled wire hanger back scratcher


Recycled wire hanger back scratcher

Recycled wire hanger back scratcher

Recycled wire hanger back scratcher

Recycled wire hanger back scratcher


3.     You now have the wires together with two finger like loops at each end.  Pull apart the loops on one end. (This will be your scratcher and the other side will be the handle end)

Recycled wire hanger back scratcher


4.     Wrap the handle side with duct tape three quarters of the way down.

Recycled wire hanger back scratcher

Recycled wire hanger back scratcher


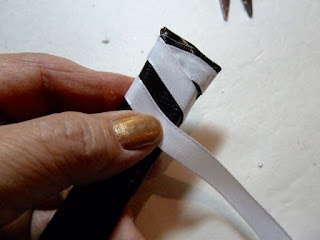
5.     Use a bit of hot glue to attach the end of some satin ribbon to the handle and begin wrapping tightly down the handle.

Recycled wire hanger back scratcher

Recycled wire hanger back scratcher

Recycled wire hanger back scratcher


6.     When you reach the area with no duct tape continue to wrap the ribbon tightly all around the fingers of the scratcher.  Down one loop and continue over to the next one.

Recycled wire hanger back scratcher


7.     When you have covered both sides of the fingers, wrap a few times around the base of the handle and attach with some hot glue.

Recycled wire hanger back scratcher


8.     Using the needle nosed pliers, bend the fingers down to make a sort of claw. 

Recycled wire hanger back scratcher

Recycled wire hanger back scratcher


Patriotic dog bow with feathers


Patriotic dog bow with feathers


Dress up your pups for patriotic holidays and parties with this cute Patriotic dog bow with feathers. The bow is attached with some elastic on to the collar so it easily goes on and off whenever you want. Alternate the ribbons and charms and you can make an entire wardrobe of seasonal bows for your pets.
It’s so easy with the Bowdabra bow maker with ruler attachment. I’ve made my elastic small because I have a tiny dog but you can make the same bow for any size dog just change the elastic to fit the collars.

My dog is a girly girl.  She doesn't like to get her feet wet when it rains.  She doesn't chase rabbits.  She basically doesn't like to get dirty and she loves her bows, so everyone knows she's a girl.   It's so easy to make bows and change them up with the season for my little girly girl.

Supplies:

  •             Bowdabra Mini Bow Maker with hairbow tool and ruler attachment
  •             Bowdabra bow wire
  •             20 inches of 1 ½” wide patriotic ribbon
  •             Two small red, white or blue feathers
  •             Sparkle star charm
  •             3 inches 1/8” wide elastic (for small dog collar but longer for larger dog) 
  •             Needle and thread
  •             Piece of matching felt ¼” wide x 1 ½” long
  •             Lighter
  •             Hot glue gun and hot glue sticks

Instructions:

1.    Gather your supplies.


2.    Cut a piece of elastic and sew together into a loop. Set aside.


3.    Cut an 18-inch piece of Bowdabra bow wire, fold in half and insert into the bow maker. You will have a loop on one side and two loose wires on the other.


4.    Cut a 20-inch piece of patriotic ribbon. Use a lighter to run quickly on the ends to seal to prevent fraying.


5.    Fold the ribbon in half to find the center and insert into the Bowdabra.


6.    Make a loop with one end bringing around and inserting the end into the Bowdabra.


7.    Bring the other end across the first loop and insert that end under the first loop and into the Bowdabra. It will look like an X.


8.    Insert the bottom ribbon loop into the Bowdabra. Repeat with the top loop. You have formed the bow.


9.    Add one of the feathers. Add another feather on the opposite side. Scrunch down with the Bowdabra wand. Insert the two loose wire ends through the loop and pull tight while the bow is still in the Bowdabra. Remove from the Bowdabra, turn to the back and tie in a knot. Cut off any excess bow wire. Arrange the bow.


10.Use the hot glue to attach the elastic loop on the back of the bow. Add the felt piece over the elastic to secure. Turn the bow over and attach the star charm in the center. Use the elastic to attach to the collar.