Showing posts with label Origami. Show all posts

Tuesday, July 28, 2020

How to make adorable little origami red elephants for earrings

origami red elephants


Elephants are considered good luck in many countries, especially with the trunk raised.  Just, grab some origami paper and you can fold these origami red elephants and make the cutest pair of earrings.  Or you could just stand them up as a mini decoration.  Use the photos as a guide and you will find although tiny, they are not that hard to fold.

Adorable mini origami red elephants


Materials:


Origami paper, red
Nail file

Optional for earrings: 

Needle and head pin 
Needle nosed pliers 
Fishhook ear wires
Wire cutters

Instructions:


First, cut a piece of red origami paper 1 ½” x 3 ½” for each origami elephant.

origami red elephants


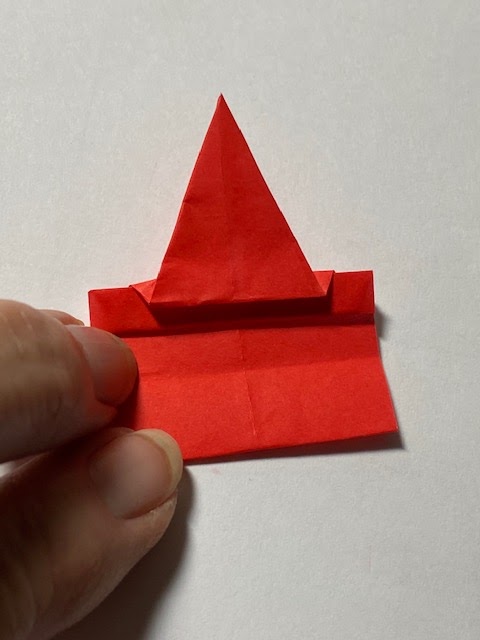
Next, fold the paper in half lengthwise.  Turn, and fold the two top edges to a point (like you are making a paper airplane) Fold a second time to make a longer point. 


Turn and fold so that the folded point touches the other side.  Turn over so that the point is on the underside.  Now, fold the folded edge over so it meets the crease, but as you make this fold flip the point back to the front.


Then, fold the left edge under so it meets the center crease. Then fold the bottom folded edge of the point to the edge of the paper.  Then fold the point over to the left, and fold back again to make a kind of fanfold. (Front of the elephant) For the back, fold the flat folded edge over so it meets the center crease and then flip the edge back to the front.  (See photo)


Turn over the paper.  This is the only tricky part so use the photos as a guide.  You will see a kind of rectangle shape.  Just fold the top layer fold the corners inward.  Turn and do the same to the opposite side. Now, it is easier to take this in your hand to do this part, push the folded corners down and press open.  Do the same thing to the opposite side and then flatten them all down.  Use your fingernail or a nail file to make the creases. 


Fold in half. Fold the back legs in so they match the front.  To make the ears, squeeze and fold at an angle making the creases for the ears on each side of the head. The trunk will point down. 

origami red elephants

origami red elephants

origami red elephants


Finally fold the trunk, up, and then back to make the trunk raise.  The red origami elephant is finished.

origami red elephants

origami red elephants


To make these into earrings, using a pint push through the underside to make a hole and insert a headpin.  Cut the headpin down if necessary. Then, use the needle-nosed pliers to twist into a loop adding the fishhook ear wires. Close loops.


Monday, June 20, 2016

Duct tape tissue holder DIY


It’s allergy season and who doesn’t carry some extra tissues with them?  Follow this tutorial and you can easily make a duct tape tissue holder to carry those tissues. This tissue holder is so simple to fold using easy origami folds and duct tape.

Duct tape comes in a myriad of colors and patterns do you can find one to fit your very own style.  You will want to make one in several colors and patterns!  

Materials:

Duct tape in your choice of colors
Sheet of printer paper
Pocket pack tissues
Plastic cutting mat
Xacto or craft knife
Scissors
Ruler

Instructions:

1.     Cut a piece of printer paper 7 ½” x 7 ½”.

2.     It’s easy to work on a cutting mat where you can measure and cut the duct tape.  You can use scissors to cut the tape, but it is easier to cut the duct tape with a ruler and craft knife directly on the mat. Cut several strips of duct tape 8 inches long.  Begin to cover the paper square.  Continue to add strips of duct tape to the square until you completely cover the side. Turn it over and cover the opposite side.  Trim up any excess duct tape.


Duct tape tissue holder DIY

Duct tape tissue holder DIY

3.     Fold the duct tape covered square diagonally.  Run your finger over the crease.

Duct tape tissue holder DIY

4.     Open the square and fold the left edge over about halfway.


Duct tape tissue holder DIY

5.     Fold the point back to the left lining up the seam with the center fold line.


Duct tape tissue holder DIY

6.     Fold the right side back over the first point and crease.


Duct tape tissue holder DIY

7.     Fold the point over to the right and line up the crease with the center line like you did on the other side.  Turn over.


8.     Fold the two overlapping points on each side to the back.


Duct tape tissue holder DIY

9.     Fold the top and bottom points to the back as well and crease.

Duct tape tissue holder DIY
Back side


10. I like to put a tiny piece of duct tape to hold the points on the back until the final piece of duct tape is applied.  (I’ve used a different color so you can see)


Duct tape tissue holder DIY

11. Cut two pieces of 4 ½” long duct tape and attach to the back to finish and secure the tissue holder.  Turn over for the pocket area.

Duct tape tissue holder DIY


12. You can fill the tissue holder with tissues.  If you use a pocket tissue pack I usually discard the package they come in and put about half of the tissues in the holder at a time.

Duct tape tissue holder DIY


Duct tape tissue holder DIY


Duct tape tissue holder DIY


Monday, June 6, 2016

Camo Duct tape wallet

Camo duct tape wallet


If you are looking for the perfect gift for the Dad who has everything for Father’s Day the Camo duct tape wallet is perfect.  Kids and adults can easily fold this wallet from some camo printed duct tape.  The wallet will hold bills, credit cards and even business cards. 

After you’ve folded your camo duct tape wallet simply wrap a small box in a solid color paper.  Create a cute little camo bow to match with the mini Bowdabra bow maker.  Attach the bow to the box to embellish your gift with a coordinated colored bow.  It’s a gift dad is sure to love!

Materials:

Camo duct tape
Sheet of 8 ½” x 11” printer paper
Ruler
Scissors
Mini Bowdabra bow maker
Hair bow tool and ruler attachment
Bowdabra bow wire
Pencil

Instructions:

1.     Cover a standard sized sheet of printer paper with the camo duct tape completely on one side.  Trim off all the excess duct tape all around.

Camo duct tape wallet

Camo duct tape wallet


Camo duct tape wallet


2.     Place the paper on your work surface.  Fold in half.  Unfold and fold again to the fold line.  Repeat for the other side.

Camo duct tape wallet


Camo duct tape wallet


Camo duct tape wallet


3.     Open the paper, turn sideways and fold in half. Unfold and you will see 8 fold sections.  Measure up ¾” on each of the 3 fold lines on each side.

Camo duct tape wallet


Camo duct tape wallet


Camo duct tape wallet


Camo duct tape wallet


4.     Cut to the ¾” you made on each fold lines on each side.

Camo duct tape wallet

5.     Turn and fold to the first fold line.

Camo duct tape wallet


Camo duct tape wallet
Add caption

6.     Turn again and fold in half.

Camo duct tape wallet


Camo duct tape wallet


7.     Cut off the corner at an angle in the closed corner.

Camo duct tape wallet


Camo duct tape wallet

8.     Unfold and open and there will be a triangle cut out on one side.  Fold up the tab (3/4” cuts) under the triangle shape, skip a section and fold a tab up in the next section.  Repeat on the other side.


Camo duct tape wallet


9.     Turn and fold both sides over to the centerline.  Fold in half.

Camo duct tape wallet


Camo duct tape wallet


Camo duct tape wallet


10. Fold the tabs into the side pockets.  Cut a piece of duct tape that will fit across the ends and attach to secure.  Do the same on the other side.

Camo duct tape wallet

Make a cute duct tape coordinating bow to wrap your gift
Visit Bowdabra blog for the duct tape bow tutorial


1
SaveSave