Sunday, April 21, 2013

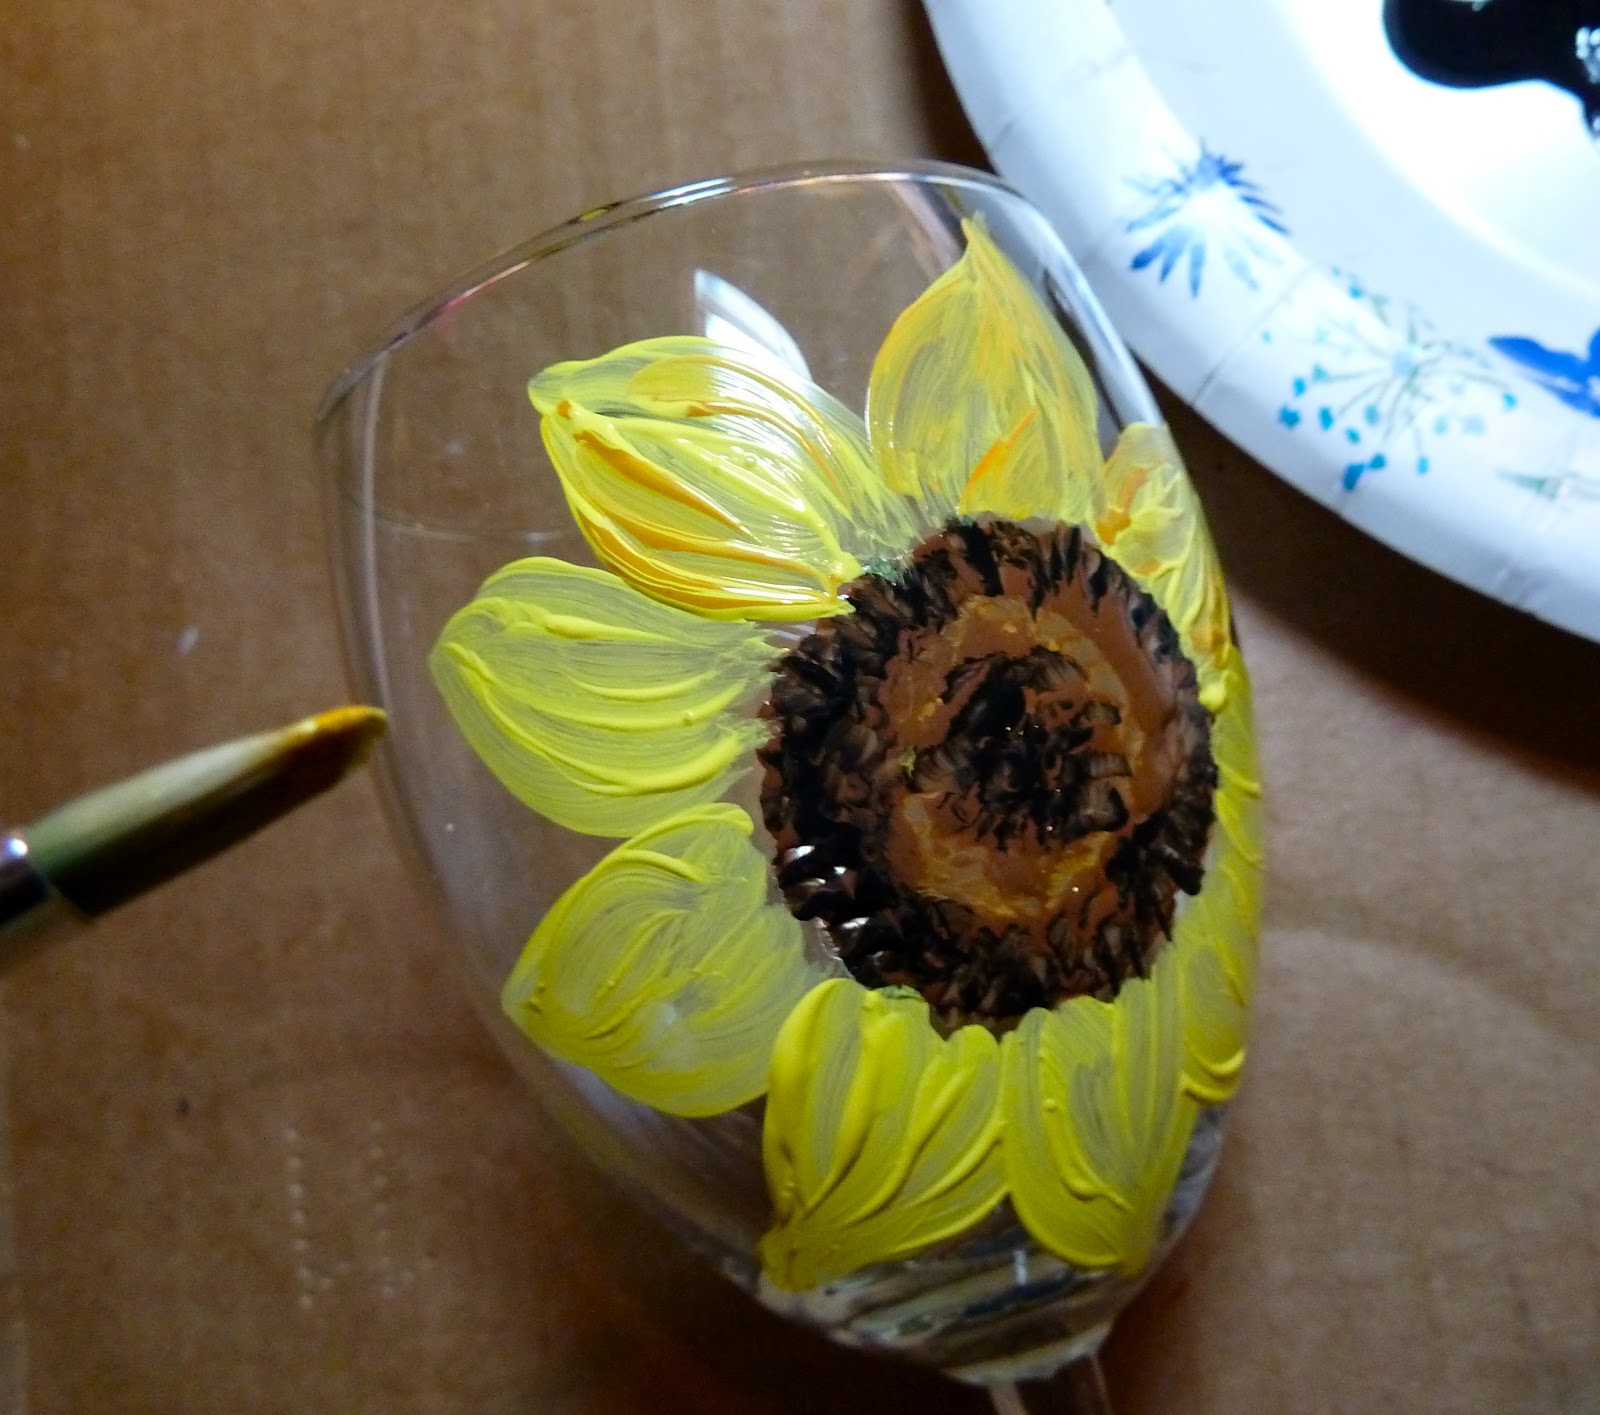
Hand painted Sunflower wine glass


Mother’s Day is fast approaching and here you are trying to think of something you can get Mom that she doesn’t already have?  A gift card is so impersonal, but a handmade creation is something she will treasure forever.  Why not serve her breakfast in bed and include her orange juice in a hand-painted sunflower wine glass? Or better yet, just stick that gift card in the wineglass and tie a ribbon bow around the stem.  Not an artist?  No problem, just follow these easy step-by-step directions and you will have a wineglass to be proud of. 

You will need:

Gloss acrylic paint (specifically for glass, it will say it on the label) in yellow, yellow ochre, brown, black and green

Wine glass (The dollar store is a great source for wineglasses in all sizes

Two paintbrushes, medium flat and small liner

Alcohol

Paper towels

Paper plate

Home oven and baking sheet

1.     Wipe the glass all around with a paper towel saturated with alcohol to remove all oils and dust.


2.     Squirt some of each color of glass paint on a paper plate.  Load the larger brush with some brown paint.  Working with a dabbing motion, paint a large circle shape on the center of the glass.  Rinse your brush out with some water. While the paint is still wet on the glass, dab some black paint all around the edges of the brown circle.  Rinse brush.  Dab some yellow paint on the inner edges of the black paint all around.  Finish by dabbing some back in the shape of a smaller circle in the center. Rinse your brush. (See photo)


3.     Load your brush with some yellow paint and begin painting petal shapes.  Vary the sizes, and don’t worry about perfection.  Natural petals are tear shaped and pointed at the ends, but not perfect.  Continue adding petals until you have gone completely around the center.  While the paint is still wet on the glass outline the petals with the darker yellow ochre color.  Let dry.


4.     Use the liner paintbrush and some black paint to make some pointed lines all around the center of the flower.  (See photo) Let dry.


5.     Repeat steps 2 through 4 to make another sunflower on the opposite side of the glass.  Let dry.

6.     Starting from a petal on each side, paint a green line down the stem of the wineglass. Add four leaf shapes on the base.  Paint the entire stem green and let dry.  Use the liner brush to paint vein lines with black paint on the leaves.


7.     Set the paint so you can wash your wine glass by baking in a 325-degree oven for 30 minutes.  Let the oven cool before removing the glass.


Note:  By heat setting the wineglass it is top rack dishwasher safe, but I always recommend hand washing.  This project is quick, easy and inexpensive.  Acrylic glass paint dries quickly so why not make a whole set?


Friday, April 19, 2013

Personalize your flip-flops


Inexpensive flip-flops are all over the place right about now and are so budget friendly at around dollar or two.  They are plain and simple summer staples, but that is the problem, they are plain and simple.  Why not dress them up with some wrapping tissue and Modpodge decoupage glue. 

You will need:

Flip-flops in desired color

Wrapping tissue in a print, flowers, stars anything goes 

ModPodge decoupage glue

Small paintbrush

Ruler, pencil scissors

Small pointed scissors

Wax paper or cardboard to cover your work surface

Tape measure

1.     Measure the thickness of the flip-flop sole.   Mine was ½” thick.   Use the tape measure to determine how many inches it is all around the sides of your flip-flop.  Cut a length of tissue paper the thickness of the flip-flop by the measurement to go around it, adding 1//4” extra at the ends. Cut it into two pieces.  It is easier to work in two pieces and overlap when the ends meet.


2.     Using a small brush spread some Modpodge decoupage glue around half the flip-flop sides and lightly press the tissue paper into this glued area.  Continue with the second piece of tissue paper and meet the other end overlapping slightly.  Spread on a second coat of glue on top and smooth out any wrinkles with your fingers.  (Don’t worry decoupage glue washes off of hands easily)  Repeat for other flip-flop and let both dry.  Snip off any tissue overlap with the pointed scissors.


3.     Measure each side of the thong part of the flip-flop and cut a piece of tissue paper the width by the length.  Cut the end by the toe area at an angle. Working on one side of the thong at a time, spread a bit of decoupage glue and gently press on the tissue paper as you did with the sole sides.  Repeat with a second coat on top being sure to smooth out any wrinkles.  Snip off any tissue overlap with the pointed scissors.  Do the same with the other side of the thong.  Let dry.  Repeat this step with the other flip-flop.  Any texture on the thong as well as the original color of the flip-flop will show through for a cool painted on look.  


4.     When both flip-flops are dry spread on another coat of decoupage glue over all the tissue paper areas and let dry. 


Note:  These are extremely durable but I do not recommend prolonged immersion in water.


Saturday, April 13, 2013

Coffee filter carnation pen


If you work in an office or a business where people are using pens sometime the pens just seem to walk away, and you never have a pen when you need one.  So it’s fun to have decorative pens in a flowerpot filled with beans or rice.  It brightens up the space and they stick around a bit longer.  This project cost practically nothing.  I bought both the coffee filters and a pack of pens for a around a dollar each!  Add some floral tape and acrylic paint and you can make a whole bouquet of cute carnation pens.

You will need:

Stick pen for each carnation

Coffee filters

Roll of green floral tape

Transparent tape

Paper plates

Acrylic paint in desired color (I used red and burgundy)

Small paintbrush

Scissors

1.     Fold the coffee filter in half and cut along the pleat lines towards the center just to the fold line that marks the edge of the pleats.  Repeat this all around.  Repeat this step with two more coffee filters for a total of three


2.     Using the scissors round out the tips of each petal on all three coffee filters.


3.     Open the filters up and mark the center and cut out a small opening in the center of each prepared filter. (This will be where you insert the pen top)


4.     Layer all three filters together and insert the pen top into the holes you made.  Using your fingers, gather together on the pen top.  Use some transparent tape to attach the base to the pen making sure you attach some tape to the pen itself.  It is ok if you add a generous amount of tape here since carnations have a thickness at the base.


5.     Cut a piece of green floral tape and begin wrapping around starting from the top and working down the pen.  Stop just before the pointed tip.  Floral tape sticks to itself and it helps if you press on the tape with your fingers.


6.     Color the carnation.  Add a tiny bit of water to a paper plate. In another section of the paper plate add your main color and thin some of it with the water.  Use the brush to add the thinned color to the flower.  You do not need much since the filter draws in the liquid.  After the color has dried a bit tap the tips only with the un-diluted acrylic paint.  Let dry.


Tuesday, April 9, 2013

Craft tip today--removing price ticket residue quickly and easily


Ever buy something on impulse (yes impulse is my middle name) just because you love it. Then when you get the item home and try peeling off the price ticket do you find that it just leaves a sticky residue? I don't know why they use stickers like that but there is nothing worse than that sticky, gummy gooey mess left behind.  You try washing (if it's something that is washable) and nail polish remover and find that the stickiness simply spreads! 

Since you love it--banish that thought of returning it.  You can get that sticky mess off very easily.

Go to your pantry and get a jar of peanut butter.  Yes I said peanut butter. Rub a glob of peanut butter over the sticky residue and wipe off with a paper towel.  You may have to repeat this once more but the sticky mess will disappear like magic!

So the next time you are faced with one of those fiendish stubborn price tickets get out the Jiff, and the problem is solved--in a Jiff.  

Saturday, April 6, 2013

Recycled paint chip photo frame


So far in my little poll Recycled Crafts are winning out all other crafts, with decor in second place.  There is still time to vote so let your voice be heard.  Of course if you want to add something not on the list, just leave a comment.  Now for the recycled/decor craft tutorial…after you’ve finished painting the room what can you do with the leftover paint chip samples? Why not make a frame that matches?  This frame takes a little time gluing on the strips but when finished gives a nice inlaid look. The strips are easy to cut in that paper shredder you are using for tax time.  So let’s get started!

You will need:

Paint chip samples in desired colors

Paper shredder

Fast tack, tacky glue

Scissors

Small pointed scissors

Mod Podge gloss decoupage glue

Small paintbrush

5 x 7 wooden frame (I used oval but you can substitute rectangle, etc.)

1.     Cut strips by putting your paint chip samples through a paper shredder. The paper shredder makes quick work of cutting the strips. If you don’t have a paper shredder you can cut them with scissors and a ruler—make the strips ¼” wide.


2.     Measure each strip to fit.  Lay each strip on top of the frame and around to the sides.  Bend the ends to the edges and cut the tips off using your fold lines as a guide.  Your strip should fit across the front of the frame, the outside edge and the inside edge.  Work on one strip at a time measuring to fit.  Please note that when you are gluing on the strips you will have to overlap some of them at an angle on the curved areas. 


3.     Run a bead of glue on each strip as you add them to the frame and press to adhere.  You may have to hold the inside and outside edges for a few seconds for the glue to set.  Continue working around frame overlapping on the curved areas a bit as needed till you reach your starting area.  Let dry.


Hold edges till glue sets 
Overlap strips at an angle around curves


4.     When the glue is dried use a small pointed scissor to cut any excess edges from around the frame.


5.     To finish, brush on a coat of gloss decoupage glue on the front and sides of the frame and let dry.  Brush a second coat of decoupage if desired.