Thursday, July 30, 2015

Sesame chicken recipe, dinner easy

Sesame chicken


You know when I’m in a hurry on the way home from work; I stop at the local Chinese carryout restaurant and pick up some Sesame chicken for dinner.  The one by my house is pretty darned good but their prices have been rising of late.  The problem with Chinese restaurant Sesame chicken is that they usually bread it heavily and deep-fry it before they add the sauce, making it not such a healthy alternative to other fast food options. Some places even add MSG.  In addition they often use dark meat, which is ok for some people but I like the white meat better.  Grocery store chicken breast tenderloins are very reasonable in price and it’s not as hard as you think to whip up your own Sesame chicken. Of course if you are a dark meat lover you can always substitute the tenderloins for boneless skinless thighs! This chicken is moist, tender and so yummy that my husband who is not a second helping kind of guy usually has seconds of this dish!

Easy Sesame chicken recipe

2 lb. package Chicken breast tenderloins cut into one-inch chunks
1 large sweet red pepper or 8 small sweet peppers (sold in bags)
1 large sweet onion
Lt. Olive oil for cooking
White or jasmine rice cooked per package directions
Plastic zip lock bag

Coating mix:
¼ c. all purpose flour
2 tbsp. Sesame seeds
1 tsp. crushed red pepper (If you like it spicy you can add more)
1 tsp. poultry seasoning
½ tsp. salt
¼ tsp. black pepper

Sauce Ingredients:
3 tbsp. Butter
1 tbsp. Flour
¼ c. teriyaki sauce
2 tbsp. Honey
1 tbsp. Pancake syrup
2 tbsp. sesame seeds

Instructions;

Put all the coating mix in a large zip lock bag and add the breast pieces one at a time to coat.  Meanwhile add a couple of teaspoons of light olive oil into a deep non-stick skillet and heat on medium.  Add the chicken pieces into the skillet and cook for about 5 minutes; turn the pieces to brown on the other side.  Remove the chicken to a large bowl and set aside.

Cut the peppers and onions into one inch sized pieces.  Add a bit more oil into the same pan you cooked the chicken and sauté the peppers and onions for 3 or four minutes on medium heat.  Remove them to the bowl with the chicken and make the sauce.

Add the two tablespoons of butter to the same pan. Melt the butter on medium heat and then whisk in the flour.  Add the teriyaki sauce stirring to blend.  Turn heat to low and add the honey and pancake syrup.  Mix the chicken, peppers and onions into the sauce.  Add the extra 2 tbsp. of sesame seeds and stir well.  Serve with hot cooked rice.

Be sure and visit Bowdabra blog for more free craft tutorials and reipes today! 

Tuesday, July 28, 2015

Felt flower hair bow


Have you ever made a flower with felt?  Use the Mini Bowdabra bow maker to quickly and easily make flowers from left over felt.  What a super way to use up leftover craft supplies!  Use these flowers for hair bows, package decorations and more.  Find the full tutorial right here at Bowdabra blog and make some today!  And while you are there check out all the other free tutorials and videos from the Bowdabra design team.


Monday, July 27, 2015

Upcycled dinosaur zipper pull


Did you know that you can upcycle a plastic carry out container to create a cute dinosaur zipper pull? Containers marked #6 are the only ones that will work. You can find them most often from restaurant carry out containers, egg cartons and more.  Simply look for the symbol on the side with a 6 in the center.  If you can’t find a #6 container you can buy Shrink plastic in the craft or stationary store.

look for this mark


Shrink plastic better known as Shrinky dinks became popular in the 70’s.  The plastic when baked shrinks to 1/3 of it’s size with the thickness of about a nickel making it very ridged and perfect for creating buttons, charms, jewelry and more.

Grab the kids because they will love making their own zipper pulls and more!

Supplies:

·      #6 plastic
·      Scissors
·      Dinosaur pattern
·      Home printer
·      Paper hole punch
·      Black sharpie marker
·      Colored pencils in choice of colors
·      Aluminum foil lined cookie sheet
·      Home oven
·      Small ball chain
·      Fine sandpaper
·      Acrylic gloss finish
·      Small paintbrush

Directions:

1.     Download and print the full sized pattern.

2.     Rub the fine sand paper over the plastic piece so that your pen and pencils will adhere to the surface.


3.     Place the pattern under the plastic and use the sharpie marker to trace the lines.  Color the dinosaur with colored pencils in your chosen colors.


4.     Cut out the dinosaur with scissors and use the paper hole punch to make a hole in the top.


5.     Line a cookie sheet with aluminum foil and bake in a 350-degree oven.  Bake for approximately 2 minutes.  It will curl when baking but when it is done it will be flat and thicker and the colors will intensify.  Remove from oven and let cool.


It shrinks from this...to this


6.     Brush a coat of gloss finish over the front to protect the charm.  Insert a small ball chain through the hole and use for a zipper pull, backpack bling, key chain or necklace.


Sunday, July 19, 2015

Four favorite back to school projects and the kids can help


It won't be long before those school bells will be ringing. I know it's only July, but after the vacations are over the kids might be getting a bit bored.  There is no better anecdote for boredom than crafting.  Kid's have so much creativity and freedom of expression.  They have no pre-conceived notions on how things should work, and after all that is how creative ideas are formed.

So get out the glue, get out the paints and supplies and try some of these favorite kid-centric projects from Make it easy crafts.  Click on the photos for the full tutorials.

A simple zip lock baggie and duct tape is all you need to make this binder pencil case in any color you choose!  Awesome!


Reading is important so print some of these free printable bookmarks and let the kids color and decorate them to suit their individual style.

Do you have some paint chip samples left over from a decorating project?  put them to good use and have the kid's redecorate a magnetic locker mirror!


Who's up for some backpack bling?  Shrinky dinks are a fun kids craft and they are still available.  You can make these with your favorite stamps.  


Come back later this week for a free printable Dino pattern for backpack bling you create and shrink with #6 recycled plastic...or regular shrinky dinks!


Thursday, July 16, 2015

Quick oven fried pecan crusted chicken fingers

Chicken fingers recipe


Are you looking for a quick, easy recipe for chicken fingers?  And why fry when you can oven fry?  It’s so easy and in 30 minutes you will have a delicious plate of crispy chicken fingers.  Chicken tenders are inexpensive and often on sale so they are thrifty as well as yummy! The addition of pecans gives just a touch of nutty flavor.  Make this recipe on busy nights when you have better things to do than slave in the kitchen and then just sit back and listen to all the complements.

Ingredients:

2 lbs. chicken tenders
2 cups Panko breadcrumbs
1 cup chopped pecans
1 egg, beaten
1 tsp. salt
½ tsp. fresh ground pepper
Dash of poultry seasoning
Light olive oil for cooking
Non- stick foil
Large cookie sheet
Food processor or blender

For dipping sauce:

1 tbsp. honey
1 tbsp. pancake syrup
1 ½ tbsp. spicy brown mustard

Directions:

To make the coating mix, add the panko breadcrumbs and chopped pecans to a food processor or blender and pulse until both are well blended.  Stir in the salt, pepper, and poultry seasoning.

Add each tender to the beaten egg and then dredge in the breading mixture coating both sides.  Set aside. 

Line a large cookie sheet with non-stick foil and coat with a couple tablespoons of light olive oil, spreading it out thinly.  Place the breaded chicken fingers on the prepared cookie sheet leaving space between each of them.

Pre-heat the oven to 400 degrees.  Bake for about 30 minutes, turning them to the other side when halfway done.  Cook until the chicken fingers read 160 degrees on a meat thermometer.

Dipping sauce:

Add the honey, pancake syrup and spicy brown mustard in a small bowl.  Mix well and serve with the chicken.

Visit Make it easy crafts and Bowdabra blog for more "dinner easy" recipes, hair bows and craft tutorials!


Tuesday, July 14, 2015

Gingerbread man hair bow from Bowdabra

gingerbread man hair bow


It's July and it's never too early to start on Christmas projects.  After all there are only 5 months left before the big day!  This cute little gingerbread man hair bow is so quick and easy to make you will want to make a few for gifts too!

He makes an adorable hair bow but he would be equally cute on the Christmas tree, on a package, wreath or garland as well.  He's a hard working little guy!  Anyway head on over to Bowdabra blog to get the full tutorial and have a Happy Christmas in July!


Sunday, July 5, 2015

Denim look frame with up-cycled denim flowers

upcycled denim look frame


I love textures and denim.  Did you know that you can mimic the texture of the woven threads of denim with paint?  Use an unconventional tool to imitate the looks of denim on a wooden frame and then accent it with real up-cycled denim flowers.  This little denim flower frame makes a great gift for anyone.  And if you use a denim scrap from a discarded favorite article of clothing it makes your frame even more special. 

Supplies:

·      Wooden frame
·      Fine sand paper
·      Acrylic paint, dark blue, light blue
·      Medium paintbrush
·      Inexpensive plastic comb
·      Denim scrap
·      Small blue bead or rhinestone
·      Fabric stiffener or thinned white glue
·      Tacky craft glue
·      Waxed paper or newspaper to protect your work surface
·      Paper or foam plate for a palette
·      Plastic sandwich bag
·      3-D foam dots
·      Flower pattern


Instructions:

1.     Print the flower pattern on your home printer and use it to cut out motifs from some scrap denim.

2.     Sand the frame all around the edges and front to make sure there are no rough spots.  Cover your work surface with waxed paper or newspaper to protect it. 

3.     Paint the entire frame with dark blue paint.  Let dry and turn over and paint the back.  Let dry. 

upcycled denim look frame


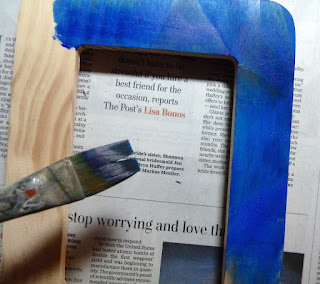
4.     Add some lt. blue paint to the plate palette and working in small sections on the front of the frame apply some paint with the paintbrush and while the paint is still wet, go over it with the comb.  This will make little lines and you can remove as much or as little of the light paint as you want.  Continue all around the frame.  Make sure you are going in one direction.  Set aside to dry completely.  You don't have to texturize the back.

upcycled denim look frame

upcycled denim look frame

upcycled denim look frame

upcycled denim look frame

5.     Meanwhile place the flower motifs you cut from the denim into a plastic sandwich bag.  Add some fabric stiffener or white glue thinned with water.  Make sure the motifs are completely saturated.  Remove the motifs and squeeze the excess glue from them and lay them on a piece of waxed paper to dry several hours or overnight depending upon the humidity and temperature.


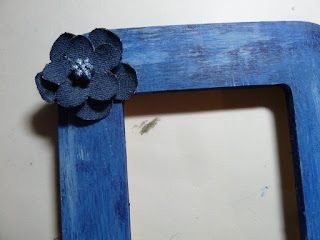
6.     Attach a foam dot to one corner of the frame and then attach the largest flower motif.  Attach another foam dot to the center of the large flower and then the smaller one on top.  Glue on a bead or rhinestone to the center of the flower.

upcycled denim look frame

upcycled denim look frame

upcycled denim look frame

upcycled denim look frame