Monday, October 31, 2016

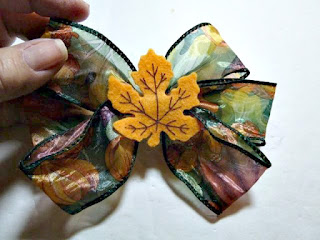
Easy to make a unique autumn loopy hair bow


autumn loopy hair bow


Make this unique autumn loopy hair bow so quick and easy that you won’t want to stop at one!  And using the hair bow tool and ruler it’s so easy to make the loops perfect every time!

Thanksgiving is right around the corner and wouldn’t this autumn loopy hair bow look perfect as you dress for Thanksgiving dinner?  There is lots of cute autumn colored printed ribbons in the stores right now and most are even on sale.  So this autumn loopy hair bow is very inexpensive to create.

So let’s get started!


Materials:

34 inches of 1 ½” wide sheer printed wired ribbon in autumn tones.
Felt leaf or other autumn felt motif
Bowdabra mini bow maker with hair bow tool and ruler attachment
Bowdabra bow wire
Alligator hair clip
Hot glue gun and hot glue sticks
Scissors
Ruler

Instructions:

1.     Gather your supplies.  Cut a piece of Bowdabra bow wire 18” long, fold in half and insert into the Bowdabra.  You will have a loop on one side and two loose wires on the other.


2.     Now cut the ribbon 34 inches long and then use a lighter to run lightly over the ends to seal them.  My printed ribbon has a wrong and a right side so in this case you will need to twist as you make the loops.


3.     Next insert the ribbon into the Bowdabra wrong side up.  Make a loop at the 2 ½” mark and insert into the Bowdabra.  Now twist so that the wrong side is facing up, bring it across and then make a matching loop on the other side. Make sure your loop is facing the right side.


4.     Now continue making loops and twisting using the ruler to match your loops until you have three loops on each side.


5.     So now you will use the Bowdabra wand to scrunch down the bow. 


6.     In the next step, insert the two loose wires through the loop and pull tight while the bow is still in the Bowdabra.  Finally, remove from the Bowdabra, turn to the back, separate the wires and tie a knot.  Fluff out and arrange the loops. And clip the wires short.


7.     Lastly, Use the glue gun to add a felt motif to the front of the autumn loop hair bow.  In the same way add a ribbon covered alligator clip to the back.

autumn loopy hair bow

autumn loopy hair bow

autumn loopy hair bow

Bowdabra bow makers help you make bows quickly and easily and  are available online, at most craft stores, and Walmart.


Tuesday, October 25, 2016

Make a quick little pumpkin pocket candy favor

Pumpkin pocket candy favor


Don’t you think this little pumpkin pocket candy favor is adorable?  And they are so quick and easy to make you will have a whole pumpkin patch in no time!

Simply add small candies and add to your table or even for the trick or treaters.  I usually make little treat bags for Halloween and they are always a hit. 

Don’t stop with candies because this little pumpkin pocket candy favor isn’t just for candy.  Be creative and fill with small jewelry items, folded dollar bills and more. 

Materials:

Bowdabra bow wire
Scrapbook paper in color and print of choice (white on one side)
Scissors
Ruler
Bone folder (or dried ink pen)
Piece of corrugated cardboard
Tacky craft glue
Wiggle eyes in two sizes
Small scrap of black felt
Lighter
8 inches 5/8” satin Halloween ribbon
Large dark sequin or rhinestone (optional)

Instructions:

1.     First cut your scrapbook paper to fit your printer and make sure the white side is the side that you will print on.  You may, however, alternately print the pattern and transfer it to your scrapbook paper.  Now using your home printer, download and print the pattern.


2.     Then cut out your pumpkin pocket candy favor pattern.  After you’ve cut out your pocket, place on a piece of corrugated cardboard.  Then, use the ruler and a bone folder to score all the fold lines.  Next fold the pocket.


3.     So now glue the pocket together with the tacky glue.  Glue the right side flap to the left side tab.  Then glue the bottom on top.


4.     To finish your pocket place and glue on two eyes (I used two different sizes) a small circle and triangle of felt.  Finally, glue on two 1” piece thin strips of felt for eyebrows.  Set aside.


5.     To make the bow cut a piece of Bowdabra bow wire 12” long, fold in half and place into the Bowdabra.  You will have a loop on one side and two loose wires on the other.


6.     Cut an 8” piece of 7/8” satin ribbon. Run a lighter quickly on the ends to seal the ribbon. (Mine was double sided) Fold in half to find the center and place into the Bowdabra with the wrong side facing up.


7.     Bring the right side around and make a loop at the 1 ½” mark and insert into the Bowdabra.  Make a matching loop on the opposite side.


8.     To finish the bow, insert the two loose wires through the loop and pull tight while the bow is still in the Bowdabra.  Now remove the bow from the Bowdabra, separate the ends, turn to the back and tie a knot.  Clip the wires short.  And glue the bow onto the front of the pumpkin. Add a dark sequin or rhinestone with some more glue to the center of the bow. (See photo)


9.     Fill your pumpkin pocket candy favor with small candy or treat. 


Monday, October 24, 2016

Easily make a fun glitter cat Halloween mask

Glitter cat halloween mask


Halloween will be here before you know it and you can have this fun glitter cat Halloween mask ready to wear in no time! 

You only need a few supplies to create this glitter cat Halloween mask.  And the kids will have fun helping.

You can use this mask to accentuate a cat costume or simply wear it alone for just a touch of sparkle when you are handing out the candy to the kiddies! 

Materials:

Plain mask
Thick tacky glue
Hot glue gun and hot glue sticks
Two colors of glitter, I used greens but any colors you choose would be great. 
Spray varnish
Corrugated cardboard
Pencil
Scissors

Instructions:

1.     The first thing you need to do is to protect you work surface with newspaper or a piece of cardboard.  I apply the glitter with a square of corrugated cardboard that has a ½” lip folded all around.  This way I can add the glitter and tap the excess glitter back into the container from the corner.
 

Glitter cat halloween mask

2.     Now draw two ears on a piece of scrap mat board.  It doesn’t matter what color since you will be covering it with glitter.  Use the scissors to cut the ears out and attach to each corner of the mask with some hot glue.


Glitter cat halloween mask

Glitter cat halloween mask


3.     Next choose your glitter main color.  Then apply a thick coating of tacky glue all around the mask and on the ears. Sprinkle on the glitter.  Set aside and let dry a bit before you add the contrasting color glitter.

Glitter cat halloween mask

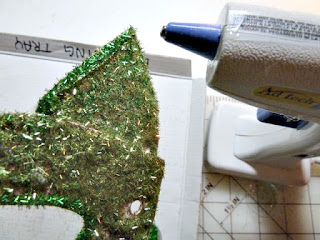
4.     So now that the main glitter has dried a bit heat up your glue gun.  The beads of glue from the glue gun will make the glitter outlines a bit more dimensional.  Using the glue gun run a bead all around the eyes, ears, and the edges, and wherever you'd like more dimension. Add the contrasting color glitter as you go. (Work in sections since the hot glue dries quickly)  Finally set it aside to let it dry completely.

Glitter cat halloween mask


Glitter cat halloween mask

5.     To finish and to make sure the glitter sets and doesn’t fall off, lightly spray with a clear varnish.  (Make sure you are working outside or with proper ventilation. 

Glitter cat halloween mask

Glitter cat halloween mask


6.     Finally, attach the elastic and enjoy wearing your glitter cat Halloween mask