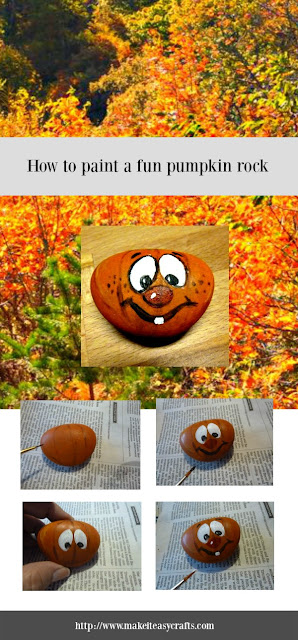
Are you ready for another rock painting lesson? Let’s paint a fun pumpkin rock! You can follow the tutorial to make it exactly like mine, or you can change up the expression on your pumpkin rock. It’s easy and fun to do it as a group craft for Girl Scouts, senior groups, and with the kids.
Join the Kindness rocks celebration. Leave your rocks for someone to fine. Add a positive message on the bottom of the pumpkin rock and make someone’s day!
Materials:
Rock
Acrylic paint, orange, yellow, burnt umber, green, white, black, red, and burnt sienna
Paintbrushes, flat, and liner or spotter brush
Sharpie marker for message on bottom
Newspaper or newsprint to protect your work surface
Instructions:
1. First, use the flat brush to paint your rock orange on the front, let dry and paint it on the back as well. Let dry.
2. Using the liner or spotter brush, add vertical lines on the pumpkin. (See photo)
3. Add a stem on the top with green paint.
4. Next, use the yellow paint to add some dimension to the ribs of the pumpkin next to the brown vertical lines. Blend well. Let dry.
5. Now using the white paint make two circles for eyes. (See photo)
6. Then, add two black dots for the pupils on each eye.
7. Paint a red oval under the eyes for the nose. Then use the black paint to make a smiling mouth. (See photo) Let dry.
8. When the paint is dry add the final touches. Paint eyebrows above the eyes with black. Paint a white dot on the nose and on each pupil. Finally, paint a small rectangle in white for a tooth on the mouth.
9. Add some green lines on the top to resemble hair. And use the spotter or liner to add some sienna dots on the cheeks for freckles. Let all the paint dry. You can add a coat of clear acrylic gloss or matte finish to protect when it is finished. If you choose, you can write a positive message on the bottom of the pumpkin rock.


