Sunday, February 28, 2016

Inspirational quotation for today and every day

Inspirational quotation for today and every day


Who hasn’t wrestled with problems in their lives and grown from them?  This inspirational quotation is one that I try and live by every day of my life.  The negatives in our lives don’t have to be negative.  Just like photo negatives the most beautiful pictures develop from dark and not very attractive strips. 

Although many of us do not use film cameras anymore and it’s like most things these days…instant gratification.  In photography as in life, there are benefits to waiting for things to develop.


I hope you enjoy my photo and quotation, and it will help you to see what might be just around the corner.

Thursday, February 25, 2016

Scrap ribbon shamrock barette


Shamrock barrette


If you have a bit of scrap St. Patrick's Day ribbon leftover from another project you already have the makings of a cute shamrock barrette.  This project is super easy and all you need is an iron, some glue, a chenille stem and a french barrette!

There is a legend that if you wear green on St. Patrick's Day you become invisible to leprechauns and they won't pinch you.  Wear the green so that there will be no pinching!


You will need:

St. Patrick’s Day grosgrain ribbon

Ironing board and iron

Ruler

Tacky Craft glue

Green sparkle chenille stem

1 ½” French barrette

Glue gun and glue sticks

Clothespins

Pencil

1.  Cut three 2 1/2" pieces of 3/4"” wide St. Patrick’s Day holiday (or green) grosgrain ribbon.  Measure and mark the center of each piece.  (1 ¼”)


2.  Use your guide mark to fold up each side of the ribbon, and carefully iron it down flat. Turn over and fold under the two corners of each of the upturned sides of ribbon. Use the point of the iron to carefully tack it down.  (See photo) Finish by ironing the entire heart shape flat.  Make two more for a total of three ribbon hearts.


3.  Open the ironed down sections and add a dab of tacky glue to adhere.  A clothespin is helpful in holding the glued edges until they set. You may iron it again if desired.  Let dry.


Front side

Back side

4.  Roll one end of a green sparkle chenille stem into a circular shape.  Use your glue gun and glue sticks to attach the circular shape onto the center of a 3” metal barrette.  Let dry.  Attach the three heart shapes onto to the top of the glued on chenille stem.  (See Photo)  Let dry.  Curl the remaining chenille stem at the bottom.


Monday, February 22, 2016

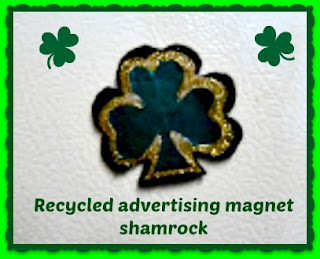
Recycled advertising magnet shamrock


Recycled advertising magnet shamrock


I have amassed a large quantity of advertising magnets.  Pizza places, credit card companies and various others constantly send out little sheet magnets with their names and numbers.  Seriously how many magnets to a local pizza joint do you need on your fridge?  So I figured if they are going to keep sending them I am going to put them to a more “seasonal use.”  This is a great kids craft!

You will need:

A shamrock sticker or clip art printed off the computer

Black felt

Sheet advertising magnet (or if you don’t have any you can purchase sheet magnets at the craft store)

Tacky glue

Gold glitter dimensional fabric paint

Pen, scissors

1.     Spread some tacky glue on the back of the sticker.  This is to insure that it stays stuck.  Attach to the black felt.  If using clip-art, cut out and spread some glue onto the back.  Attach to the piece of black felt.  Let dry.  


2.     Cut around the motif leaving a quarter inch of black felt showing.  Place the prepared shamrock on the advertising magnet and trace around with a pen.  Cut out the shamrock shaped magnet.  Spread some glue on the back of the felt shamrock and attach to the magnet. Let dry.  Trim up any overhanging edges.

3.     Draw a line with Gold dimensional fabric paint all around the shamrock shape.  It can be a thin line or a thick one as desired.  Make sure you test the fabric paint on scrap paper first so that it comes out in an even line.  Let dry.  Stop throwing those advertising magnets away and make as many shamrocks as you want and deck out your fridge for St. Patty’s Day.  While you are at it why not try some Easter designs as well?  You can't get any more thrifty since this project costs practically nothing!!!


Thursday, February 18, 2016

St. Patrick's Day Green Hair bow tutorial

Hair bow tutorial


St Patrick's Day is March 17th and you can be wearing the green with this adorable St. Patrick's Day Green Hair Bow.  It's so easy using the Bowdabra bow maker and some scrap ribbon.  Head on over to Bowdabra blog for the full quick and easy tutorial!


Sunday, February 14, 2016

President's Day facts and history


President's Day facts

On Monday February 15, 2016 we celebrate Presidents day and I thought it would be nice to list a few interesting President's Day facts and history about the holiday, so here goes:
  1. President’s Day originally commemorated George Washington’s Birthday on February 22.
  1. Due to the uniform Monday holiday act, President’s Day (As it is now known) falls on the third Monday in February.
  1. Since the New Date fell between Abraham Lincoln and George Washington’s birthdays, many felt that it honored both statesmen; President’s day was born.
  1. Since Presidents Day now fell on a three-day weekend, marketers used this day to clear out old winter stock and “President’s Day sales” began.
  1. Some states use President’s Day to celebrate others on that day. Arkansas celebrates Washington and Daisy Gatson Bates a civil rights activist, while Alabama also celebrates Thomas Jefferson who was born in April.
  1. Today President’s Day celebrates all presidents, past and present.
  1. Traditionally cherries are the order of the day. Whether it is cherry pie, cherry cobbler or just plain cherries many consume cherries on this day. This is in reference to the story, whether it be truth or myth of George Washington chopping down the cherry tree.
  1. George Washington was born in Virginia. (Can you tell I’m proud of my home state?) He was born in Westmorland County in 1732. He lived his boyhood years in Fredericksburg at Ferry farms and his later years at Mount Vernon. If you are ever in Virginia be sure to visit some of these historical sites.
I hope you enjoyed these President's Day facts and brief history.  If you would like to learn more about George Washington the following links will give you more information.


Thursday, February 11, 2016

Dollar Bill Valentine Heart

Dollar bill Valentine heart


They say a dollar doesn't buy much anymore.  I find that dollars can purchase more smiles than you can imagine. Have you ever folding a dollar bill into something non-monetary? In this world where people are more self centered I enjoy just surprising someone with a folded dollar bill.

It may be the hard-working hostess or waitress in a restaurant.  Sometimes it's a child who is not very happy at the moment.  Sometime's it's the perfect thing to stick in a Valentine's Day card. The thing is, it's a surprise when someone gives you something without any expectation of something in return except a smile.

 I love to seeing the happy looks on someone's face when I give them a dollar that has been transformed into something else.  The only problem is they never want to unfold it and spend it.  Then again, maybe that is not a real problem.

With Valentine's Day approaching I thought these little dollar bill hearts will brighten someone's day. And it's so easy, just follow the simple directions and you too can share happy hearts in abundance.

You will need:

A crispy dollar bill (One that is fairly new)
A few minutes of your time (Origami is very relaxing, but addictive as well)
A straight pin or opened paper clip (Something to help open the tiny folds)

Directions:

1. Begin with the dollar with Washington facing up.  Fold one corner of the bill to the center and crease.  Do the same with the other side.  Your fold lines will form an X.  Repeat on the opposite end of the bill.


2.  Open the bill and turn over and fold down right at the center of the X to make a crease.  Now use your finger to push in the sides, and you will have a point.  Working on the opposite end of the bill do the same.  (See photo)


3.  Now working on one pointed end, fold up just the top layer.  Fold he other pointed end up as well meeting the two.


4.  Now using a straight pin or opened paper clip open this point and with your finger press down.  Wow, you have as square!  Do the same with the other point as well.  You will have two squares next to each other.


5. Now is the tricky part but it's not really hard...just follow the photos.  Fold up each side of the square into a little kite shape.  Next use the pin to open the folded piece and press down.  You have a little decorative point at the tip.  Repeat for the other folded piece.  Do the same with the other square.


6.  Repeat steps 3-5 with the opposite pointed end of the bill.


7.  Fold the bill so that both decorative edges meet and press down.  Wow, now you have the beginnings of your heart and a tab at the top and a tab at the bottom.  Fold the bill down (It makes no difference which side you fold) so that the two tabs meet.


8.  Tuck in one of the tabs and then tuck in the other tab tightly.  Press down to secure the fold.  Turn over and fold in each side evenly to better form your heart.


See how easy that was?  Now, ready, set, fold!