Wednesday, December 1, 2021

How to make an elegant, beaded, ornament hangers from a paper clip


If you’ve got a container full of paper clips you have the start of easy beaded ornament hangers. You can use the large ones for heavy-weight ornaments and the regular ones for lighter-weight ornaments. The touch of beads adds an elegant touch and is super easy to make.


beaded ornament hangers


Materials:


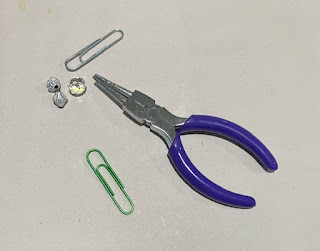
Paper clips, colors, silver, gold whichever you have on hand

Round nose pliers 

Clear and sparkle beads


Instructions:


beaded ornament hangers


First, straighten out the paper clip using the pliers.  Try and get it as straight as you can.


beaded ornament hangers


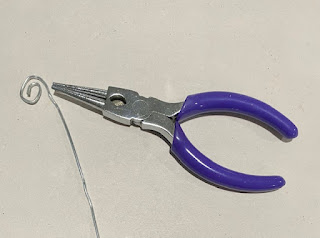
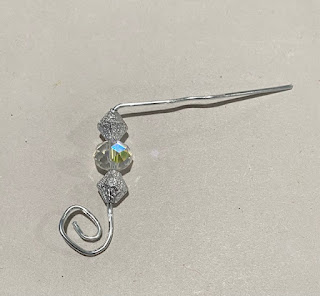
Next, using the pliers curl one end of the straightened paper clip.  Then, thread on three beads, and bend the wire to the right.


beaded ornament hangers

beaded ornament hangers


Now, curl the other end.  It is much easier with regular paper clips than the larger ones. Work on it till the curl looks right.


beaded ornament hangers

beaded ornament hangers


Attach your ornament to one curled end and then, hang it on the tree.  


beaded ornament hanger


Sunday, November 21, 2021

How to make a super easy dollar Christmas stocking extra special

Christmas stocking


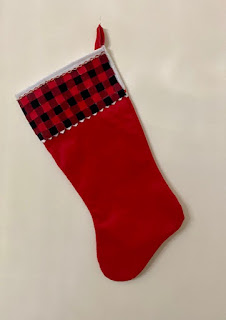
I always fill stockings for my adult children. The problem is that when they go back to their homes, they take the Christmas stocking with them. So, the following year, I must come up with another generic stocking to fill.  Since, the cost of the contents is usually pricey, the stocking must be reasonable, but attractive.  I got this simple felt stocking for a dollar, but I wasn’t happy with the way they looked.  So, I created a felt mosaic buffalo plaid embellishment.  It is so easy that you could even do this with young children.


Materials:


Inexpensive felt stockings

Red felt

Burgundy felt

Black felt

Fabric glue

Cardboard to insert into the stocking while you add your felt squares.


Instructions:


Gather your supplies.


First, cut a piece of cardboard the width of the stocking and insert it into it.  This will help with stability while you add the your felt squares to your Chiristmas stocking.


Now, cut ½” x ½” squares from the red, burgundy and black felt.  Next plan out how the squares will be positioned on your stocking.


Now begin to glue each square on the stocking working horizonally.


Row 1:  black, burgundy, black, continue this pattern to the end


Row 1: burgundy, red, burgundy, continue this pattern to the end.


Repeat row 1 and 1 till you have made your felt mosaic buffalo plaid as wide as you want on your stocking. Optionally add some extra trim to the top of the stocking.


Christmas stocking


Let dry completely.  You will have a faux felt mosaic buffalo plaid Christmas stocking.


Christmas stocking

Don't stop here though.  You could also glue different ribbons on the cuff of the stocking for a very attractive look.  Add trims, cabochons, beads, or bells for a myriad of variations.  


Thursday, October 7, 2021

How to make a sweet little reindeer candy holder party favor


Kids with a little help from mom or Dad can make these little reindeer candy holder party favors quickly and easily.  With just a few supplies (some of them recycled) they are created quickly.  Make one or a few for gifts.


reindeer candy holder party favor


Materials:


  • Mini clothespins (2) 2”
  • Paper cardboard tube from an aluminum foil or paper towel roll cut to 2 ½” long
  • A thin strip of cork
  • Mini cork
  • Colored paper clip
  • Sheer white fabric bag (sold in multiples at craft stores)
  • Brown and black paint
  • Small paintbrush
  • Glue gun and glue sticks 
  • Small wiggle eyes
  • One small red pom-pm
  • Candy for filling
  • Scissors, wire cutters, Needle nosed pliers
  • X-acto for cutting paper towel roll
  • Small ribbon bow


Instructions:


First, cut your paper towel roll to the correct length. and take apart the mini clothespins.


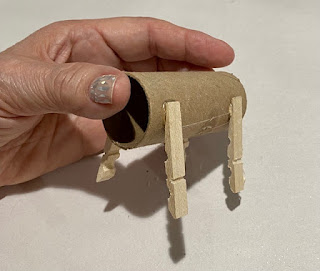
Next, take apart the mini clothespins, and glue them onto the prepared paper towel roll piece so that it stands up. 


reindeer candy holder party favor


Working with the small cork (head.), cut a piece of thin cork in an ear shape and glue it to the back of the cork  (The thicker end) Now, glue the cork on the top of the paper roll with the shorter end facing out. 


reindeer candy holder party favor


Cut the paper clip in half and twist each piece into a pleasing antler shape. Use a nail or pin to make a pilot hole in the top of the head and attach each antler with a little glue.


reindeer candy holder party favor


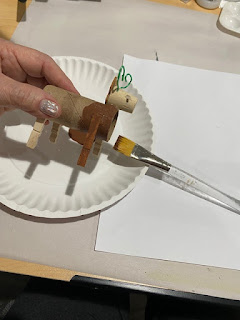
Paint the entire reindeer with brown paint.  Paint the tips of each leg black for hoofs.  Let dry.


reindeer candy holder party favor


Fill the sheer fabric bag with candy or small treats and insert it into the reindeer's body.  Let the tied end show so it resembles a white tail.


To finish, glue on two eyes, a red pompom for a nose, and add a small bow under the chin.  Your reindeer candy holder party favor is ready to bring smiles and sweetness to your guests.


reindeer candy holder party favor


Thursday, September 2, 2021

How to make a super easy glow in the dark pet bow

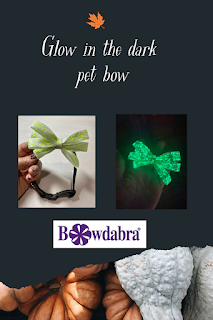
glow in the dark pet bow


You can make an adorable glow in the dark pet bow that is easily attached to the pet’s collar.  Simple attaching a covered hair elastic in a figure 8 position on the back allows easy on and off.  There are lots of glow in the dark ribbons, especially in the fall for Halloween.  The one I used only needs to be under a light for 20 minutes and it will glow for approximately 8 hours.  


How to make a super easy glow in the dark pet bow


Materials:


  • Glow in the dark ribbon I used 7/8” wide
  • Covered hair elastic
  • Mini Bowdabra
  • Bowdabra bow wire
  • Hot glue gun and hot glue sticks.
  • Iron and ironing board (optional)


Instructions:


First, cut a piece of Bowdabra bow wire.  Then, fold it in half and insert it into the Bowdabra.  You will have a loop on one side and two loose wires on the other side.  This will serve as your slipknot. Tuck the ends under to stay out of the way while you are making your bow.


Next, cut a 36-inch piece of ribbon of your choice.


Next, lay the ribbon into the Bowdabra right side down.  Then, bring the other side over making a loop.  Twist so that the right side is facing up and make a matching loop.  Continue twisting and making loops until you have four loops on each side.  


Now, scrunch everything down with the Bowdabra wand.  Then, insert the loose wires through the loop and pull tight while the bow is still in the Bowdabra. Remove the bow from the Bowdabra, separate the ends, turn to the back, and tie a knot.  Tie a double knot for extra security. Clip the wire ends.  Adjust and arrange the loops of the bow.


Using, a hot glue gun, twist the elastic hair tie into a figure 8 shape and glue to the back of the bow.  This will allow the collar to slip through both loops of figure 8 elastic, attaching the bow. 


Cut a two-inch piece of matching ribbon.  Fold it in half lengthwise.  Using the glue gun, start from the back and glue the 2-inch folded ribbon to cover the bow going over the already attached elastic.


Feed your collar through both loops of the elastic.  


glow in the dark pet bow

glow in the dark pet bow


glow in the dark pet bow


glow in the dark pet bow


Thursday, August 5, 2021

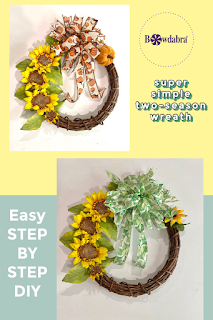
How to make a super simple two-season wreath, summer, and fall

two-season wreath


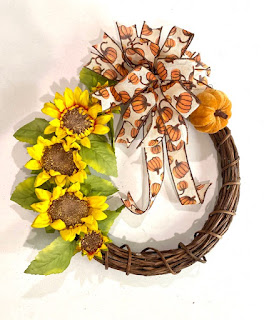
Make this two-season wreath with just a few supplies and two different Bowdabra bows.  Using four sunflowers and one pumpkin pick you can quickly change the bows in the center to reflect summer or fall.  All you need do is switch out one sunflower with a pumpkin pick and tie on the corresponding bow.  Easy peasy! 


In the summer wreath, I used a printed summer ribbon for the bow, and I made my loops on the bow a bit smaller than the fall Bow.  It is just a matter of whatever your preference on how many loops or how big they are.  


Note: This post may contain affiliate links which means I may receive a small commission at no additional cost to you. Please see privacy policy for more information.


So, let’s get started!


Materials:


Wreath form, grapevine, or similar wreath

Bowdabra bow maker

Bowdabra bow wire

Summer print wired ribbon 1 ½” wide

Fall print wired ribbon 1 ½” wide

Five sunflowers in different sizes, cut from a pick

One small pumpkin pick

Hot glue gun and glue sticks

Scissors


First, create your simple wreath.  Insert four sunflowers along one side securing with hot glue. Wait until your bow is complete to put the last sunflower on the other side simple inserting it into the wreath without gluing for easy removal.


Make your bows


I will demonstrate the Fall bow, and please note that you create the summer bow in the same way. First, cut a piece of Bowdabra bow wire 35” long.  You want it to be extra-long so that you can tie it in a bow to the wreath for easy removal. Fold the bow wire in half and lay in the Bowdabra.  You will have a loop on one side and two loose wires on the other.  This will be used as a slip knot.


Next, from the printed ribbon cut a 26” piece.  This will be your tail.  Twist to make sure the right side is facing out and place in the Bowdabra.


Now cut six or eight pieces of printed ribbon 20-22 inches long. If you want your bow loops to be bigger cut the longer length. The pieces of ribbon you cut will determine how many loops your bow will have. (The summer bow had 8 loops and the fall bow has 6 loops)


Next, take one of your pieces of ribbon and twist to make sure the right side is facing up and lay it into the Bowdabra. This is when you can adjust the size of your loops.


Continue taking the ribbon pieces, twist, and insert into the Bowdabra. Make your loop on one side, then, reverse the loop on the other side. Keep going in this way till you have placed all your ribbon pieces. Scrunch down with the Bowdabra wand.


To finish, insert the two loose wires through the loop and pull tight while the bow is still in the Bowdabra. Remove the bow turn to the back and tie a knot, tie another knot.


Dovetail all the tails. To dovetail fold in half and cut at an angle towards the fold.  Fluff and arrange all the loops and tails on your bow.  This is the reason why a wired ribbon is helpful.


two-season wreath


Tie the bow with the excess wire into a bow for easy removal when it is time to go back to a summer wreath. Remove the single sunflower and replace it with a small pumpkin pick.  You now have a fall wreath.


two-season wreath


Wednesday, June 23, 2021

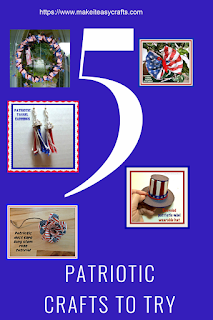
Check out five of the easiest patriotic crafts

If you are looking for easy patriotic crafts, look no further.  These 5 simple crafts will make the holiday a bit more fun. There is something for everyone, wearables, kid's crafts, and family crafts.  So let's get started!

patriotic crafts


First, make a long stem duct tape patriotic rose. It's so easy and quick to make and looks great on a July 4th table or in a vase for any event.  You can make it easy! 


Long stem duct tape rose DIY


For the next easy craft, get the kids involved.  Crafting as a family is a fun and rewarding activity. These napkin butterflies are a quick and inexpensive craft and will look great in so many ways.  You can attach them to a bamboo stick, hair clip, and more.  The kids will have a blast making these fun butterflies!


And for something a bit more elegant, why not make these patriotic tassel earrings.  Jewelry making is not as hard as you might think.  These earrings will be sure to get a lot of compliments so let’s get going and don’t forget to make a few for gifts too!


Our next craft is a cute wearable mini patriotic hat.  Simply attach it with some hair clips and you can be decked out for the party!


Finally, If you are getting your house decorated for July 4th, then you really need something to greet your guests.  The next project is a patriotic wreath.  Simple and so much fun to put together!


 That's all for today, come back for more fun DIY projects, and remember to make it easy!