Wednesday, December 20, 2017

How to make a unique holiday gift for your favorite hairdresser


Do you need to make a unique little holiday gift for your favorite hairdresser?  You can give a gift card or an extra large tip but if you want to give that unique holiday gift that will be treasured then, paint one! 

It’s easy with these step-by-step instructions.  Simply purchase a wide backed hairbrush.  I got one for a song at a department store.  This little snowman will be perfect for the holidays and even throughout the winter. Tie a festive bow on the handle and you will have a perfect and unique holiday gift for your hairdresser!

Materials:

Wide backed hairbrush
Acrylic paint, white, black, Payne’s gray, red, orange, burnt umber, ultramarine blue
Small paintbrush
Ribbon Bow
Alcohol
Paper or foam plate to use as a palette

Instructions:

1.     Gather all your supplies. Then, Wipe down the back of your hairbrush to remove any oils. 


2.     Next, working on the back of the brush, load your brush with white paint.  Make a small circle close to the top of the hairbrush.


3.     Now make two circles, each larger than the previous one on top of each other.  (Snowman is shape made)


4.     While the white paint is still semi-wet add some blue to the left sides curving around each white circle.  Blend together so there is no line of demarcation.


5.     Add some extra white paint where it needs it.

6.     Now, draw a hat shape with the Payne’s gray.  Add a little white paint on the right side and top and blend together. Let dry.


7.     Finally, paint a red scarf around the snowman’s neck.  Add two black dots for eyes, and several for the mouth.  Paint an orange triangle shape for the nose and underline with the burnt umber for shadows.

8.     Finish the snowman.  Use black paint and burnt umber to paint two arms.  It doesn’t matter what direction it faces or how many twigs you add. Add some little dabs of white paint on the twig arms, and top of the hat.  Then, add some snow with white paint under the snowman.  Use the blue paint to add some shadows.  For a final touch add some dots for snow. (Optional)


9.     Tie a bow on the handle and give to your favorite hairdresser!


Monday, December 18, 2017

How to gift a book with a personalized ribbon bookmark

personalized ribbon bookmark


At Christmas, some of my friends and family are avid readers.  While they do have tablets with EBooks on them, nothing beats the turning of real pages.  So as I purchase these books I make a simple but personalized ribbon bookmark for each book.  The supplies for the ribbon bookmark are easily available and inexpensive.  And best of all they adjust to the book.  Use buttons that your friend or family will love. 

It’s so easy you will want to make several for yourself as well!

Materials:

Elastic hair tie
Grosgrain ribbon to fit snuggly around the book
Unique button, or cabochon, embellishment
Hot glue gun and hot glue sticks
Scissors
Lighter to seal ribbon

Instructions:

1.     Gather your supplies.  To begin, wrap the ribbon of your choice around the book.  Keep in mind that you will be folding the ribbon under as a seam.  Cut the piece of ribbon and run a lighter lightly across the ends to seal.


2.     Next, Add the hair tie and fold under.  Add some hot glue (or you can sew this if you desire) to attach.


3.     Now make sure the opposite end is folded to where each end meets and the seams face the same direction and hot glue or sew that ends as well. (See photo)


4.     Then, attach a button of the folded end with hot glue or sew it on.  Make sure your button or embellishment is tall enough for the elastic to attach.


5.     Add the bookmark to the book attaching the elastic around the button or embellishment to secure the place.

Monday, December 11, 2017

How to make a sweet puppy card brooch for the holidays


Do your children need a cute little gift for the teacher this year?  Maybe you would like to make something special for a friend or co-worker.  If you are like me you get lots of cards in the mail and never throw any away.  They are just too cute, especially the puppies, kittens and other cute animals.  So this year, I grabbed a few simple supplies and made adorable a sweet puppy card brooch.  They were an immediate hit.  I mean who doesn’t love puppies or kittens? 

You can make some too and they cost practically nothing so when you need a few simple gifts they very budget friendly.  Simply look through old cards or new ones that you can pick up at the dollar store, or even samples you get in the mail.  Choose a small animal image, cut out and create your brooches.

Materials:

Christmas cards with puppies or kittens or any adorable animal
ModPodge Dimensional Magic
Stiffened felt in coordinating color
Scissors
Waxed paper to protect your work surface
Tacky craft glue
Pinback
Hot glue gun and hot glue sticks
Tiny bows, usually 10 in a package

Instructions:

1.     Find your image. Cut out your image. Use some tacky craft glue to attach the image to the stiffened felt and let dry. 


2.     Place your prepared image on some waxed paper.  Do not shake the ModPodge dimensional magic or you will have bubbles form.  Use the ModPodge dimensional magic to cover the image right up to the edges.  Let dry for several hours. 

3.     Now, add another coat of ModPodge dimensional magic up to the edges as you did before.  Let dry completely.

4.     Using the hot glue attach a little ribbon to the front of your brooch.


5.     Add a pin back on the back. 


We hope you enjoyed this simple and easy craft tutorial.  This is a super kid’s craft.  Kids just love when they something for their teacher or Grandma!  Visit Make it easy crafts again for more fun and easy DIY crafts! And please follow on Facebook, Pinterest, G+, twitter, and bloglovin.  We love comments.


Tuesday, December 5, 2017

Chicken and dumplings - easy to make comfort food your family will love

chicken and dumplings


Chicken and dumplings is a meal that brings back memories of childhood.  And it is easier than you may think to make!  When it’s cold outside chicken and dumplings warms you up like no other meal.

This meal is very budget friendly and can feed 4-6 people.  Every time I fix it, I get tons of compliments.  So tonight warm up from the inside with some chicken and dumplings!

Ingredients:

2 lbs. chicken breast tenders cut into 2-inch pieces
1 lb. petite red potatoes cut into quarters
16 oz. bag of frozen mixed vegetables
½ small onion chopped
Clove garlic, minced
2 quarts of chicken stock
2 tbsp. olive oil
½ tsp. poultry seasoning
Salt and pepper to taste
3 tbsps. Flour (optional)
¼ milk (optional)

For dumplings:

2 cups buttermilk biscuit mix
2/3-cup milk
½ teaspoon parsley

Instructions:

Add olive oil in a large Dutch oven pot.  Heat the oil, and add the chicken pieces.  Cook on medium heat until the chicken is slightly brown stirring occasionally. While the chicken is cooking chop the onions and cut up the potatoes.

 Next, add the chopped onion to the chicken and cook an additional 5 minutes. Add the salt, pepper, garlic, and poultry seasoning and stir well.

Now, add the chicken stock, potatoes, and frozen mixed vegetables. Cook on medium-high heat until the potatoes are done.

Mix the dumplings.  In a medium bowl add 2 cups buttermilk biscuit mix, 2/3-cup milk and ½ tsp. parsley.

Check the chicken and vegetables for doneness.  If you like a thicker stew in a small bowl, whisk together 2-3 teaspoons flour and cold milk.  Add to the stew, stirring well, and cook for five more minutes till you reach the thickness you want.  Please note that the dumplings will also thicken the stew slightly when you add them.

Now add the dumplings.  Drop the biscuit mix by teaspoonful onto the boiling stew.  Reduce heat and cook uncovered for 10 minutes.  Cover and cook an additional 10 minutes. 


Serve in bowls.  Serves 4-6

Please follow Make it easy crafts on Facebook, Pinterest, and Twitter and we'd love to hear your comments!

Friday, December 1, 2017

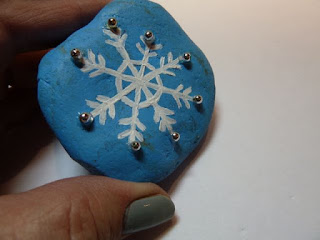
How to paint a snowflake rock for the holidays

snowflake rock


Rock painting is all the rage these days.  It’s fun to paint a rock with a positive message on the back and leave it somewhere for someone to find.  Then, they, in turn, leave it somewhere else.  Kids, adults, anyone can paint a rock.  The cost is minimal only requiring some paint and anything goes.  And this little snowflake rock is so easy and so much fun!

You can make your snowflake rock individual by varying the shapes and sizes of snowflakes.  Then to finish, write a simple word on the back.  I chose Joy, but you can use peace, kindness, snow, or any other positive word that fits the season.  They make a great gift as well to use as a desk decoration or paperweight!

Materials:

Rock
Acrylic paint, light blue, white
Tiny silver beads
E6000 glue
Pencil
Sharpie paint marker in black
Small paintbrush
Newspaper or something to protect your work surface

Instructions:

1.     Paint the entire front of the rock light blue, let dry and then turn it over and paint the back.


2.     Next, use a pencil to outline the snowflake.  First, draw a vertical line.  Then draw a horizontal line.  Finally, draw an x with two lines in the center.  


3.     Now, draw lines near the base, connecting the snowflake all around.  (See photo)


4.     To finish your snowflake pattern draw two lines on each spoke all around. (See photo)


5.     Use white paint to go over your pattern.  Let dry.


6.     Go over the snowflake for your snowflake rock a second time if necessary and let dry completely.


7.     Turn the rock to the back and using the pencil, write your message or word.  Then go over it with the black sharpie and let it dry.


8.     Use E600 glue to attach some tiny silver beads on the ends of each spoke. (Optional)  Let the glue dry. Your rock is ready to spread some kindness!


snowflake rock

Visit Make it easy crafts and again and please follow us on Facebook!