Showing posts with label kids. Show all posts

Friday, April 3, 2020

Five super simple upcycled crafts to turn trash into treasure

5 simple upcycled crafts


Since the coronavirus has a lot of people self-quarantined many are looking for things to do.  If you didn’t have time to go to the craft store to stock up on supplies, don’t worry.  You can create upcycled crafts with just ordinary stuff you find around the house and turn trash into treasure.

Just be creative.  If something calls for felt, substitute construction paper.  It’s all relative.  There are so many options.  

Most of these projects are great to make with bored kids.  Great for family time while we are all staying inside and safe. 


1.     Recycle advertising magnets into magnetic pets.  You can really have fun with these magnets.  Try using photos of friends and relatives in addition to pets.  If you don’t have double-stick tape, substitute some school or tacky glue spread thinly.

5 simple upcycled crafts


2.      Paint chip photo frame.  You might have some paint chip samples leftover from a painting project.  If you do, the color chips are super cut up and applied onto a frame. You can use a paper shredder to cut the strips or just cut them with scissors to vary the sizes.  Don’t have a frame, use some corrugated cardboard cut in a frame shape and apply the strips to that.

5 simple upcycled crafts


3.     Plastic bag friendship bracelets.  If you get the newspaper delivered many times during rain they come enclosed in plastic bags.  Don’t toss those bags, use them to make cool friendship bracelets.  This one uses a rattail ribbon, but you can easily substitute extra shoelaces, ribbon, strips of fabric.  Be creative.  It’s fun and easy and kids love them!

5 simple upcycled crafts


5 simple upcycled crafts


4.     Shrink an egg carton to make charms.  Remember shrinky dinks?  Well, did you know that any plastic container that has a #6 on it you can shrink to 1/3 of its size and the thickness of about a nickel.  A lot of egg cartons are listed number 6 so if you have one of these follow the tutorial and create all sorts of charms you can use for key chains, backpack charms, hair clips and more.  Remember only number 6 will work. 

5 simple upcycled crafts


5.     Cut up an old DVD and make a shiny mosaic Easter egg.  You can use paper mache eggs, plastic eggs, even Styrofoam eggs.  The trick is for this craft is that DVD’s have two layers, when you separate the layers they super easy to cut into pieces.  The pieces can then be glued onto an egg or other surface.  


Monday, December 11, 2017

How to make a sweet puppy card brooch for the holidays


Do your children need a cute little gift for the teacher this year?  Maybe you would like to make something special for a friend or co-worker.  If you are like me you get lots of cards in the mail and never throw any away.  They are just too cute, especially the puppies, kittens and other cute animals.  So this year, I grabbed a few simple supplies and made adorable a sweet puppy card brooch.  They were an immediate hit.  I mean who doesn’t love puppies or kittens? 

You can make some too and they cost practically nothing so when you need a few simple gifts they very budget friendly.  Simply look through old cards or new ones that you can pick up at the dollar store, or even samples you get in the mail.  Choose a small animal image, cut out and create your brooches.

Materials:

Christmas cards with puppies or kittens or any adorable animal
ModPodge Dimensional Magic
Stiffened felt in coordinating color
Scissors
Waxed paper to protect your work surface
Tacky craft glue
Pinback
Hot glue gun and hot glue sticks
Tiny bows, usually 10 in a package

Instructions:

1.     Find your image. Cut out your image. Use some tacky craft glue to attach the image to the stiffened felt and let dry. 


2.     Place your prepared image on some waxed paper.  Do not shake the ModPodge dimensional magic or you will have bubbles form.  Use the ModPodge dimensional magic to cover the image right up to the edges.  Let dry for several hours. 

3.     Now, add another coat of ModPodge dimensional magic up to the edges as you did before.  Let dry completely.

4.     Using the hot glue attach a little ribbon to the front of your brooch.


5.     Add a pin back on the back. 


We hope you enjoyed this simple and easy craft tutorial.  This is a super kid’s craft.  Kids just love when they something for their teacher or Grandma!  Visit Make it easy crafts again for more fun and easy DIY crafts! And please follow on Facebook, Pinterest, G+, twitter, and bloglovin.  We love comments.


Friday, December 1, 2017

How to paint a snowflake rock for the holidays

snowflake rock


Rock painting is all the rage these days.  It’s fun to paint a rock with a positive message on the back and leave it somewhere for someone to find.  Then, they, in turn, leave it somewhere else.  Kids, adults, anyone can paint a rock.  The cost is minimal only requiring some paint and anything goes.  And this little snowflake rock is so easy and so much fun!

You can make your snowflake rock individual by varying the shapes and sizes of snowflakes.  Then to finish, write a simple word on the back.  I chose Joy, but you can use peace, kindness, snow, or any other positive word that fits the season.  They make a great gift as well to use as a desk decoration or paperweight!

Materials:

Rock
Acrylic paint, light blue, white
Tiny silver beads
E6000 glue
Pencil
Sharpie paint marker in black
Small paintbrush
Newspaper or something to protect your work surface

Instructions:

1.     Paint the entire front of the rock light blue, let dry and then turn it over and paint the back.


2.     Next, use a pencil to outline the snowflake.  First, draw a vertical line.  Then draw a horizontal line.  Finally, draw an x with two lines in the center.  


3.     Now, draw lines near the base, connecting the snowflake all around.  (See photo)


4.     To finish your snowflake pattern draw two lines on each spoke all around. (See photo)


5.     Use white paint to go over your pattern.  Let dry.


6.     Go over the snowflake for your snowflake rock a second time if necessary and let dry completely.


7.     Turn the rock to the back and using the pencil, write your message or word.  Then go over it with the black sharpie and let it dry.


8.     Use E600 glue to attach some tiny silver beads on the ends of each spoke. (Optional)  Let the glue dry. Your rock is ready to spread some kindness!


snowflake rock

Visit Make it easy crafts and again and please follow us on Facebook!


Monday, October 9, 2017

How to paint this super fun star quilt rock

star quilt rock


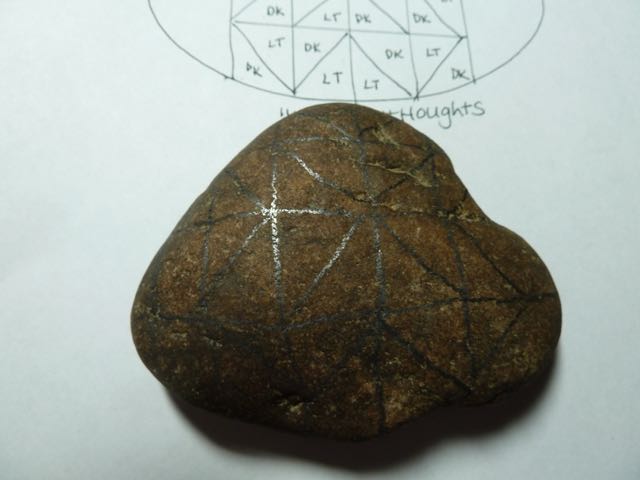
Warm up to this super fun star quilt rock.  It’s easy to make this rock and then put your “warm thoughts,” on the underside and leave it for someone to find.  It’s easy to paint and kids will love to vary the colors of the quilt.  Simply follow the diagram painting all the dark sections first and then follow with the light ones.  After you have finished your quilt leave your positive message on the back!  Kindness rocks! 

Materials:

Rock
Acrylic paints, burnt sienna (dark), Yellow ochre, (light) and red.  (I’ve used fall colors but you can substitute if you wish)
Small paintbrush
Black sharpie marker
Black extra fine marker
Palette or paper plate
Pencil

Instructions:

1.     First, use the pencil to mark off lines for the squares on your rock.  The lines don’t have to be perfect.  Then, make diagonal lines on the squares following the diagram.  Don’t worry about the ends since they will just be one solid color.


2.     Next, paint the underside of the rock yellow ochre and let dry.


3.     Now using the small paintbrush, paint the dark diagonal areas first and let dry.


4.     Next, paint the light color diagonal areas and let dry.

5.     Depending upon your rock you may want to add a second coat and let dry.

6.     When the rock is dry, use the wood end of the paintbrush dipped in red paint to make dots on all the yellow ochre. (Light areas)  Continue till you have added dots on all the light diagonal lines.


7.     Finally, use the black sharpie marker to outline all the lines.


8.     Use the extra fine marker to make stitch lines on the black sharpie lines. (See photo)


9.     Turn rock over to the solid side and paint your message.  After you’ve painted it use the wood end of the paintbrush to put dots on the letters.  Let it dry and leave the rock in a park, store, sidewalk and more for someone to find and make their day warmer, and brighter!


Diagram for painting

Check out some of our other rock painting tutorials like this Leaf rock!
Thanks for your visit and we'd love to hear your comments!


SaveSave