Monday, November 28, 2016

How to make quick and colorful aquarium gravel earrings

aquarium gravel earrings


Make these aquarium gravel earrings, then just sit back and enjoy the compliments!  You can make an inexpensive jewelry gift this Christmas using unusual supplies. The results are super unique and definitely won’t break the bank!

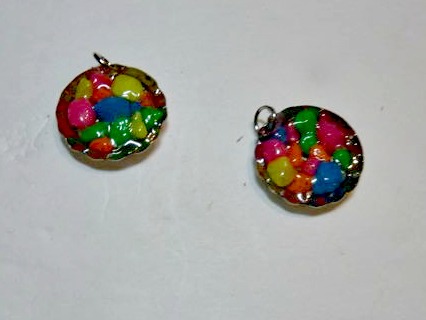
Use clear dimensional glue and various colored aquarium gravel to make a pair of elegant aquarium gravel earrings in any color you desire.  I used sterling silver jewelry findings readily available in the craft stores but you can substitute nickel free versions if you desire.  Be ready for everyone to ooh and aah and be amazed at how you created them!  Who says jewelry has to be ordinary?  These aquarium gravel earrings are the perfect gift teens and that unique adult on your gift list.

Handmade gifts are always a hit since you are giving not only a personalized Christmas present, but are also gifting from the heart.

Materials:

Aquarium gravel in any color or combination of colors you desire
Clear dimensional glue (I used dimensional magic)
Tacky craft glue
Tweezer
Small bottle cap bevels
Jump rings
Fish hook ear wires
Needle nosed pliers

Instructions:

1.     First, gather all your supplies.  Add a bit of tacky craft glue in the center of your bevel.  Use tweezers to pick up and add the small colored gravel pieces in the glue and let it set for a few minutes.

aquarium gravel earrings

aquarium gravel earrings

aquarium gravel earrings

aquarium gravel earrings


2.     Next, slowly add some of the dimensional glue on top of the glued gravel.  Do not shake the dimensional glue so you don’t get any bubbles.  Fill the bevel to the edges.  Set aside to dry. (I like to give it at least 24 hours)

aquarium gravel earrings


aquarium gravel earrings

3.     Now that your dimensional glue has dried, you will need to add the jewelry findings. 

4.     First using the needle nosed pliers, twist to open a jump ring.  Add to the bevel.  Then add another jump ring if necessary to assure that when the fish hook ear wires are added they are facing the correct direction.

aquarium gravel earrings


5.     Add the ear wires and close the jump ring with the same twisting motion.

aquarium gravel earrings

6.    That's it!  Wasn't that super easy?  You can purchase earring cards at the craft store for a professional look.


aquarium gravel earrings


Monday, November 21, 2016

Download these free printable doggie coloring gift tags


Christmas is coming and you can label all your gifts with these doggie coloring gift tags. 

Adult coloring is all the rage these days and these free downloadable doggie coloring gift tags are a great way to label your gifts.  Dog lovers will love these tags and you can color them in their favorite colors.  It’s also fun for kids, keeping them busy while you wrap. 

Simply download the free doggie coloring gift tags and print them on white card stock in your home printer.  Cut out the tags, punch a hole in the top center with a paper punch and add a gold cord. 

Optional:  Color the tag in and add the names to and from, (Ex: To: Pet’s name, From: Santa) Use some self stick laminating film to cover, add the gold cord to hang and hang on the tree for a lasting personalized Christmas ornament!

Materials:

Paper punch
Gold cord
Colored pencils or markers
Optional self-stick laminating film
White card stock
Home printer

Instructions:

1.     Download the doggie coloring gift tags printable.

2.     Print on white cardstock.  Color with fine lined markers or colored pencils

3.     Use a paper punch to make a hole in the top center of tag.  Thread some gold cord through for hanging.  Add names and use to tag all your gifts.


Monday, November 14, 2016

How to make an adorable angel from an old CD


Adorable angel from an old CD


Did you know that you could use one of those forgotten and tossed aside CD’s to make this adorable angel!

Use this adorable angel on your tree and watch the colors of the room dance and flash every time the light hits them.  Or you can use the angel as an extra package decoration on your presents as an extra little gift! 

All you need to create this angel is a wood-burning tool (think summer camp) or hot stencil cutter and a piece of glass from an old picture frame. 

Adorable angel from an old CD


Materials:

Old cd
Wood-burning tool or hot stencil cutter mutlti-tool
Sharpie marker
Glass from old picture frame (to work on)
22-gauge wire
E6000 glue
Gold acrylic paint
Small paintbrush

Instructions:

1.     Download and print the angel pattern pieces.  After you print the angel pattern cut out all the pieces and use them to trace around the front with the sharpie marker on the printed side of the Cd. For each angel cut one body piece, one wings piece, and two hand pieces.  Turn one hand piece over so that it faces the opposite direction.  When you put them together they will look like they are praying.

Adorable angel from an old CD

Adorable angel from an old CD


2.     After you transfer all the patterns on the CD place it on the piece of glass. Using the wood-burning tool carefully go around, cutting each piece.  Work slowly and let the tool do the work.  After you have completely gone around the pattern the piece will easily pop out. Continue until you have all the pieces ready.

Adorable angel from an old CD


Adorable angel from an old CD


Adorable angel from an old CD

3.     First place some glue along the bottom edge of the wings and attach to the back of the body.  Next, use a small amount of glue to attach the hands on each side.  Let the glue dry.

Adorable angel from an old CD

Adorable angel from an old CD

Adorable angel from an old CD


4.     After the glue has set, make a ring with the wire and use some glue to attach to the back of the head for the halo.

Adorable angel from an old CD

Adorable angel from an old CD

5.     Then set the angel aside till all the glue dries completely. 

6.     Finally, Apply two coats of gold acrylic paint to the back of the angel letting it dry between coats. 

Adorable angel from an old CD

Adorable angel from an old CD

Adorable angel from an old CD

7.     Enjoy your adorable angel!

Adorable angel from an old CD

Adorable angel from an old CD


Thursday, November 10, 2016

Easy to make quick and yummy jalapeño poppers

Yummy jalapeño poppers


With the holidays right around the corner quickly whip up some of these yummy jalapeño poppers to snack on before the main course. 

If your guests aren’t into spicy snacks then you can just mix up the filling, add a 15-ounce jar of mild salsa.  Heat it up until the cheese melts in the microwave and you have a delicious sausage Queso for tortilla chips!

If you have guests with meat or meat preferences, change it up by using chicken or meat free sausages.

 Yummy Jalapeño poppers
 

1 lb. Hot Italian sausage
1 8-ounce brick of cream softened
Cup of sharp shredded cheddar cheese
12-15 Jalapenos, halved and seeded
Green onions, chopped
15 oz. jar of mild salsa (for queso option only)

Preheat oven to 425.  In a skillet, cook sausage over medium heat till browned.  Drain the grease.  In a medium bowl mix sausage, cream cheese, cheddar cheese and onion together until well blended.

Next, spoon the sausage mix into the jalapeno halves.  Place on a cookie sheet and bake for 20 minutes in the preheated oven, till brown and bubbly.

Garnish with some more chopped green onions add to a decorative platter and serve.

Yummy jalapeño poppers


For the queso option, add the jar of salsa to the filling, stir and heat in a microwave till it’s hot and bubbly. Serve with chips.

Visit Bowdabra blog for more dinner easy recipes and crafts!