Showing posts with label Gift wrapping. Show all posts

Friday, August 21, 2020

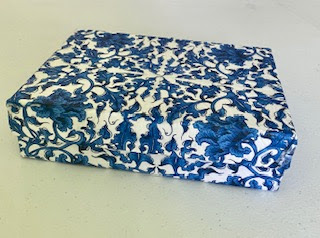
How to upcycle a subscription box with decoupage


upcycle a subscription box


How to upcycle a subscription box with decoupage


Many people are enjoying internet subscription boxes whether it is for makeup, supplies, just about anything.  A lot of these subscriptions arrive in sturdy two-piece boxes that would be a shame to toss.  What can you do with them?  Well, they make wonderful gift boxes and decorative storage for small items in your home.  


Using a printed paper napkin of your choice and some ModPodge decoupage medium you can transform these boxes into amazing gift boxes and more for almost zero dollars!  Christmas is right around the corner and these would be a perfect no-wrap addition to your holiday gift-giving.


Note: Please be advised that Plaid Enterprises, Inc. has compensated Make it easy crafts by furnishing Plaid product at no charge in connection with this post.


Materials:


A subscription box with cover

Gesso or white paint

Paintbrush

ModPodge decoupage medium

Printed napkin

Ruler, scissors

Ribbon

Hot glue gun and hot glue


Instructions:


First, gather all your supplies.  Next, cover your work surface.  Then, use the paintbrush and some Gesso or white paint to cover the writing or advertising print on the top and sides of the box.  You may want to paint the entire box top and bottom.  Set aside and let dry completely.


upcycle a subscription box


Choose your napkin and then, remove the extra layer.  You may have to cut a piece to see where it can come apart.  Most napkins have a print layer and a solid layer.  Discard the solid layer.


Now measure and cut strips and pieces to fit on all sides of the box.  Cut pieces for the top, bottom, sides, etc.  Work on one section at a time taking care not to touch the wet areas with your fingers, only use the brush for placement. 


Using the ModPodge brush a thin layer of medium on each area attach the corresponding napkin pieces and then immediately brush a layer on top. Work all around the box adding pieces of the napkin.  Let dry


upcycle a subscription box

upcycle a subscription box


When the entire piece is dry, brush a thin layer of ModPodge over every area and let dry completely.


Draw a bead of hot glue over the top of the box sides and attach a strip of decorative ribbon all around.  The subscription box is now ready to enjoy anew!


upcycle a subscription box

upcycle a subscription box

Check out all the other decoupage and various craft tutorials on Make It Easy Crafts today!


Tuesday, November 21, 2017

How to make amazing dimensional gift bags quick and easy

dimensional gift bags


Black Friday comes and goes.  And you’ve bought a few gifts you will want to come home to wrap them before anyone sees them.  What happens when the gifts are small and hard to wrap?  You grab a gift bag, right?  Well, you can make several dimensional gift bags in minutes that will definitely be a showstopper! 

These dimensional gift bags are quick and easy to make using some elements cut from Christmas cards and then embellished with little extra touches.

I always buy my Christmas cards through the mail and in the months that precede the holiday I receive stacks of samples with just the covers to choose from.  I would never throw them away and that is how the dimensional gift bags came about.  You just need at least two card fronts that are identical.  If you don’t get card samples just use an inexpensive pack of cards that are all the same for your dimensional gift bags.

Materials:

Two Christmas card fronts with individual elements you can cut out
Small sharp pointed scissors
Dimensional foam circles
Gift bags (I purchased a pack of 10 for under $5) or you can even use a plain recycled store bag and cover the logo with your image
Tacky craft glue
Small bows, rhinestones, jewels, pompoms or any coordinating embellishment
Dimensional fabric paint – Crystal sparkle

1.     Gather your supplies. Carefully, cut out both chosen images from the card fronts.


2.     Spread some tacky craft glue on the back of one of the images.  Center the image on the bag and attach. 


3.     Next, remove the paper from the double-sided sticky surface on the foam circle and attach to the image on the bag.  Add them all around randomly.  I like to add a second foam dot on top of the first one for extra height.  You can if you desire, use only one.


4.     Now, remove the paper from the dots and add the second image on top of the first one making sure you line it up evenly.

5.     Then, add the embellishments with some tacky glue and let dry. 


6.     Use the crystal sparkle dimensional fabric paint to accent the image.  Let dry.


7.     Add the gift to your bag and you will be sure the gifted recipient will save it and re-use it for years to come.

We would love to hear your comments and hope to see you again at Make it easy crafts.  Please follow us on Facebook 

Wednesday, December 21, 2016

Use extra Christmas cards make an awesome 3-D gift bags

3-d gift bags


Aren’t these 3-D gift bags adorable?  Each year I order my Christmas cards from an online retailer.  In the months leading up to the holiday they send packs of sample cards.  They are not usable since they are just the cover of the cards and have writing on the back but I just can’t throw them out!  So I use the images on the front of the cards to make cool 3-D gift bags! 

All you need are some double-sided sticky dots and two card images that are the same.  You won’t be able to stop making these little bags and it’s a great craft for kids to do as well.  Plus you are upcycling something and putting it to good use!

Materials:

Two Christmas card fronts with duplicate images
Glue stick
Gift bag
Small pointed scissors
Glue raised double sided sticky dots

Instructions:

1.     Choose an image from the cards that you like.  The images must be exactly the same for the 3-D effect to work.  Carefully cut around your images.  (You may use several images if you desire you just need two of each)


2.     Use a glue stick to apply glue to the back of one of the images and attach it to the gift bag. 


3.     Next, apply the double-sided sticky dots onto the back of the second image.  This will raise your image to give it a 3-D look.


4.     Now align your second image exactly on top of the first image, remove the backing paper from the dots and attach to the second image.  You bag now has a 3-D appearance.  You may attach other smaller images around the first on if you choose to create scenes. 


5.     Fill the bag with small gifts, candies.  This makes a great gift for teachers, mailmen, and many others.


Monday, December 12, 2016

How to make a pillow look like a beautiful gift pillow

gift pillow


When you are decorating for the holidays use the Bowdabra to make any pillow look like a beautiful gift pillow!  It’s so easy to make a removable package bow which when you attach it to your pillows will make it look exactly like a beautiful gift pillow.

It also is a great way to give a beautiful gift pillow to someone on your list.  Simply purchase a new pillow in a holiday solid color and make the removable package bow.  And no sewing is involved!  Give the pillow to the person of your choice and you won’t have to use any wrapping paper!  Easy!

Materials:

1 ½” wide Christmas ribbon, wired and preferably foiled and not glitter since glitter will get all over everything
Pillow of choice
Bowdabra bow maker
Bowdabra bow wire
Tape measure
Scissors
Hot glue gun and hot glue sticks
Iron on hook and loop tape (Velcro)

Instructions:

1.     Use the tape measure to measure around your pillow vertically.  My pillow was 35 inches.


2.     Cut the ribbon 35 inches long.  Glue it end to end with the hot glue gun.  Slip the pillow in the loop to make sure it fits snuggly but not too tight.


3.     Next cut another length of ribbon 37 inches.  Run a lighter over the ends to keep them from fraying. Fold it to find the center and attach it with some hot glue to the center of the loop you made.  You will have two lengths of ribbon on each side. 


4.     Now, insert the pillow through the loop. Then wrap these two loose lengths of ribbon around to the back of the pillow. Make sure the ends have a little overlapping margin. (This is where you will attach the hook and loop tape)


5.     So now follow the manufacturer’s instructions to iron on the corresponding hook and loop tape pieces on each of the ends of the ribbon. Make sure they are the right sides and attach correctly.  You have the package ribbon and will now make the bow for the center.


6.     To make the bow for the center, cut a piece of Bowdabra bow wire 18” long.  Fold the wire in half and insert into the Bowdabra.  You will have a loop on one side and two loose wires on the other.


7.     To make the bow tail, place the ribbon into the Bowdabra several inches up from the end.


8.     Fold the ribbon to form your first loop. (if your ribbon is not the same on both sides you will have to twist as you insert the loops) Continue folding and twisting the ribbon to form additional loops. Mine was five loops on each side.


9.     Scrunch down with the Bowdabra wand.  Insert the two loose wire ends through the loop and pull tight while the bow is still in the Bowdabra.  Remove the bow, turn to the back and tie a knot.  Fluff and arrange the bow.


Attach the bow to the center of the ribbon package loops with some more hot glue.  Use the Velcro closures in the back to put on or remove from your pillow.


Bowdabra bow makers are readily available online or at most major craft and discount department stores.