Showing posts with label Decoupage. Show all posts

Monday, November 2, 2020

How to use a holiday napkin to make amazing seasonal glass décor


 Did you know that ModPodge comes in a dishwasher safe formula?  And did you also know that you can use a holiday napkin to make amazing seasonal glass décor?  All sorts of holiday napkins are readily available at craft and party stores throughout the holiday seasons.  I found the most beautiful fall leaves accented with gold that is perfect for Thanksgiving.  


You can also use Christmas, New Year’s, Patriotic, Easter, and more napkins when they are available.  And if you use ModPodge dishwasher safe you can put your glassware on the top shelf of the dishwasher or hand wash as needed.  


Note: please be advised that Plaid Enterprises, Inc. has compensated Make it easy crafts by furnishing Plaid product at no charge in connection with this post.


Seasonal decor


Materials:


Glassware, plates, wine or beverage glasses, canning jars, etc.

Napkins in desired prints

Gold leaf pen

alcohol

ModPodge dishwasher safe formula

Small paintbrush


Instructions:


First, choose your napkin.  Then, separate the layers of the napkin so that you are only using the printed piece. 


Seasonal decor

Seasonal decor


Next, choose your clear glass item.  For plates and dishes make sure the right side of the napkin is showing through the glass, so you will have to apply the ModPodge to the wrong side of the napkin.  If using beverage or wine glasses, apply the napkin right side up on the outside of the glass, but about an inch or so from the rim so that your lips will only touch the glass when using.


Seasonal decor


Now, measure and cut the right size for the area you are covering with the napkin.  Then, using the small paintbrush, liberally apply some ModPodge to the surface.  Immediately place the prepared napkin piece.


Next, brush a coat of ModPodge on the napkin.  Wrinkles are fine and give the piece added texture. Let it dry for a couple hours and then apply two more coats of the ModPodge as necessary.  Let dry completely.  It will be dishwasher safe or you can hand wash after it cures for about 28 days.


Seasonal decor

Seasonal decor


Friday, August 21, 2020

How to upcycle a subscription box with decoupage


upcycle a subscription box


How to upcycle a subscription box with decoupage


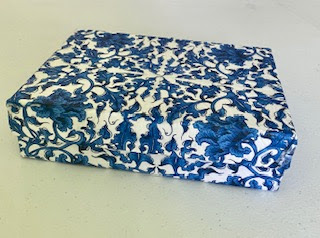
Many people are enjoying internet subscription boxes whether it is for makeup, supplies, just about anything.  A lot of these subscriptions arrive in sturdy two-piece boxes that would be a shame to toss.  What can you do with them?  Well, they make wonderful gift boxes and decorative storage for small items in your home.  


Using a printed paper napkin of your choice and some ModPodge decoupage medium you can transform these boxes into amazing gift boxes and more for almost zero dollars!  Christmas is right around the corner and these would be a perfect no-wrap addition to your holiday gift-giving.


Note: Please be advised that Plaid Enterprises, Inc. has compensated Make it easy crafts by furnishing Plaid product at no charge in connection with this post.


Materials:


A subscription box with cover

Gesso or white paint

Paintbrush

ModPodge decoupage medium

Printed napkin

Ruler, scissors

Ribbon

Hot glue gun and hot glue


Instructions:


First, gather all your supplies.  Next, cover your work surface.  Then, use the paintbrush and some Gesso or white paint to cover the writing or advertising print on the top and sides of the box.  You may want to paint the entire box top and bottom.  Set aside and let dry completely.


upcycle a subscription box


Choose your napkin and then, remove the extra layer.  You may have to cut a piece to see where it can come apart.  Most napkins have a print layer and a solid layer.  Discard the solid layer.


Now measure and cut strips and pieces to fit on all sides of the box.  Cut pieces for the top, bottom, sides, etc.  Work on one section at a time taking care not to touch the wet areas with your fingers, only use the brush for placement. 


Using the ModPodge brush a thin layer of medium on each area attach the corresponding napkin pieces and then immediately brush a layer on top. Work all around the box adding pieces of the napkin.  Let dry


upcycle a subscription box

upcycle a subscription box


When the entire piece is dry, brush a thin layer of ModPodge over every area and let dry completely.


Draw a bead of hot glue over the top of the box sides and attach a strip of decorative ribbon all around.  The subscription box is now ready to enjoy anew!


upcycle a subscription box

upcycle a subscription box

Check out all the other decoupage and various craft tutorials on Make It Easy Crafts today!


Wednesday, July 18, 2018

How to make a quick and easy doggy treat jar


Updated July 2018

Make this quick and easy doggy treat jar for your best friend.  If you are like me you have little bags of treats all over the place.  Sometimes those zippers just don't seal well and you end up with stale and hard treats.  You don't want your little prince or princess to turn up his or her nose at them.  

So, you can quickly make a personalized treat jar using a simple wide mouth jar some photos of your pet and decoupage glue. You can purchase a jar at the dollar store or even recycle a clear food container.  Easy, inexpensive and so much fun.

You will need:

·      Glass or recycled plastic wide mouth jar (I found one for under $3.00 at Target)

·      Decoupage glue (I use Modpodge available in craft stores)

·      Small paintbrush

·      Computer and printer with all-purpose paper

·      Photos of your dog

1.     Prepare your jar.  If there is a label on a recycled one simply soak it off in some warm water.  If the surface is sticky from the label, rub some peanut butter on it, wipe it off and wash it. Rub down the jar with alcohol.

2.     Load your desired photos onto your computer and put them all in a strip collage using your favorite photo editing program. (This way the photos are all one size).  Simply add the photos and print on all-purpose paper.  You may need a couple strips depending upon the size of your jar.


3.     Cut out each photo.  On a curved surface it is easiest to add the photos one at a time smoothing out any wrinkles with your fingers. (Don't smooth them all out though, wrinkles give it character) It may get a little messy but it washes off your hands easily. Using the small paintbrush apply some decoupage glue on the jar where you would like your photos to go. Press the photos on the wet glue area one at a time. Add a generous amount of decoupage glue on top of the photos.  Keep adding until you have added all the photos you want and let it dry.


4.       Brush a coat of decoupage glue over all the photos one last time and let dry.


5.     Fill with treats and let your pups enjoy their new jar!


Note:  Decoupage glue dries clear.  

Monday, September 11, 2017

How to easily decorate a special rock with decoupage or paint


Painting rocks are all the rage at the moment, but I've been painting and decorating rocks for ages.  When I travel out of state or country I skip the gift shops with their souvenirs often made in China. Instead, I pick up a local rock.  This special rock is actually a piece of your trip. It doesn't have to be large, just large enough to paint or decoupage on.

So for a real souvenir of your travels, pick up a rock, paper, and scissors and you will be all set.  If you are not into decorating rocks, shells or driftwood works just as well.

If you choose to paint your rock instead of decoupage, simply use a small paintbrush and acrylic paints of your choice. What a great way for kids to create a very special rock!


You will need:

Rock, shell, or driftwood in your choice of size

Modpodge decoupage glue (You can use outdoor modpodge if your rock is large and you want to display it outdoors)

Sharpie marker

Computer and printer

Scissors

Small paintbrush

Waxed paper

1.     Wash and dry the rock.  Gather your supplies and cover your work surface with some waxed paper. Use your printer to print an image that represents the area or an even a small personal photo on all-purpose paper.  Carefully cut out the image. (I like to use the state seals)


2.     Brush some Modpodge glue generously on the flattest side of the rock.  Place the image on the glued area and brush some more glue on top.  Let dry.  When dry brush another coat over entire rock.  Let dry. The glue dries clear.


3.     When the glue has dried use a sharpie marker to write the place and date on the rock.  You can also write a small quote if you wish.  You can write on the back or the bottom optionally.  Brush another coat of Modpodge glue on the writing to protect it.


Note:  You can also use personal vacation photos, tickets, images cut out from travel pamphlets.  The sky is the limit for personalization! When you have finished you will have a lasting memento of your travels that is actually a piece of the place.

I'd love to hear your comments!  And be sure and stop by Make it easy crafts again and say hello!


Saturday, June 17, 2017

How to easily turn junk mail into a cute wastebasket


If you have a lot of junk mail lying around instead of tossing it in the wastebasket, try putting it on the wastebasket!  This cute wastebasket is so easy to make with some Modpodge decoupage glue, some strips of junk mail and a little time. 

When you are done you will have a colorful quilt-like and very cute wastebasket!  The paper may wrinkle a bit when you add the strips. The wrinkled look adds texture and gives it a quilt-like appearance.  So much fun that you can even get the kids involved! 


Materials:

A small round wastebasket, any color

A pile of junk mail, flyers or advertising media

Tacky craft glue

Scissors or paper cutter

Mod Podge decoupage glue

Paintbrush

Turn ordinary junk Mail into a cute wastebasket


1.     Cut the junk mail into strips.  Vary the thickness but a good start is ¼”.  It is easier if you stack them together and cut the strips with a paper cutter but you can use scissors.  You can even use a shredder.


2.     Spread some tacky glue around the edge of the wastebasket.  Begin adding strips around.  Overlap and connect each strip.  Continue adding glue and strips working your way down the wastebasket.  If a strip doesn’t meet connect with smaller strips.  Being perfect doesn’t matter and you can’t do it wrong.  Let dry.  You may notice that the strips may wrinkle slightly; this is desirable since it adds texture to the wastebasket.  You can smooth the wrinkles down with your fingers if desired.


If strips don't meet cut smaller pieces to connect


3.     When the wastebasket has dried use the paint brush to spread some Gloss Modpodge over the entire surface and let dry.


Friday, March 31, 2017

How to Make your own fun designer shoes with napkins


The designer shoe tutorial, created with napkins was one of my most popular posts several years ago.  In case you missed it, I'm re-posting a new version.  By the way my shoes are still beautiful four years later and I can't wear them anywhere that I don't receive some compliments. 


So I'm sure you've seen all the designer shoes in the magazines.  They are embellished with colors and flowers and jewels.  Did you know with a just few supplies and some floral napkins, you can make your own individual, one of a kind designer shoes.  And you are the designer!  It's really quite easy to apply the cut out from a simple napkin with decoupage glue (available in every craft store) Finish with a final coat and you are ready for Easter or any event.

Don't stop with just napkins though.  Even though the flower shoes are so cute, you can even add jewels with some hot glue, for further embellishment.  So let's get started!  You may even want to try this technique with older shoes to up-cycle a favorite pair that needs a little oomph.


Pair of white shoes (I used white but other colors will work with equally wonderful results)

Napkins with flower prints (look for ones that you can cut the flowers out individually, party stores are a great source)

Mod Podge exterior decoupage glue

Small paintbrush

Small pointed scissors

1.     Separate all layers of the napkin leaving only one top layer.  


2.     Use the small pointed scissors to cut out individual flowers to apply to the shoes.  Cut more flowers out as you need them.


3.     When you have cut out quite a few flowers, use the small paintbrush to apply some Mod Podge to the shoe, immediately apply a cut out napkin flower.  Apply some more Mod Podge on top of the flower you just applied.  Continue applying glue, flower and glue in a pleasing arrangement until you have covered the entire shoe.  If there are any folds in the shoes use the paintbrush loaded with Mod Podge to tuck them in nicely.


4.     Repeat steps 1-3 for the other shoe.  Let dry overnight.

5.     Apply another coat of Mod Podge glue on top of both shoes and let dry at least 24 hours.


Thursday, September 1, 2016

How to easily make an attractive apple cider vinegar bottle


You can easily make an attractive apple cider vinegar bottle for yourself or as a hostess gift. 

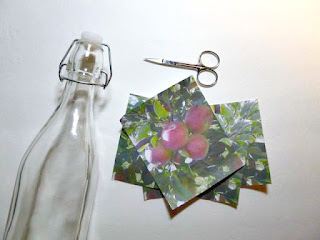
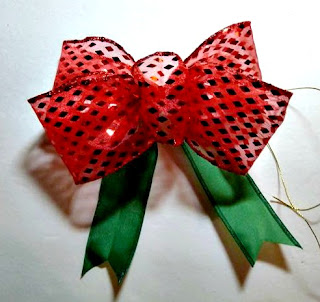
Decoupage has been around for a long time and if you haven’t tried it, you are missing some great crafting fun.  Bottles of all shapes and sizes are showing up in the craft stores now and they make great surfaces for decoupage.  The bottle I picked up recently is on its way to being a beautiful and unique apple cider vinegar bottle.  Add a beautiful Bowdabra bow and present it to your hostess at your next get together!  Bowdabra bow makers are available at all major craft retailers and online.

To get the apple photos for your decoupage project simply go online and search for public domain pictures.  Find some apple photos you like and print on all-purpose paper.

Materials:

Mod podge decoupage glue
Small paintbrush
Photos
Scissors
Bottle with stopper
Mini Bowdabra bow maker with ruler attachment
12 inches green 1 ½” wide wired ribbon
36 inches red 2 ½” wide wired ribbon
18” Bowdabra bow wire
Printer and all-purpose computer paper
Alcohol

Instructions:

1.     First wash and then wipe the outside of your bottle with alcohol to remove any dirt and oils.


Apple cider vinegar bottle


Apple cider vinegar bottle

2.     Next, search public domain pictures on the Internet to find an apple photo you like.  Print the photo in a workable size.  I printed mine at 4 x 6. 

Apple cider vinegar bottle

3.     After you print your photo, cut around the leaves and apples with small scissors in a pleasing configuration.

Apple cider vinegar bottle


Apple cider vinegar bottle

4.     Now apply some decoupage glue with a small paintbrush on the front of your bottle.  Immediately place the image on the glue.  Then brush on some more glue on top of the image and over the edges.  (The glue dries clear)
Apple cider vinegar bottle


Apple cider vinegar bottle

Apple cider vinegar bottle


5.     Add another coat of glue to the top and on any areas that are not laying flat.  Use the brush to press the image on the bottle.  Let the glue dry completely.

Apple cider vinegar bottle

Now make the Bow


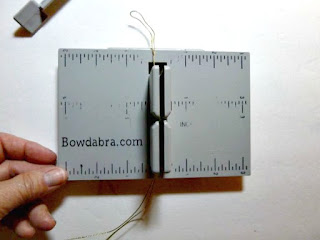
6.     First cut a piece of Bowdabra bow wire 18”.  Fold in half and insert into the Bowdabra.  You will have a loop on one side and two loose wires on the other.  Fold the wires under the Bowdabra to keep out of the way while you are working.

Apple cider vinegar bottle

7.     Now take the green ribbon, and find the center and insert into the Bowdabra. 

Apple cider vinegar bottle

8.     Next place the end of the red ribbon into the Bowdabra and make a loop to the 3-inch mark on the ruler. Twist the ribbon as you insert it into the Bowdabra to make sure the right side is facing up and make a matching loop on the other side.

Apple cider vinegar bottle

Apple cider vinegar bottle

9.     Twist and make another loop.  On the last loop bring the end under and insert into the Bowdabra.  Continue and make the last loop.  You will have a little loop facing to the right, which will be your round center of the bow.

Apple cider vinegar bottle

Apple cider vinegar bottle

Apple cider vinegar bottle


10. Scrunch down with the Bowdabra wand. Insert the two loose wires through the loop and pull tight while the bow is still in the Bowdabra.  Remove from the Bowdabra, turn to the back, separate the wires and tie a knot. 

Apple cider vinegar bottle

Apple cider vinegar bottle

Apple cider vinegar bottle


11. Lastly, fluff the bow and poof out the center.

Apple cider vinegar bottle


12. For the final touches, use the extra wire to tie the bow to the bottle. Fill with flavored vinegar or apple cider vinegar and display or give as a unique hostess gift.


Apple cider vinegar bottle