Showing posts with label Painted wine glasses. Show all posts

Tuesday, September 5, 2017

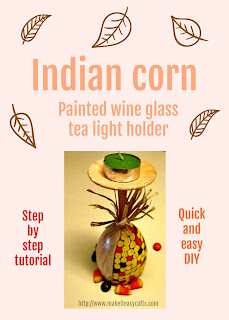
How to make an easy indian corn tea light holder

Indian corn tea light holder


      So it’s almost fall, my favorite time of year.  Who doesn’t love the crisp morning air, the pumpkin spice everywhere you look, and the colors of the season?  It is the perfect time to paint an Indian corn tea light holder on an upside down wine glass! 


      It's so easy to paint this cute Indian corn tea light holder!  Decorate it with some raffia and simply add a flameless or regular tea light candle for a décor piece that everyone will love!

Supplies:


Small and medium sized paintbrushes

Gloss acrylic paint, tan, gold, yellow, lt. yellow, red, purple, white, sienna, and orange

Brown sharpie marker

Raffia

Tea Light

Waxed paper or cardboard to protect your work surface

Alcohol

Paper towels

1.     Wash and wipe down your wine glass with a paper towel and alcohol.


2.     Using the brown sharpie marker, make a mark from the base of the stem to the rim on each side.  In essence you are marking half your wine glass.  


3.     On one side begin making small circles across with the marker continue making circles across and down until you reach the rim.  These are the Indian corn kernels.  See photo.  You will use these guidelines much like a coloring book and fill them in individually.


4.     Using the larger paintbrush and the tan gloss paint, cover the side that is not marked with kernels brushing with a downward motion.  Continue with tan on the stem and the base.  Let dry.  Turn rim side down and paint the bottom with tan and let dry.  Repeat with second coat.  When the second coat is dry, make some downward marks with sienna and white for a textural effect.  Repeat this step on the bottom of the base (which will be the candle holder) but brush the sienna and white in a spoke like pattern.


5.     Using the marks you made for kernels begin filling each one individually with the smaller paintbrush.  Use yellow, orange, purple, and red, varying the locations until you have filled in every one to the bottom.  Let dry and repeat with a second coat.


6.     Cute a 12-inch piece of raffia.  Cut and tie a six-inch piece of raffia onto the longer piece.  Continue adding raffia pieces until you have about six.  Trim up the ends.


7.     Tie the raffia strip with the fringe on the stem.  (See photo)


If you don't like how your marks are coming out when marking your glass, simply rub with some alcohol and start over.

Thursday, May 28, 2015

4 painted wine glass tutorials


So you think you can’t paint?  You may think these wine glasses are difficult to create, but think again! You can paint these beautiful wine glasses for all your summer parties, weddings, and birthdays. The tutorials take you step by step all the way to the beautiful finished wine glass. They make wonderful gifts and it’s never too early to think about Christmas. Since you paint on the outside of the glass in layers, when you look inside the glass you will see the inside of the flower!  Just click on the photos for the tutorial.  If you have any questions feel free to contact me.

 Blue flower painted wine glass


Fourth of July patriotic floral wine glass


White floral wine glass


Red Day lily painted wine glass


Wednesday, January 21, 2015

Red Floral Valentine's Day painted wine glasses


February is almost here.  Soon Valentine's Day will be here and the color red is kind of the color the day.  Wouldn't these Red daylily wine glasses be gorgeous as you raise a toast to your true love?  I happen to be one of those sappy individuals who got engaged on Valentine's Day and I've been happily married ever since.  So get those paintbrushes ready, set, go...

Materials:

Acrylic gloss paint (It will say it’s for glass on the label) Red, black, yellow, lt. green

Wine glasses

Alcohol

Paper towels

Liner brush

Flat brush

Tape measure and clear tape

Cotton swab or toothpick

Paper plate or palette to hold your paint

Home oven and cookie sheet

1.     Wash and dry the wine glasses.  Wipe down the glasses with alcohol to remove any residue, oils or finger marks.


2.     Wrap the tape measure around the bowl of the glass.  Attach with clear 
tape.  Thin some red paint with water and make dots two inches apart for a total of six. (My wine glass was 12 inches in circumference.  If yours is smaller make allowances for six equal sections. Remove the tape measure. Using the thinned paint make petal shapes using the dots as guides.  It is not important to be perfect since flower petals are not perfect.


3.    Turn the glass over and work on the outside bottom of the glass.  Use the liner brush with black paint to make dots on the bottom of the bowl, a bit down the stem and some on the lower petal areas.  Let dry.  Add some black lines in between the dots.  (See photo) Let dry.


Inside of glass view


Inside of glass view

4.     Load the liner brush with yellow paint and add some longer yellow lines in between the black dots.  (See photo)  Do this in every petal space.  


Inside of glass view

5.    Paint the entire bottom black.  This will make the center of the flower appear darker on the inside of the glass.  Let dry.  


6.    Load the flat brush with red paint and fill in the first petal right over top of the dried dots and lines.  Continue with red paint filling in the second petal, but before the paint is dry, dip a corner of the flat brush in black paint and use it sideways to darken the area between the petals.  Rinse and dry your brush.  Continue making petals in this manner till you have filled in all six petals.  Let dry.


7.    Repeat step six for a second coat. Let dry.

8.    Paint the stem lt. green and let dry completely.  If you make any mistakes you can easily fix it with a cotton swab and alcohol or scrape it with a toothpick.  The paint is not set until you bake it.


9.    Place your wine glasses on a cookie sheet and put in a 350-degree oven for 30 minutes.  Let cool in the oven before removing.  (Don’t worry it won’t melt)