Friday, October 18, 2013

Fall leaves silverware pocket tutorial


Every so often I walk into the dollar store and find something that I just have to buy for no reason at all.  Then just as if the item can speak, an idea for a use pops into my head.  I found these fall leaves table scatter at the dollar store and at the time I didn’t know what I would do with them, and then I thought why not a fall leaves silverware pocket to dress up a Thanksgiving table –or any fall dinner.  After thanksgiving your guests can even take them home as a party favor.  To make them quick you can use a glue gun but this is also fun kid’s project when you use thick tacky glue.  If using tacky glue you will need some clothespins to hold the pocket together while the glue sets.

You will need:

·      Dark brown stiffened felt rectangle (It will make two pockets)

·      Tan embossed felt

·      Fall leaves table scatter or fall felt shapes

·      Ruler

·      White colored pencil (to write on dark felt)

·      Scissors

·      Pinking shears or decorative paper edgers

·      Glue gun and glue sticks…or

·      Thick tacky craft glue and clothespins to hold the glued area till dry

1.     Gather your supplies. Fold the stiffened brown felt in half lengthwise.  Press to crease.  Measure 4 inches from the side edge and make a line.  Cut out.  The folded pocket will be 4 Inches wide by 4 ½” inches deep.


2.     Use the glue gun to run a bead of glue down the sides of the pocket and press to attach…or if working with children, run a bead of thick tacky glue down the sides and press to attach.  Hold with clothespins until dry.  Add more tacky glue if necessary to make sure the pocket is secure.  Use the pinking shears or paper edgers to trim the top for a decorative look.


3.     Cut a strip of embossed felt 2 inches by 4 ½." Use the pinking shears to trim the top edge like you did on the pocket. Center this embossed felt on the front of the pocket and attach with glue gun or tacky glue.


4.     Glue on the leaf table scatter in a pleasing arrangement on the front of the pocket. 


I haven't been able to visit my favorite blogs much this week since I am suffering from a painful slipped disc. I'm starting to feel better so soon I will be back to my usual schedule.  As always thanks for visiting Make it easy crafts and your awesome comments.


Friday, October 11, 2013

Wine cork snowflake ornament


The best time to start working on Christmas ornaments are before the hectic Christmas season is upon you.  In early fall you can make tons of ornaments and when Christmas rolls around you will be all set.  Besides you will need a little time to gather up those wine corks!

You will need:

·      7 Wine corks

·      7 Beads (I like silver sparkle ones)

·      18 inches of 14-gauge silver wire

·      Wire cutters

·      Needle nosed pliers

·      Tacky glue

·      Glitter

·      Paper plates

·      Sharp pointed awl

·      Ruler

·      Pencil

·      Small paintbrush

1.     Measure and mark ¼” from the end of a wine cork. (The thicker end that didn’t go into the wine bottle.  The end which was inserted into the wine bottle is a tad thinner than the outside end.)  Use the awl with a twisting motion to drill all the way through the cork.  Take it out and drill it the opposite way to make sure there is a path through the cork.  Repeat for the other 6 corks.


2.     Squeeze some tacky glue onto a paper plate and on another plate pour some glitter.  Use the paintbrush to apply some glue onto each end of the wine corks and dip into the glitter.  Use a third paper plate to place the wine corks with the glittered ends to dry and let dry completely.


3.     Using the wire cutters cut an 18-inch length of 14 gauge silver wire.

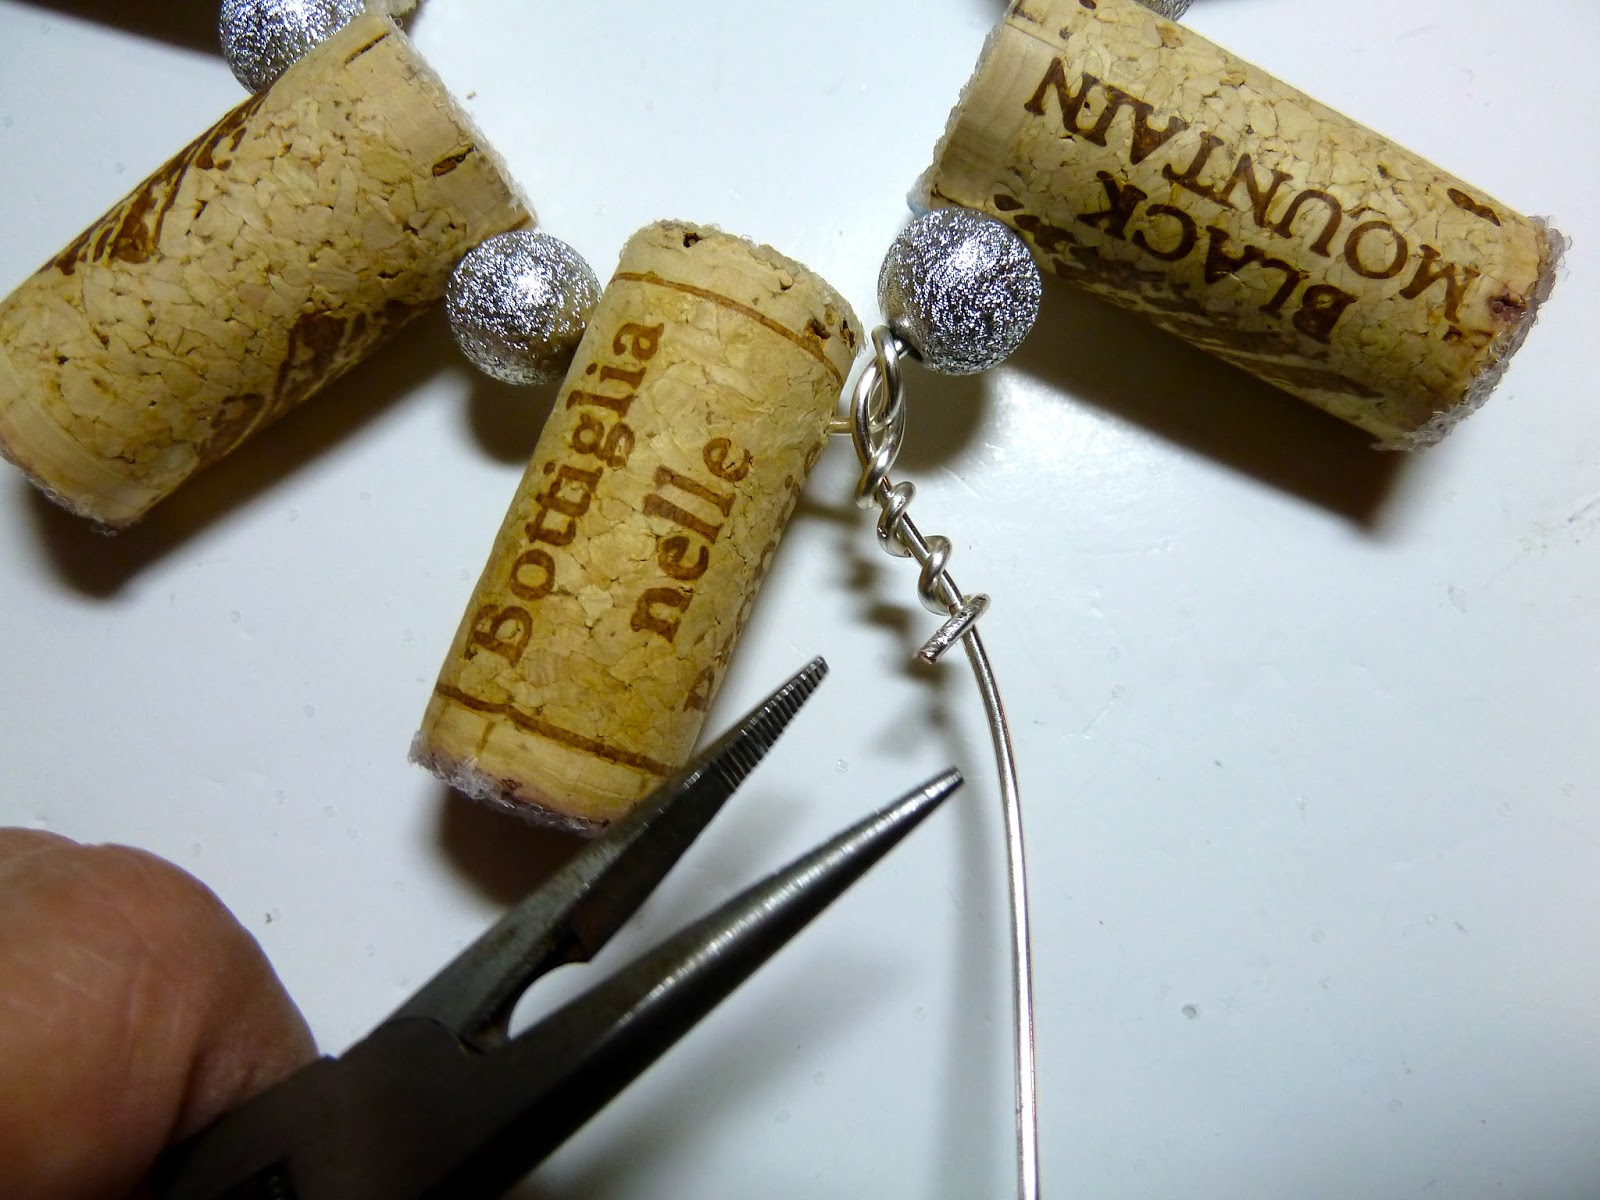
4.     Thread the wire through each wine cork with a bead in between until you have added all the wine corks and beads.


5.     Use the needle nosed pliers to join the two wire ends in a circle and twist around to join.  Make a loop with the excess and twist around in a pleasing shape as before. 


6.     Adjust the wire into a circular shape. The corks will form a sunburst star.


Note:  You may eliminate the glitter step if you desire but I think that glitter gives it a bit of flair. And don't forget there is only one day left to enter the giveaway for the October breast Cancer awareness drop earrings! There is also a tutorial to make some of your own as well right here


Saturday, October 5, 2013

Breast Cancer Awareness Drop Earrings


October is Breast Cancer Awareness month.  These easy drop earring are created with pink wire, E-beads and pink heart beads.  They can be made quick as a wink and you can wear them to show your support. Try this easy step-by-step tutorial today.  And if you like easy tutorials like this one be sure to visit and like Make it easy crafts on Facebook.  

You will need:

Needle nosed pliers

Wire cutters

22 gauge pink wire

Pink size E beads

Four pink heart beads

2 Fish hook ear wires

Ruler

1.  Measure and cut two 6-inch pieces of pink wire with wire cutters. One for each earring.


2.  Thread on 12 size E beads onto the wire.  Bend in half making sure the ends meet and twist the two wires together in an oval shape.  (top of earring made)


3.  Thread on 6 pink e-beads onto the end of one wire side and then add the heart bead.  Curl the ends to hold on the beads.  Repeat with the other side. Bend the earring to shape if needed.


4.  Bend open the loop of a fish hook ear wire and attach to the center top of the earring.  There will be six beads on each side.  Close the loop with the needle nosed pliers.  Repeat steps 2-4 for second earring.


Wednesday, October 2, 2013

Floral painted wine glass tutorial


Painted wine glasses are all the rage.  Follow this simple step-by-step tutorial and you can create unique floral wine glasses of your own.  Using a layering technique the inside of the flower shows through the interior of the glass. And with Christmas right around the corner they will make great Christmas presents.  Bake your glasses (No they won’t melt) to make them top rack dishwasher safe although I would recommend hand washing.

You will need:

·      Gloss paint (specifically for glass and it will say so on the label) You can buy them in bottles but since you will be using several different colors and you don’t use that much on each wine glass, I suggest a set of tiny paint pots in various colors:
·      Dark brown, med brown, bright yellow, yellow, light yellow, light green, green, white, gray, light pink

·      Wine glasses

·      Alcohol

·      Paper towels

·      Cotton swabs

·      Small liner brush

·      Small flat brush

1.     Wash and dry the wine glasses.  Wipe down the glasses with alcohol to remove any residue, oils and finger marks.


2.     Turn your wine glass upside down and work on the outside bottom outside of the bowl.  Using the liner brush make small dots around with dark brown.  Working towards the base, add a second line of dots with medium brown.  Follow with bright yellow, yellow and light yellow. (See photos)  Continue adding dots around with light green, bright yellow and green. End with light green dots right up to base of the stem.  Let dry.  You will be layering colors so you will need to let the paint dry between layers.  (This layer is the inside of the flower and when you are finished you will not see the dots on the outside. You can look inside the wine glass to visualize how it is coming out)


View of inside of glass

3.     Using the liner brush and gray paint, outline four petals starting at the base where you began your circle of dots.  Fill in the petals with the flat brush loaded with white paint.  Let dry.


4.     Repeat with a second layer of white paint on the petals.  While the paint is still wet line the edges with a bit of gray and blend.  Let dry.  Make sure you have covered the petal with white as well as you can.  You may have to add a third coat of paint.

5.     When the paint is dry add some green paint in petal shapes a little up the side of the white petals.  Cover the dotted area with green and continue down the stem and base.  Let dry and add a second and maybe a third coat. 


6.     Finish with a little light pink paint on the tips only of the petals and blend into the white.


7.     Use a cotton swab with alcohol to remove any paint where you may not want it.

8.     Bake your wine glasses.  Place your painted wine glasses on a baking sheet. And place in a 350-degree oven for 30 minutes.  Let cool in the oven.  When done they will be top rack dishwasher safe but I recommend hand washing.


Note:  If you don’t like what you have painted and want to start over, simply wash it off.  It won’t become permanent until you bake it or let it sit for several days. Be sure to visit Make it easy crafts for upcoming tutorial on painting a orange day lily wine glass soon!