Saturday, October 24, 2015

Recycled DVD ornament tutorial


Did you know that old DVD’s have two layers?  If you separate the layers, one side will be a shiny disc that you may cut easily with a pair of scissors.  The other disc will have the printing on it.   When you fill a plastic ball ornament with the cut up pieces they will shine and flash with the lights on the tree!  So pretty and so quick and easy!  I used three DVD’s to fill the ornament, two of them I only used the shiny discs.  One was a DVD rewriteable so it was just white on one side of the discs which worked well.   Note:   Only DVD’s are layered and this will not work with CD’s.

Materials:

  • Plastic Christmas ball with wide opening
  • Several old DVD’s
  • Awl or nail
  • Flat head screwdriver (Optional)
  • Scissors
  • Glue for plastic or glass
  • Safety glasses


Instructions:

1.     Cut the DVD to the center.  Carefully stick a nail or awl or flat head screwdriver between the layers and gently pry up.  They will come apart easily once it gets started.


2.     Cut pieces of the DVD with scissors.  It will cut very smoothly and easily.  Cut the shapes any way you like.  If you want to get fancy you can cut little hearts, stars, or just random shapes.  The larger the shapes the less you will need to cut. Take off the top cap of the ornament and add the DVD pieces.


3.     When you have filled the ornament to the amount you desire, add some glue around the rim and attach the top cap.  The pieces of DVD’s will catch the light when you hang it on the tree.


Wednesday, October 14, 2015

Free printable autumn owl tree coloring page


When my daughter was little we would go out in the fall to collect leaves of all colors. Then we would take them home and press them to try and preserve their beautiful colors. I remember thinking at the time how cool it would be if one tree had all the leaves so we could get back in the house and enjoy the best of autumn's beauty.

This fantasy tree autumn owl coloring page does just that.  There are leaves of all shapes and sizes on this tree.  Watch out for the poison ivy by the roots though, they are one of the first leaves to change colors and are often very beautiful!

Enjoy printing and coloring this free page.  Coloring is no longer just for kids.  Adults enjoy coloring too!  It's fun and relaxing to color and has been proven to relieve stress.  Just click on the photo, download and print on your home printer.  Check back often for more one of kind free printable coloring pages from Make it easy crafts.

If you are interested in learning more about the benefits of coloring check out this article, "Coloring isn't just for kids."

Monday, October 12, 2015

Autumn twig broom swag door décor

https://www.bowdabrablog.com/2015/10/12/autumn-twig-broom-swag-door-decor/


You know I love to decorate my door for each season.  I change the wreaths and swags often. Fall is such a busy time.  One minute It’s Labor Day, you turn around, and before you know it Halloween is sneaking up on you with Thanksgiving close behind. And look out because here comes Christmas!

It’s so busy in the fall when school is in full swing and there are tons of festivals and events to attend that I like to combine the décor for Halloween and Thanksgiving.  That way it stays up longer!  You can make this quick (and I mean quick) and easy Autumn twig broom swag door décor in just a few minutes with a leaf garland and some fall picks. Add a beautiful burlap bow that you create with the Bowdabra bow maker for the perfect final touch.  Right now the craft stores are offering 50% off on fall garlands and picks so grab a few and get crafting.

Click on the photo to visit Bowdabra blog for all the instructions!  


Thursday, October 8, 2015

Shrimp and smoked sausage gumbo


I admit that I love gumbo.  I’m also a big fan of okra, which is why I grew one pretty tall okra plant in my little garden this year.  So I collected the okra, blanched and froze them just waiting for a cool day when I could make some gumbo.  I like my gumbo a bit on the spicy side and it just hits the spot on a cold and damp day.  This recipe is pretty quick and simple to make and tastes pretty darned awesome!

Ingredients:

·      2 tbsp. olive oil
·      2 medium bell peppers
·      1 large sweet onion
·      2 large stalks of celery
·      ½ tsp. salt
·      ¼ tsp. black pepper
·      1 lb. lg. raw shrimp, thawed if frozen
·      14 oz. package smoked sausage
·      32 oz. chicken broth
·      3 bay leaves
·      ¼ tsp. garlic powder
·      ¼ tsp. thyme leaves
·      1 cup cut okra
·      2 14.5 oz. cans fire roasted diced tomatoes
·      Cayenne pepper to taste
·      2 cups white rice cooked according to package directions

Instructions:

Add 2 tbsp. olive oil to a large 4-quart soup pot on medium heat.  Cut the peppers, onion and celery into bite sized pieces and add to the pot. Add the salt and pepper and cook on medium heat for 8-10 minutes. 


Meanwhile peel the shrimp if unpeeled and set aside.  Cut the smoked sausage into bite sized pieces.

Remove the vegetables to a bowl and set aside.  In the same pot add the smoked sausage and cook until browned.  Add the vegetables back in the pot along with the 32 oz. of chicken broth, 2 cans of tomatoes, shrimp, 3 bay leaves, ¼ tsp. garlic powder, ¼ tsp. thyme leaves and 1 cup of cut okra.  Bring to a boil and then reduce the heat to a simmer.  Cover and simmer for about 20-30 minutes until all the vegetables are tender.


Add cayenne pepper to taste.  I usually add 1 tsp. but that is pretty spicy so I suggest you start with less and add more if you desire. Add as much cooked white rice as you like to the top of the soup when serving.

Visit Make it easy crafts and Bowdbra blog each week for more dinner easy recipes and crafts!

Monday, October 5, 2015

Light-up Pumpkin Mason jar tutorial

Light-up Pumpkin mason jar


I always decorate for every holiday in my entry foyer. When I pulled out my fall décor I thought how nice it would be to have a seasonal light up item with a timer that would double as a nightlight. So for inspiration I took a trip to the local craft store and while there I found a cute orange mason jar. I picked up an battery powered LED timer light string at the discount store and started to make the Light-up pumpkin Mason jar.  It’s so easy you will want to make one for all the holidays as well!

Supplies:

  • Orange Mason jar (If you can’t find an orange one you can spray paint a clear one.)
  • Battery powered LED light string with a timer
  • Black enamel acrylic paint
  • Small paintbrush
  • All purpose computer paper
  • Tape
  • Pencil or pen
  • Scissors
  • Green felt
  • Hot glue gun and hot glue sticks
  • Extra large green pipe cleaner
  • (Orange spray paint for clear Mason jar)

Instructions:

1.     Gather your supplies.  If you are using a clear mason jar, set aside the top and spray paint the jar orange.

Light-up Pumpkin mason jar

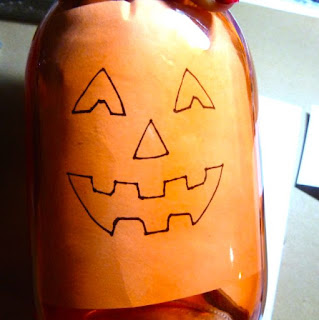
2.     Draw a pumpkin face on a piece of all-purpose paper.  Cut the paper with the face to a size that will fit inside the jar.  Tape to the inside of the jar to use as a pattern.

Light-up Pumpkin mason jar

Light-up Pumpkin mason jar

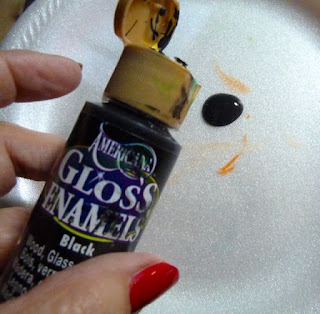
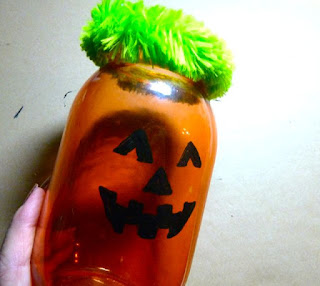
3.     Use a small paintbrush and black enamel acrylic paint to outline and fill in the pumpkin features on the outside of the jar.  Let the paint dry completely.

Light-up Pumpkin mason jar


Light-up Pumpkin mason jar

4.     Meanwhile Place the control box for the light string on the green felt and outline the outside. Cut out the marked felt, make another mark where the switch on the box is and cut out a small rectangle. This will allow you to turn the light on and off.  Attach to the top of the box with the hot glue gun.  (Do not glue to the bottom where you insert the batteries)

Light-up Pumpkin mason jar

Light-up Pumpkin mason jar

Light-up Pumpkin mason jar


5.     Cover the sides with green felt strips that you have cut to size attaching with more hot glue.

Light-up Pumpkin mason jar

Light-up Pumpkin mason jar

Light-up Pumpkin mason jar

Light-up Pumpkin mason jar


6.     Using some hot glue attach an extra large green pipe cleaner around the top rim of the jar.  (You will not need to use the lid)

Light-up Pumpkin mason jar

Light-up Pumpkin mason jar

7.     Fill the jar with the LED lights and run the end of the string with the felt covered switch box behind the jar. Set the light timer.


Thursday, October 1, 2015

Pumpkin party free printable coloring page


Coloring is a relaxing hobby.  It relieve's stress and eases tension.  I've recently started adding free printable coloring pages to the blog.  These page are for ages 1 to 90 and are a fun way to spend some free moments.  Simply click on the photo to download the free printable.

The printable page today is titled Pumpkin party.  Pumpkins come in all colors from oranges, red orange or yellow.  They come in black, green white and more.  And who is to say you can't have a plaid pumpkin if you want.  Let your imagination run wild as you color these pumpkins to fit your individual personalities.  Click on the link below if you would like more information about the benefits of the new coloring trend.