Sunday, September 13, 2015

Upcycled Breast Cancer Awareness leather wristlet

Breast cancer awareness wristlet


Upcycle the leather or faux leather from on old handbag to make a cute Breast Cancer awareness wristlet!   It’s so easy you will want to make more than one for gifts.  You won’t need many supplies because lightweight leather cuts easily with just regular scissors. You can even use a paper punch to make the holes for snaps. I got snap setting kit, which included 20 snaps, and tools to put them on in the craft store for under $7!

Supplies:

·      Lightweight leather or faux leather cut from an old handbag
·      Scissors
·      Small hole paper punch (If your leather is heavy you may need a leather punch tool)
·      Lightweight Snap set (which includes snaps, setter, and anvil)
·      T-square Ruler
·      Disappearing marker
·      Small paintbrush
·      Pearl pink acrylic paint
·      Tape measure
·      Rubbing alcohol

Instructions:

1.     Cut apart the handbag and get as many usable pieces as possible. Working on the back and using a disappearing marker, measure, mark, and cut a ¾” x 9” strip of leather.  (Standard adult size)  For smaller or larger sized wrists use a tape measure to get the correct length for your needs.

Breast cancer awareness wristlet


Breast cancer awareness wristlet

Breast cancer awareness wristlet

Breast cancer awareness wristlet


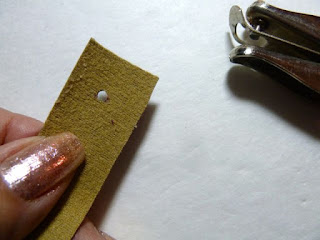
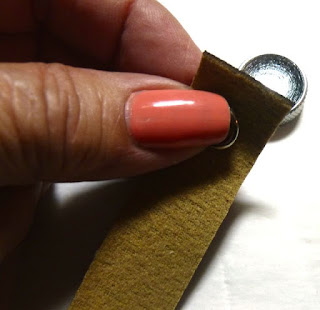
2.     Add the snap closure.  Measure and mark a dot ½ from the end of the strip.  Use the paper hole punch to make a hole on both ends where you marked. Repeat on the opposite end.  Follow the instructions on your snap kit to add the snaps.

Breast cancer awareness wristlet

Breast cancer awareness wristlet

Breast cancer awareness wristlet

Breast cancer awareness wristlet

Breast cancer awareness wristlet

3.    Wipe down the right side of the leather wristlet with rubbing alcohol to remove any dirt or oils.  Using the small paintbrush and some pink pearl acrylic paint begin making little pink loops on the right side of the wristlet (See photo)

Breast cancer awareness wristlet

Breast cancer awareness wristlet

Breast cancer awareness wristlet


4.     You can vary the directions the pink ribbons are painted or make them all facing in one direction. 

Breast cancer awareness wristlet

5.     Let the paint dry completely.

Breast cancer awareness wristlet


Breast cancer awareness wristlet


Friday, September 11, 2015

Dinner easy snack time- fried matzo


Let me start by mentioning that I love foods from all different cultures. Being of Greek descent I’ve had my share of Greek foods. I adore Italian and Asian foods. I have to admit that I haven’t had many Jewish foods in my life except for the knishes, which I just have to have whenever I am in New York.

My good friend Barbara, who is Jewish, makes an awesome snack, Fried Matzo, which she recently shared with me. I’ve had matzo crackers before but never knew that they make a delicious snack when fried.

Traditionally this dish, sometimes known as matzo brei, is a common breakfast meal during Passover. It can be savory or sweet, depending upon whether you add salt or sugar. What an amazing and versatile treat!

Barbara says,
“Fried Matzos used to be made with chicken fat (schmaltz,) but that is not so common anymore. Since the high Jewish holidays are approaching many people will be making them although not for religious reasons.”


Fried Matzo recipe

Ingredients:

  • ½ tsp. vegetable oil
  • 2 cups hot water
  • 2 six-inch matzo sheets
  • 2 large eggs
  • 1/8” tsp. kosher salt
  • 1 tbsp. butter, divided
  • Extra kosher salt to taste

Directions:

Heat vegetable oil in a non-stick fry pan over low heat. Pour hot water into a bowl. Break matzo sheets into small chunks and soak in hot water for about 2 minutes.

Whisk egg and 1/8” tsp. kosher salt in a separate bowl. Strain matzo and shake to remove excess water. Stir matzo into egg mixture. Pour the heated oil out of the frying pan and add ½” tbsp. butter to pan.

Pour matzo and egg mixture into hot butter; cover and cook until a pancake forms, about 10 minutes. Slide matzo mixture onto a plate. Place remaining ½ tbsp. butter in the hot pan. Place a second plate over the matzo pancake and flip plates over so the uncooked side is on the bottom. Place the pancake in the melted butter. Cover and cook until bottom of pancake is browned, about 8 minutes. Remove from heat and season with kosher salt.

To learn more about Fried matzos check out this article about matzah brie and come back each week to Make it easy crafts and Bowdabrablog for more dinner easy recipes


Tuesday, September 8, 2015


Dinner easy slow cooker, pork stew with green beans and potatoes is the perfect recipe for those cool autumn nights. School has started or will start shortly in most places. Time is short and there is so much to do with open houses, meeting the teachers, getting the school supplies, and a ton of other last minute chores. Who has time for a good, healthy dinner? We all can enjoy delicious dinners if we employ our slow cookers. All you do is assemble the ingredients in the morning and when you get home, dinner is just about ready. Whip up some biscuits and you are ready to sit down to a meal that will, as my mother would say, “stick to your ribs!”
Why buy those packaged mixes for the crockpot? It’s just as easy and to whip up this pork stew and you won’t have all that extra salt and preservatives!
Easy slow cooker pork stew with green beans and potatoes
Ingredients:
  • 2 lbs. pork loin, fat trimmed off and cut into bite sized pieces
  • 6 small red potatoes cut into 1-inch cubes
  • 1 onion, chopped
  • 2 cloves garlic, minced
  • 2 cans chicken broth
  • ½ cup all purpose flour
  • 1 16 oz. bag frozen green beans, thawed
  • 2 tsps. Worcheshire sauce
  • 1 tsp. dried thyme
  • ½ tsp. black pepper
  • ½ tsp. salt
Instructions:
Cut up the pork and place in the bottom of a large slow cooker. Add the potatoes, garlic, onion and green beans. Sprinkle the Worcestershire sauce on top and follow with the thyme, pepper and salt. Pour in the two cans of chicken broth and stir.
Cover and cook 8 -10 hours on low or 4 -5 hours on high.
When you get home mix the flour with a little cold water making sure the flour mixture is smooth. Turn crock put to high and add the flour mixture stirring well to blend. Let it cook for 30 more minutes to thicken. Serve with warm biscuits or bread on the side.
Be sure and visit Bowdabra blog for more easy craft tutorials and recipes!


Wednesday, September 2, 2015

Welcome September


It's still warm in many parts of the country but September is here and soon there will be crisp days and cool nights.  In 21 short days, September 23 it will herald the first day of fall.

I'm ready right now.  I'm ready for pumpkin spice everything from coffees to beers.  I'm ready for apple festivals and pies.  I'm ready for heirloom apples that you can't buy in the local grocery store.

I'm ready for the leaves to turn the beautiful magentas, reds, oranges and golds.  I'm ready for majestic blue ridge mountains to frame these colors with the backdrop mountain pines.

I'm ready for tailgating, football and warm and spicy, hot and bubbly chili.  Craft and Renaissance fairs.  I'm looking forward to apple butter in big outdoor pots and kettle corn made fresh.  I'm ready for weather that begs for warm cozy sweaters and fires in the fireplace.

You know how makeup companies sometimes categorize complexions into seasons.  Even if they label me a winter I guess you could say I'm an really an autumn at heart.

What season are you?


Monday, August 31, 2015

Free Printable Horse coloring page


This is the first in a series of free printable horse coloring pages.  You can download them and color and decorate them however you would like.  There is plenty of scientific evidence to suggest that coloring is a relaxing and stress reducing hobby for children and adults alike!  Some are whimsical and intricate in detail allowing for your creativity to blossom in new and exciting ways.  Some are plain horses that you can color in the usual way or--not.

Use colored pencils, markers or a combination of all sorts of media!  Enjoy and be sure to return for more free printable coloring pages.

Click on the photo, download the page and print on your home printer at full size.


Saturday, August 29, 2015

Free Printable Horse coloring page 2

Horse coloring page


This coloring page is the second in our series of free printable coloring pages.  Enjoy the stress relieving activity with your choice of any coloring mediums.  Click on the photo, download and print full size on your home printer.  Please let me know in the comments if you are enjoying these coloring pages so I can keep them coming!

If you get the chance check out this article:


Wednesday, August 26, 2015

The best of Make it easy crafts free kids printables


Want some free printables for the kids?  Today we've compiled a few of our favorites for you to print out and enjoy.

Coloring is so trendy right now.  Kid's are doing it like they always did but now grownups are joining in on the fun. Coloring can do so many things.  It relieves stress and stimulates relaxation.  It amps up ones creativity.  As fast and stressful as this world can be, coloring brings you down to earth and promotes well being.  While these printables are geared for kids, I'm working on some grown-up coloring pages, so stop back by soon and check out the color zone!

Click on the photos for the free tutorials and printables

Whip up a cute little coloring booklet for the kiddies...easy and fun. 


The next printable is an apple bookmark.  This is a great way to get your kids reading!


Kid's love their pets so this stained glass style pet printable coloring page is going to be fun.  Print it on tracing paper and they can tape it to a window just like real stained glass!


It will be Halloween  before you know it and kids love to decorate. These hanging spiders are fun and they can color them any way they choose, then hang them on threads.


Monday, August 24, 2015

cheer bow

Hi everybody!  I'm over at Bowdabra blog today creating easy, fun cheer bows!  Head on over so you can follow along with the easy tutorial. And while you are there be sure to check out the hundreds of free craft tutorials, videos and recipes!  
I know you’re not thinking too much about fall and football games while still in the heat of summer but it won’t be too long before you will be dressing up that pony tail with a cheer bow. You can make your cheer bow in any combination of colors to show your team spirit. And what’s more, you create the entire bow including the hair elastic in the Bowdabra! Leave it plain as a beautiful big bow to highlight your team colors or go one step further and glue on a charm, foam letters or rhinestone to the front to personalize it even more. This is a super kid’s craft too!
These pony tail bows are so quick you will want to make cheer bows for the whole cheer squad!


Thursday, August 20, 2015

Dinner easy side dish – Savory Greek style green beans


This week at "Dinner easy" we are focusing on the side dish or better known as the supporting player to a great meal. You can’t have an orchestra without the string section and you can’t have a villain without a minion.  The same goes for dinner.  What’s a main course without a side dish? 

I’m of Greek ancestry; my husband on the other hand is Irish.  I am willing to bet before he married me he never tasted any Greek food in his life.  It’s opened up a whole new culinary experience for him and one of his favorites is Greek style green beans.  In fact if you ask him what sort of veggie he likes best he will always say Greek green beans. 


Pair this easy side dish with our moist delicious meatloaf recipe, add a baked potato and you have a complete dinner easy!


Savory Greek style green beans

Ingredients:

  • 1 lb. fresh or frozen green beans (thawed if frozen)
  • Garlic clove, minced
  • 1 tbsp. light olive oil
  • ¼ cup chopped onions
  • 14.5 oz. can fire roasted diced tomatoes
  • 1 8 oz. can tomato sauce
  • ½ tsp. salt
  • ½”tsp. pepper
  • ½” tsp. oregano
  • 1 tbsp. lemon juice


Directions:

Heat the oil on medium heat in a large pot.  Add the onions and garlic and sauté about 5 minutes until the onions are translucent.  Stir in the green beans and cook a little longer.  Reduce the heat to medium low.  Add the tomatoes, tomato sauce, salt, pepper, oregano, and lemon juice.  Cook on medium low for 5 more minutes.  Reduce heat to low, cover and simmer for about 45 minutes.

Be sure to visit Bowdabrablog and Make it easy crafts for Dinner easy next week for more tasty recipes!