Showing posts with label Jewelry. Show all posts

Tuesday, July 28, 2020

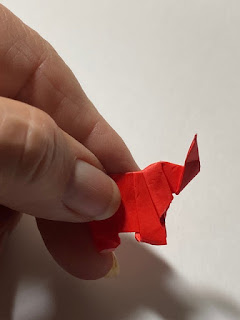
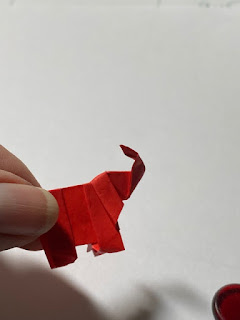
How to make adorable little origami red elephants for earrings

origami red elephants


Elephants are considered good luck in many countries, especially with the trunk raised.  Just, grab some origami paper and you can fold these origami red elephants and make the cutest pair of earrings.  Or you could just stand them up as a mini decoration.  Use the photos as a guide and you will find although tiny, they are not that hard to fold.

Adorable mini origami red elephants


Materials:


Origami paper, red
Nail file

Optional for earrings: 

Needle and head pin 
Needle nosed pliers 
Fishhook ear wires
Wire cutters

Instructions:


First, cut a piece of red origami paper 1 ½” x 3 ½” for each origami elephant.

origami red elephants


Next, fold the paper in half lengthwise.  Turn, and fold the two top edges to a point (like you are making a paper airplane) Fold a second time to make a longer point. 


Turn and fold so that the folded point touches the other side.  Turn over so that the point is on the underside.  Now, fold the folded edge over so it meets the crease, but as you make this fold flip the point back to the front.


Then, fold the left edge under so it meets the center crease. Then fold the bottom folded edge of the point to the edge of the paper.  Then fold the point over to the left, and fold back again to make a kind of fanfold. (Front of the elephant) For the back, fold the flat folded edge over so it meets the center crease and then flip the edge back to the front.  (See photo)


Turn over the paper.  This is the only tricky part so use the photos as a guide.  You will see a kind of rectangle shape.  Just fold the top layer fold the corners inward.  Turn and do the same to the opposite side. Now, it is easier to take this in your hand to do this part, push the folded corners down and press open.  Do the same thing to the opposite side and then flatten them all down.  Use your fingernail or a nail file to make the creases. 


Fold in half. Fold the back legs in so they match the front.  To make the ears, squeeze and fold at an angle making the creases for the ears on each side of the head. The trunk will point down. 

origami red elephants

origami red elephants

origami red elephants


Finally fold the trunk, up, and then back to make the trunk raise.  The red origami elephant is finished.

origami red elephants

origami red elephants


To make these into earrings, using a pint push through the underside to make a hole and insert a headpin.  Cut the headpin down if necessary. Then, use the needle-nosed pliers to twist into a loop adding the fishhook ear wires. Close loops.


Friday, April 3, 2020

Five super simple upcycled crafts to turn trash into treasure

5 simple upcycled crafts


Since the coronavirus has a lot of people self-quarantined many are looking for things to do.  If you didn’t have time to go to the craft store to stock up on supplies, don’t worry.  You can create upcycled crafts with just ordinary stuff you find around the house and turn trash into treasure.

Just be creative.  If something calls for felt, substitute construction paper.  It’s all relative.  There are so many options.  

Most of these projects are great to make with bored kids.  Great for family time while we are all staying inside and safe. 


1.     Recycle advertising magnets into magnetic pets.  You can really have fun with these magnets.  Try using photos of friends and relatives in addition to pets.  If you don’t have double-stick tape, substitute some school or tacky glue spread thinly.

5 simple upcycled crafts


2.      Paint chip photo frame.  You might have some paint chip samples leftover from a painting project.  If you do, the color chips are super cut up and applied onto a frame. You can use a paper shredder to cut the strips or just cut them with scissors to vary the sizes.  Don’t have a frame, use some corrugated cardboard cut in a frame shape and apply the strips to that.

5 simple upcycled crafts


3.     Plastic bag friendship bracelets.  If you get the newspaper delivered many times during rain they come enclosed in plastic bags.  Don’t toss those bags, use them to make cool friendship bracelets.  This one uses a rattail ribbon, but you can easily substitute extra shoelaces, ribbon, strips of fabric.  Be creative.  It’s fun and easy and kids love them!

5 simple upcycled crafts


5 simple upcycled crafts


4.     Shrink an egg carton to make charms.  Remember shrinky dinks?  Well, did you know that any plastic container that has a #6 on it you can shrink to 1/3 of its size and the thickness of about a nickel.  A lot of egg cartons are listed number 6 so if you have one of these follow the tutorial and create all sorts of charms you can use for key chains, backpack charms, hair clips and more.  Remember only number 6 will work. 

5 simple upcycled crafts


5.     Cut up an old DVD and make a shiny mosaic Easter egg.  You can use paper mache eggs, plastic eggs, even Styrofoam eggs.  The trick is for this craft is that DVD’s have two layers, when you separate the layers they super easy to cut into pieces.  The pieces can then be glued onto an egg or other surface.  


Thursday, May 10, 2018

How to make polymer clay bow earrings for a perfect gift this Mother's Day

polymer clay bow earrings

If you are looking for a quick and beautiful gift for mom this Mother's Day look no further.  These earrings are easy to make and require very few supplies.  A gift from the heart, made with love, is so much better than store bought flowers that will wilt in a few days.  Mom will be wearing these earrings for years to come!

Make some extra pairs because these earrings make perfect gifts for teachers, grads and more!

Updated May 2018

Polymer clay bow earrings


You will need:

Polymer clay

Clay tools, (roller, pointed tool, craft knife, clay blade)

Waxed paper to cover work surface

Earring posts and backs

Gloss glaze for polymer clay

Ruler

Aluminum foil to cover cookie sheet and home oven pre-heated to 275 degrees

E6000 glue

Masking tape to hold bows while applying the glaze

1.     Roll out your clay thinly.  Use the clay blade to cut two strips of clay 1/8” wide by 1 ½” long.  


2.     Fold one end into the center and press lightly to make a loop.  Fold the opposite end to the center to meet the first loop.  Press in the center with the pointed clay tool.


3.     Cut two more strips of the thinly rolled out clay 1/8” wide by ½” long.  Fold at an angle.  (See photo) Place the bow loops you just made on top of this piece and press to adhere. (Bow tails made)


4.     Make the center knot by attaching a tiny strip of clay at the top center and bring around to the bottom using the pointed clay tool.  Press lightly to attach a knot to each bow.

5.     Cover a cookie sheet with aluminum foil.  Preheat your oven to 275 degrees and bake for 20 minutes.  Do not over bake.  Do not use a microwave.  Let cool.

6.     Attach a piece of masking tape, sticky side up and place the baked bows on to hold while you brush on a coat of clay glaze and let dry.


7.     Add some E6000 glue to the back of your post earring findings and attach a bow.  Repeat for the second earring. Let dry completely. (E6000 glue is available in craft stores and discount department stores everywhere and works best)

We love comments and suggestions.  And please follow us on Facebook!

Monday, October 2, 2017

How to make simple duct tape earrings for Breast Cancer Awareness

Duct tape earrings for breast cancer awareness


October is Breast Cancer Awareness month.  You can whip up these simple duct tape earrings to show your support.  You can also use this technique to make other awareness earrings using the appropriate color duct tape. 

I’ve used a pink camo duct tape to make mine for Breast Cancer Awareness, but you can alternately use a solid color pink for the same effect.

Materials:

Pink camp duct tape
Self-healing cutting mat
X-acto or craft knife
Ruler
Headpins
Small pink heart beads
Pink size E seed beads
Medium silver bead
Fish hook ear wires
Needle-nosed pliers
Hot Glue gun and hot glue sticks

Instructions:

1.     Cut two pieces of duct tape 1” x 4” using the cutting mat, ruler, and craft knife.


2.     Fold the duct tape in half together.  Repeat for the second piece of duct tape.  Now fold the duct tape into ribbon shape and use the glue gun to attach so it stays together.


3.     Next, thread onto a 2 ½” head pin in this order:  Seed bead, pink heart, silver bead.  Now poke through the top of the ribbon.  Add another seed bead.


4.     Then, using the needle-nosed pliers, bend the top of the head pin to the right.  Next, add the fishhook ear wire making sure it faces in the correct direction, and bend the wire closed.