Showing posts with label Paper crafts. Show all posts

Tuesday, July 28, 2020

How to make adorable little origami red elephants for earrings

origami red elephants


Elephants are considered good luck in many countries, especially with the trunk raised.  Just, grab some origami paper and you can fold these origami red elephants and make the cutest pair of earrings.  Or you could just stand them up as a mini decoration.  Use the photos as a guide and you will find although tiny, they are not that hard to fold.

Adorable mini origami red elephants


Materials:


Origami paper, red
Nail file

Optional for earrings: 

Needle and head pin 
Needle nosed pliers 
Fishhook ear wires
Wire cutters

Instructions:


First, cut a piece of red origami paper 1 ½” x 3 ½” for each origami elephant.

origami red elephants


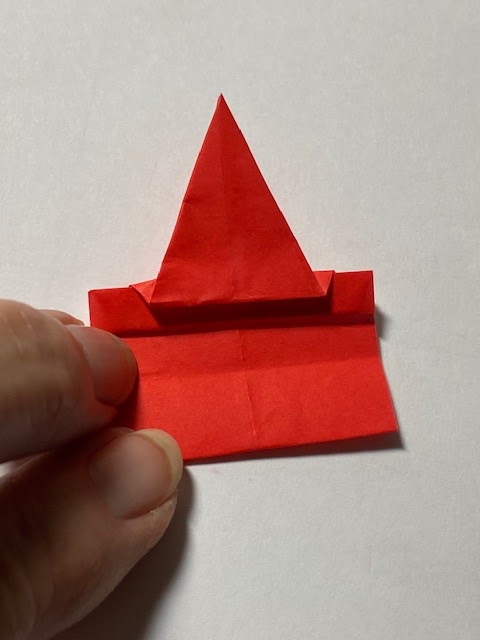
Next, fold the paper in half lengthwise.  Turn, and fold the two top edges to a point (like you are making a paper airplane) Fold a second time to make a longer point. 


Turn and fold so that the folded point touches the other side.  Turn over so that the point is on the underside.  Now, fold the folded edge over so it meets the crease, but as you make this fold flip the point back to the front.


Then, fold the left edge under so it meets the center crease. Then fold the bottom folded edge of the point to the edge of the paper.  Then fold the point over to the left, and fold back again to make a kind of fanfold. (Front of the elephant) For the back, fold the flat folded edge over so it meets the center crease and then flip the edge back to the front.  (See photo)


Turn over the paper.  This is the only tricky part so use the photos as a guide.  You will see a kind of rectangle shape.  Just fold the top layer fold the corners inward.  Turn and do the same to the opposite side. Now, it is easier to take this in your hand to do this part, push the folded corners down and press open.  Do the same thing to the opposite side and then flatten them all down.  Use your fingernail or a nail file to make the creases. 


Fold in half. Fold the back legs in so they match the front.  To make the ears, squeeze and fold at an angle making the creases for the ears on each side of the head. The trunk will point down. 

origami red elephants

origami red elephants

origami red elephants


Finally fold the trunk, up, and then back to make the trunk raise.  The red origami elephant is finished.

origami red elephants

origami red elephants


To make these into earrings, using a pint push through the underside to make a hole and insert a headpin.  Cut the headpin down if necessary. Then, use the needle-nosed pliers to twist into a loop adding the fishhook ear wires. Close loops.


Tuesday, January 23, 2018

How to make a quick and easy Valentine's Day magnetic bookmark

Valentine's Day magnetic heart bookmark


This quick to make Valentine's Day magnetic bookmark is so easy that you may want to make a bunch and give them out in a Valentine card to your friends and loved ones.  You can easily sign them before you add the contact paper.  You could even give your sweetie a book of love poems and add the Valentine's Day magnetic bookmark with it.  Change the colors and scrapbook paper print to personalize!  

Materials:

Magnetic sheet, one side adhesive

Scrapbook paper in desired print

Tacky craft glue

Small amount of clear contact paper

Glitter fabric paint, red

Pencil, ruler, scissors

1.     Make a pattern of two small hearts, one a bit larger than the other. (To make a heart pattern fold a piece of paper in half and draw a half heart on the fold. Cut out. Open and you will have a symmetrical heart.)  Play around with different sizes and shapes of hearts.


2.     Using the heart pattern, cut out a large one and a small one from the magnetic sheet.  Cut out a small and large heart from the scrapbook paper as well.


3.     Remove the adhesive backing from the large magnetic sheet heart, line up the corresponding large scrapbook paper heart and attach.  Trim around any overlapping edges. Repeat with the smaller magnetic and scrapbook paper hearts.


4.     Cut a strip of scrapbook paper 6 inches by 2 inches.  Fold 2 inches down from one end. On the unprinted side of the scrapbook paper you can write your Valentine a message if you desire.


5.     Cut two pieces of clear contact paper 6 ½” x 2 ½.” Lay one piece of contact paper adhesive side up and remove the backing.  Place the scrapbook strip print side down on top and adhere.  Remove the backing from the other piece of contact paper and place over the strip already attached to the contact paper.  (Like a contact - paper sandwich)  Trim any edges that do not meet.  Refold where you folded it 2 inches down from the top.

Add your message here


6.     Spread some tacky glue on the larger of the two hearts and adhere to the front of the bookmark (short edge)


7.     Spread some tacky glue on the smaller heart and attach to the area of the back where it meets the front heart, thus magnetizing the two together. (This will keep it on the page)  Let dry completely.  When dry you may decorate the front with small dots of glitter fabric paint if desired.


Enjoy and hope you and yours have a Happy Valentine's Day!

Tuesday, November 21, 2017

How to make amazing dimensional gift bags quick and easy

dimensional gift bags


Black Friday comes and goes.  And you’ve bought a few gifts you will want to come home to wrap them before anyone sees them.  What happens when the gifts are small and hard to wrap?  You grab a gift bag, right?  Well, you can make several dimensional gift bags in minutes that will definitely be a showstopper! 

These dimensional gift bags are quick and easy to make using some elements cut from Christmas cards and then embellished with little extra touches.

I always buy my Christmas cards through the mail and in the months that precede the holiday I receive stacks of samples with just the covers to choose from.  I would never throw them away and that is how the dimensional gift bags came about.  You just need at least two card fronts that are identical.  If you don’t get card samples just use an inexpensive pack of cards that are all the same for your dimensional gift bags.

Materials:

Two Christmas card fronts with individual elements you can cut out
Small sharp pointed scissors
Dimensional foam circles
Gift bags (I purchased a pack of 10 for under $5) or you can even use a plain recycled store bag and cover the logo with your image
Tacky craft glue
Small bows, rhinestones, jewels, pompoms or any coordinating embellishment
Dimensional fabric paint – Crystal sparkle

1.     Gather your supplies. Carefully, cut out both chosen images from the card fronts.


2.     Spread some tacky craft glue on the back of one of the images.  Center the image on the bag and attach. 


3.     Next, remove the paper from the double-sided sticky surface on the foam circle and attach to the image on the bag.  Add them all around randomly.  I like to add a second foam dot on top of the first one for extra height.  You can if you desire, use only one.


4.     Now, remove the paper from the dots and add the second image on top of the first one making sure you line it up evenly.

5.     Then, add the embellishments with some tacky glue and let dry. 


6.     Use the crystal sparkle dimensional fabric paint to accent the image.  Let dry.


7.     Add the gift to your bag and you will be sure the gifted recipient will save it and re-use it for years to come.

We would love to hear your comments and hope to see you again at Make it easy crafts.  Please follow us on Facebook 

Sunday, May 7, 2017

Make an easy rose pen for a Mother's Day surprise

rose pen


Did you know that you recycle a simple brown paper bag into an adorable rose pen for a fun Mother’s Day surprise?  Follow the simple steps and you can make an entire bouquet for Mom’s desk in no time, with very little cost! 

This project is easy enough for older kids with a little help.  Your Mom will love her new rose pen and use it often! 

rose pen


Recycled paper bag rose pen

Supplies:

Stick pen
Brown paper bag
Flower pattern
Thin cardboard
Tacky craft glue
Scissors
Ruler
Small paintbrush
Acrylic paint in choice of color
Marker in a similar color
Small piece of packaging tape (stronger than regular tape)
Green floral tape

Instructions:

1.     Download the flower pattern and trace onto a piece of thin cardboard.  Cut open a brown paper bag and lay it flat onto your work surface.  Use the cardboard pattern to trace three flowers and cut them out.


2.     Using the acrylic paint apply a coat of paint onto each flower.  Let dry, turn over and apply a coat of paint on the opposite side.  Let dry.


3.     Use a ruler and coordinating marker to mark spoke like lines from the petals (See photo) do this on each flower.


4.     Cut one section to the center of one flower.  On the second flower cut out one petal.  On the third flower cut out two petals.  Save the cut out single and double petals, they will be the center of the rose.


5.     On the first flower add some glue to the petal adjacent to the cut line and fold and attach the petal next to it.  (See photo)  It will look like a bowl.  Repeat this step on the second and third flower folding the petals together.  Let the glue dry.


6.     Use the scissors to cut a small curved opening at the bottom of each flower (This is where the pen will be inserted)


7.     Using the cut pieces of petal use the pen or a pencil to fold around and glue together.  Cut the uneven end straight.


8.     Insert the pen through the smallest center petal and slide up to the top leaving some extra at the end.  Cut a small piece of packaging tape and secure this center petal onto the pen.  Working from the bottom (pen point end) slide on the next sized center petal all the way to the first one.  It will fit tightly.  Use the small paintbrush to curl the petal down.


9.     Continue adding each flower from smallest to largest and curling the individual petals with the paintbrush until you have added them all.  Cut a small piece of tape and secure the last flower onto the pen. 


10. Begin at the bottom of the flower with floral tape, twisting around the pen and down.  Floral tape sticks to itself.  Cover the entire pen up to the end.