Showing posts with label rock. Show all posts

Friday, December 1, 2017

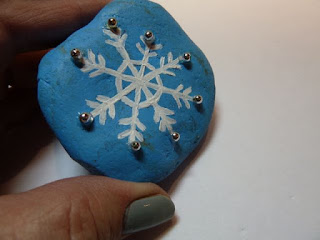
How to paint a snowflake rock for the holidays

snowflake rock


Rock painting is all the rage these days.  It’s fun to paint a rock with a positive message on the back and leave it somewhere for someone to find.  Then, they, in turn, leave it somewhere else.  Kids, adults, anyone can paint a rock.  The cost is minimal only requiring some paint and anything goes.  And this little snowflake rock is so easy and so much fun!

You can make your snowflake rock individual by varying the shapes and sizes of snowflakes.  Then to finish, write a simple word on the back.  I chose Joy, but you can use peace, kindness, snow, or any other positive word that fits the season.  They make a great gift as well to use as a desk decoration or paperweight!

Materials:

Rock
Acrylic paint, light blue, white
Tiny silver beads
E6000 glue
Pencil
Sharpie paint marker in black
Small paintbrush
Newspaper or something to protect your work surface

Instructions:

1.     Paint the entire front of the rock light blue, let dry and then turn it over and paint the back.


2.     Next, use a pencil to outline the snowflake.  First, draw a vertical line.  Then draw a horizontal line.  Finally, draw an x with two lines in the center.  


3.     Now, draw lines near the base, connecting the snowflake all around.  (See photo)


4.     To finish your snowflake pattern draw two lines on each spoke all around. (See photo)


5.     Use white paint to go over your pattern.  Let dry.


6.     Go over the snowflake for your snowflake rock a second time if necessary and let dry completely.


7.     Turn the rock to the back and using the pencil, write your message or word.  Then go over it with the black sharpie and let it dry.


8.     Use E600 glue to attach some tiny silver beads on the ends of each spoke. (Optional)  Let the glue dry. Your rock is ready to spread some kindness!


snowflake rock

Visit Make it easy crafts and again and please follow us on Facebook!


Monday, October 9, 2017

How to paint this super fun star quilt rock

star quilt rock


Warm up to this super fun star quilt rock.  It’s easy to make this rock and then put your “warm thoughts,” on the underside and leave it for someone to find.  It’s easy to paint and kids will love to vary the colors of the quilt.  Simply follow the diagram painting all the dark sections first and then follow with the light ones.  After you have finished your quilt leave your positive message on the back!  Kindness rocks! 

Materials:

Rock
Acrylic paints, burnt sienna (dark), Yellow ochre, (light) and red.  (I’ve used fall colors but you can substitute if you wish)
Small paintbrush
Black sharpie marker
Black extra fine marker
Palette or paper plate
Pencil

Instructions:

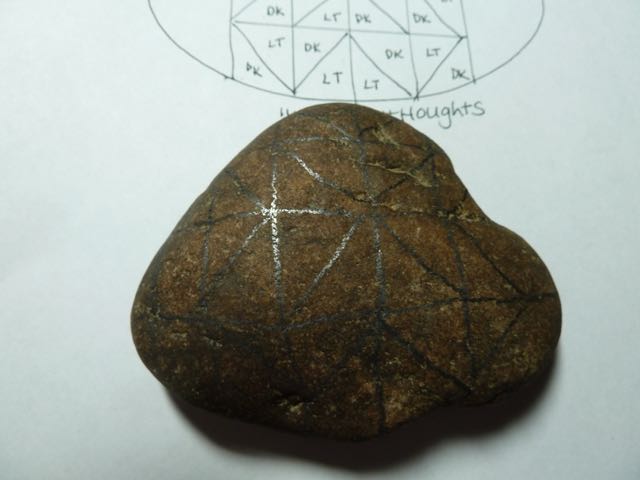
1.     First, use the pencil to mark off lines for the squares on your rock.  The lines don’t have to be perfect.  Then, make diagonal lines on the squares following the diagram.  Don’t worry about the ends since they will just be one solid color.


2.     Next, paint the underside of the rock yellow ochre and let dry.


3.     Now using the small paintbrush, paint the dark diagonal areas first and let dry.


4.     Next, paint the light color diagonal areas and let dry.

5.     Depending upon your rock you may want to add a second coat and let dry.

6.     When the rock is dry, use the wood end of the paintbrush dipped in red paint to make dots on all the yellow ochre. (Light areas)  Continue till you have added dots on all the light diagonal lines.


7.     Finally, use the black sharpie marker to outline all the lines.


8.     Use the extra fine marker to make stitch lines on the black sharpie lines. (See photo)


9.     Turn rock over to the solid side and paint your message.  After you’ve painted it use the wood end of the paintbrush to put dots on the letters.  Let it dry and leave the rock in a park, store, sidewalk and more for someone to find and make their day warmer, and brighter!


Diagram for painting

Check out some of our other rock painting tutorials like this Leaf rock!
Thanks for your visit and we'd love to hear your comments!


SaveSave

Monday, September 25, 2017

Easy does it, how to paint a fun pumpkin rock

pumpkin rock


Are you ready for another rock painting lesson?  Let’s paint a fun pumpkin rock!  You can follow the tutorial to make it exactly like mine, or you can change up the expression on your pumpkin rock.  It’s easy and fun to do it as a group craft for Girl Scouts, senior groups, and with the kids. 

Join the Kindness rocks celebration. Leave your rocks for someone to fine. Add a positive message on the bottom of the pumpkin rock and make someone’s day!

Materials:

Rock
Acrylic paint, orange, yellow, burnt umber, green, white, black, red, and burnt sienna
Paintbrushes, flat, and liner or spotter brush
Sharpie marker for message on bottom
Newspaper or newsprint to protect your work surface

Instructions:

1.     First, use the flat brush to paint your rock orange on the front, let dry and paint it on the back as well.  Let dry.


2.     Using the liner or spotter brush, add vertical lines on the pumpkin.  (See photo)


3.     Add a stem on the top with green paint. 


4.     Next, use the yellow paint to add some dimension to the ribs of the pumpkin next to the brown vertical lines.  Blend well.  Let dry.


5.     Now using the white paint make two circles for eyes. (See photo)


6.     Then, add two black dots for the pupils on each eye.


7.     Paint a red oval under the eyes for the nose.  Then use the black paint to make a smiling mouth.  (See photo)  Let dry. 


8.     When the paint is dry add the final touches.  Paint eyebrows above the eyes with black.  Paint a white dot on the nose and on each pupil. Finally,  paint a small rectangle in white for a tooth on the mouth.


9.     Add some green lines on the top to resemble hair.  And use the spotter or liner to add some sienna dots on the cheeks for freckles.  Let all the paint dry. You can add a coat of clear acrylic gloss or matte finish to protect when it is finished.  If you choose, you can write a positive message on the bottom of the pumpkin rock.


pumpkin rock


SaveSave