Showing posts with label Summer. Show all posts

Wednesday, July 4, 2018

7 simple tips for July 4th fun with family and pets


Make it easy crafts would like to wish you a very Happy July 4thholiday.  We hope you will enjoy the sunshine and other outdoor fun activities.  In addition, we are listing 7 simple tips for July 4thfun with family and pets.

We hope you enjoy this free printable Happy 4th of July coloring page with your family and friends.

Updated July 2018

7 simple tips for July 4th fun with family and pets


  1. Don’t allow children to ignite or play with fireworks.

  1. Keep a bucket of water handy and dispose of used fireworks properly after igniting.

  1. Keep pets indoors. Fireworks can terrify pets.  If you choose to allow your pet outdoors, make sure they are wearing an ID tag in case they become frightened and run away.

  1. Do not drink alcoholic beverages and ignite fireworks. Much like drinking and driving the two do not mix.

  1. Make sure there are plenty of outdoor games and activities to entertain children and guests. Print the coloring page and have a contest for the best one.  Games like badminton, volleyball, and even wading pools are great for family get-togethers.

  1. If you are serving salads at your event make sure any that include mayonnaise, dressings or easily contaminated dishes are refrigerated. Replace them under refrigeration promptly after serving.

  1. Never pick up a firework that has failed to ignite.

Friday, July 28, 2017

How to make quick and savory Greek style green beans

Greeks style green beans


The summer bounty of fresh vegetables is in full swing!  I love going to the local farmer’s market and buying fresh tomatoes and green beans.  Being of Greek descent I know I’ve touted the delicious flavors of Greek cooking many times.  So I’m at it again.  One of my family’s favorite Greek recipes is the Greek style green beans.  In fact, it is my husband’s most asked for vegetable recipe!

You see, while I love green beans any way, shape, or form, he isn’t fond of the lightly sautéed style of beans.  The beans just don’t seem cooked to him.  Raw or cooked never bothered me.  As a child, I’d sit in the kitchen helping my mom snap raw beans gobbling up just as many as I’d snap.  Before my husband met me, the only beans he would ever eat were slow-cooked with a ham hock.  (Which I also love)

I know, I know, this entire introduction for a simple side dish.  Side dish or not a good one can make the meal.  And what is even better is that these Greek style green beans are so easy to make.

So I think I’ll be on my way to that local Farmer's Market to get some fresh beans today!  How about you?


Savory Greek style green beans

Ingredients:


•   1 lb. fresh or frozen green beans (thawed if frozen)
•   Garlic clove, minced
•   1 tbsp. light olive oil
•   ¼ cup chopped onions
•   14.5 oz. can fire roasted diced tomatoes  (you can substitute fresh diced tomatoes if desired)
•   1 8 oz. can tomato sauce
•   ½ tsp. each of salt and pepper
•   ½” tsp. oregano
•   1 tbsp. lemon juice


Directions:

Heat the oil over medium heat in a large pot.  Add the onions and garlic and sauté about 5 minutes until the onions are translucent.  Stir in the green beans and cook a little longer.  Reduce the heat to medium low.  Add the tomatoes, tomato sauce, salt, pepper, oregano, and lemon juice.  Cook on medium low for 5 more minutes.  Reduce heat to low, cover and simmer for about 45 minutes.

We hope you stop by Make it easy crafts each week for more craft tutorials, recipes, printables and so much more.  


Monday, June 26, 2017

How to make fun pencil pouch from duct tape

fun pencil pouch


It’s almost July and pretty soon it will be time to purchase school supplies.  You can personalize a fun pencil pouch from a plastic zipper storage bag and some duct tape.

There are literally hundreds of different color duct tapes available.  So there is a personalized design for every taste and color preference. And duct tape is very sturdy. You can even punch holes in the bag to add to a binder. 


This fun pencil pouch is fun to make for kids.  So you will never  be at a loss when they come to you saying they are bored.

Materials:

One gallon sized slider style storage bag

Duct tape in desired print or color

Plastic cutting mat-- optional (helps with cutting the duct tape)

Ruler, marker, scissors

Three-hole punch or regular hole punch

1.     Measure and cut 3 inches off the bottom edge of the storage bag.  Discard the cut off piece.


2.     Measure and cut 5 pieces of duct tape to 10 ½” each.

Cutting duct tape is easy to measure on a plastic cutting mat

3.     Starting at the upper edge attach a 10 ½” piece of duct tape over the plastic of the bag and across. Press to adhere.  Repeat with three more pieces of duct tape overlapping just a bit where the edges meet to cover the bag. Overlap the bottom edge of the final piece and press to the opposite side.


4.     Turn over to cover the other side.  Cut 4 pieces of duct tape to 12” each.  Start as you did on the first side except fold the extra length on each side (about ½” on each side) to the back. (Already covered side)  


5.     When you have completely covered the bag, you will need to reinforce the sides and bottom edge.  To do this cut 2 pieces of duct tape 7 ¾” each.  Press half the tape on one side covering any uneven edges and turn the excess to the opposite side.  Repeat on the other end.  For the bottom, cut another piece of duct tape 10 ½” and attach part to one side and fold the rest to the other side. (Bottom reinforced)


6.     Use a three-hole punch to make holes for the loose-leaf binder along the bottom edge.  If you do not have a three-hole punch, use a piece of loose-leaf paper to trace where the holes should be and punch with a regular hole punch.


Come back and visit each week for more Quick craft tutorials, recipes and more from Make it easy crafts!


Thursday, August 18, 2016

Make a quick and easy sleepover breakfast party favor

Sleepover breakfast party favor

You will surely be the hit of the party when you make a sleepover breakfast party favor for each of your child’s guests. For one thing, breakfast is on the table in a flash and the best part is the surprise detachable hair bow with each treat.

School will soon be back in session and with it comes sleepovers. After they play till the wee hour who wants to get up and fix a big breakfast? Adults and kid’s especially love cereal. In fact,  you can get a different one for each taste and dietary needs. I used the round tubs but you can easily substitute the little rectangular boxes instead.

Make a sleepover breakfast party favor for each girl in all the same color or change it up to match each one’s fave. Then, after the party each guest will get to take home a lasting memento. And you will have less clean up and more fun.

Lets make a sleepover breakfast party favor


Materials:


            Individual Cold or hot cereals
            Plastic spoon for each sleepover breakfast party favor
            7/8” grosgrain ribbon in desired color
            Hot glue and hot glue sticks
            Mini Bowdabra bow maker with hair bow tool
            Bowdabra bow wire
            Rhinestone, cabochons, button or other bling for the center of bow
            Alligator hair clip

1.    First, gather your supplies. To start, measure how much ribbon you will need to wrap around the cereal container.

Sleepover breakfast party favor


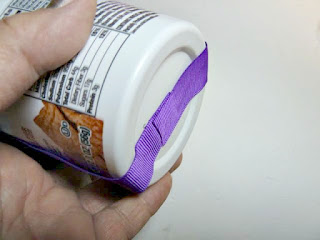
2.    Starting at the bottom, add some hot glue to the center. Attach the end of the ribbon and begin to wrap around adding more hot glue as you go. Continue to wrap up the sides and across the top. Don’t add any glue to the top center since that is where you will insert your spoon.

Sleepover breakfast party favor


Sleepover breakfast party favor


3.    Then, continue gluing and attaching ribbon down the other side till you meet at the other end. Check to see that the spoon will easily fit under the ribbon on the top. Set aside.

Sleepover breakfast party favor


Sleepover breakfast party favor

Make the hair bow for the top of the cereal


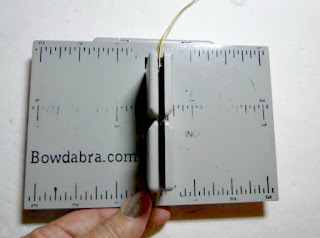
4.    Next make the bow. First, cut a piece of Bowdabra bow wire 18” long, fold in half and insert into the Bowdabra. You will have a loop on one side and two loose wires on the other.

Sleepover breakfast party favor

5.    Now, cut a 15” piece of 7/8” wide grosgrain ribbon, then fold in half to find the center and insert into the Bowdabra.

Sleepover breakfast party favor

6.    Then you make a loop with one end, bring it around and insert the end under and into the Bowdabra.

Sleepover breakfast party favor

7.    Now, Bring the other end across the first loop, bring it under and insert the end into the Bowdabra. To clarify, it will look like an X.

Sleepover breakfast party favor


Sleepover breakfast party favor

8.    Now, to finish the bow, push the first loop into the Bowdabra, then push the second (top loop) into the Bowdabra and you will form the bow.

Sleepover breakfast party favor


Sleepover breakfast party favor

9.    Scrunch down with the Bowdabra wand.  Insert the two loose wires through the loop and pull tight while the bow is still in the Bowdabra. Remove the bow, turn to the back and tie a knot. Tie a second knot and then arrange the bow if necessary.  Finally, using the hot glue gun attach an alligator clip to the back of the bow. Cut off any extra wire. You may optionally add a small charm, rhinestone or ornament to the center of the bow with some more hot glue because you can never have too much bling!  Lastly, attach the removable hair bow to the spoon on the top of the sleepover breakfast party favor.

Sleepover breakfast party favor


You can find Bowdabra bow maker at just about every craft store and Walmart!