Showing posts with label step by step. Show all posts

Tuesday, July 28, 2020

How to make adorable little origami red elephants for earrings

origami red elephants


Elephants are considered good luck in many countries, especially with the trunk raised.  Just, grab some origami paper and you can fold these origami red elephants and make the cutest pair of earrings.  Or you could just stand them up as a mini decoration.  Use the photos as a guide and you will find although tiny, they are not that hard to fold.

Adorable mini origami red elephants


Materials:


Origami paper, red
Nail file

Optional for earrings: 

Needle and head pin 
Needle nosed pliers 
Fishhook ear wires
Wire cutters

Instructions:


First, cut a piece of red origami paper 1 ½” x 3 ½” for each origami elephant.

origami red elephants


Next, fold the paper in half lengthwise.  Turn, and fold the two top edges to a point (like you are making a paper airplane) Fold a second time to make a longer point. 


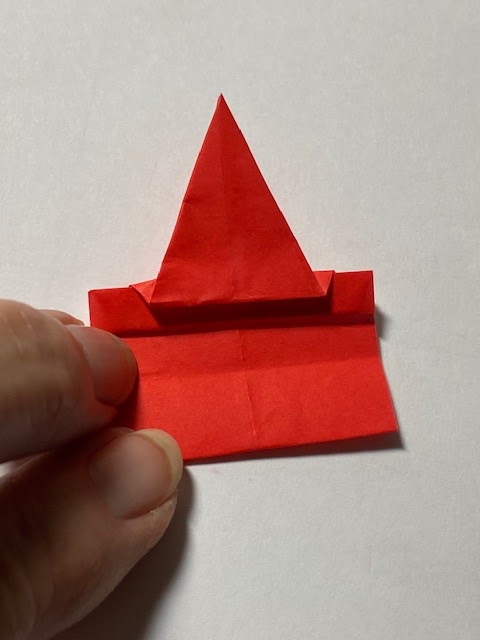
Turn and fold so that the folded point touches the other side.  Turn over so that the point is on the underside.  Now, fold the folded edge over so it meets the crease, but as you make this fold flip the point back to the front.


Then, fold the left edge under so it meets the center crease. Then fold the bottom folded edge of the point to the edge of the paper.  Then fold the point over to the left, and fold back again to make a kind of fanfold. (Front of the elephant) For the back, fold the flat folded edge over so it meets the center crease and then flip the edge back to the front.  (See photo)


Turn over the paper.  This is the only tricky part so use the photos as a guide.  You will see a kind of rectangle shape.  Just fold the top layer fold the corners inward.  Turn and do the same to the opposite side. Now, it is easier to take this in your hand to do this part, push the folded corners down and press open.  Do the same thing to the opposite side and then flatten them all down.  Use your fingernail or a nail file to make the creases. 


Fold in half. Fold the back legs in so they match the front.  To make the ears, squeeze and fold at an angle making the creases for the ears on each side of the head. The trunk will point down. 

origami red elephants

origami red elephants

origami red elephants


Finally fold the trunk, up, and then back to make the trunk raise.  The red origami elephant is finished.

origami red elephants

origami red elephants


To make these into earrings, using a pint push through the underside to make a hole and insert a headpin.  Cut the headpin down if necessary. Then, use the needle-nosed pliers to twist into a loop adding the fishhook ear wires. Close loops.


Monday, November 6, 2017

Puppy rock


My little Jack Russell terrier is my muse.  She models for me when I paint, and she has me running around as fast she runs.  So it only goes to figure that I would paint a puppy rock. And this rock doesn't need trips to the vet or walking.  It's the new millennium version of the pet rock!

Painted rocks are all the rage these days.  You can leave them in parks or stores for someone to find.  It just makes someone’s day when they pick up a painted rock with a positive message written on it.  Kindness truly does rock!

And this little puppy rock is a great gift for your favorite dog lover.  You can use it as a paperweight or just for a little extra décor on your desk or shelf.  Paint one or paint a bunch.  You can’t get a craft that is less expensive.  When you finish your puppy rock add a cute little Bowdabra bow on her head or under her chin with E6000 glue and you will have the cutest little pup!

Materials

Oval river rock
Graphite paper
Stylus
Pencil
Small paintbrush
Acrylic paint, sienna, white, black, and pink
Fine line permanent marker
Paper plate or palette
 Face pattern

For the bow:

8” 5/8” grosgrain ribbon in the desired color
Mini Bowdabra with hair bow tool and ruler attachment
Bowdabra bow wire
E6000 glue

Instructions:

1.     First, download and print the face pattern.
2.     Next, cut out the pattern and place a piece of graphite paper under it on top of the rock of your choice.  Use the stylus to trace around the pattern.

3.     Now, remove the graphite paper and go over the faint lines with a pencil if need be. 

4.     Then, begin painting your rock.  Start with the Sienna and a small brush and paint the ears.  Make sure you leave a tiny space between the sections. (You will outline your puppy with the marker in this area when you are done)

5.     Next, paint the muzzle and forehead with white paint. Paint the eyes leaving the pupil area.  Paint the nose and pupils with black paint.  Paint the tongue with pink paint.

6.     Add another coat of paint on all the areas and let dry.  With a tiny bit of white paint add to small dots on each eye and two on the nose. (See photo)  Let dry completely.  Then, use the fine line permanent marker to outline all the areas on the pup.

7.     Make the optional bow.  Cut an 18” piece of Bowdabra bow wire, fold in half and insert into the Mini Bowdabra.  You will have a loop on one side and two loose wires on the other.  This serve as a slipknot when finished.

8.     Cut an eight-inch piece of 5/8” wide grosgrain ribbon.  Insert into the Bowdabra leaving a small tail.  Make a loop on the other side at the ½” mark and then make a matching loop on the other side.  Scrunch down with the Bowdabra wand.

9.     Now, insert the two loose wires through the loop and pull tight.  Separate the ends and tie a knot.  Remove from the Bowdabra. Fold each end in half and cut to dovetail.


10.  To finish your puppy rock, use some E6000 glue to add the bow to the rock and let dry. 


Sunday, October 29, 2017

How to easily paint a cute turkey rock table setting

Thanksgiving turkey rock


Painting rocks are all the rage these days.  Whether you leave them for someone to find or you gift them for paperweights, they are inexpensive and fun.  This turkey rock is cute and you personalize it with the name of your guest.  Leave the turkey rock at each table setting and your guest can take it home as a customized party favor and memento.

Add the date and year on the back and the turkey rock will be a lasting memento of the holiday.  You can even have the back blank and let each guest write something they are thankful for before the meal.  It’s a fun tradition for Thanksgiving.

Let's get started:

Materials:

Rock
Acrylic paint in white, brown, lt. brown, yellow, red, orange, and black
Sharpie or any permanent marker in black
Small paintbrush
Newspaper to protect your work surface
pencil

Instructions:


1.      First, paint the entire rock front and back with orange paint.  Let each side dry before painting the other and then let completely dry.  It may help to use a hair dryer to dry all the layers quickly.

Thanksgiving turkey rock


2.      Now, use a pencil to lightly add guidelines for all the shapes. The head is a teardrop oval.  The body is a larger oval.  The beak is a small diamond shape. The feet are three claws on each side of the body. The eyes are two round circles on each side of the beak.  The waddle is a long fat comma shape.  And the feathers are spoke-like fan shapes with a curved top.  You will just fill in the spaces as you would a coloring book!  Super easy.  If you don’t like your pencil lines, erase them and start over.

Thanksgiving turkey rock


3.     Use the paintbrush and brown paint to block in the head. Next, with the same brown, add a rounded shape. This is the body, which is approximately twice the size of the head.  Let dry.  (See photo)  You are blocking in the basic shapes working around the eyes, beak, and waddle. You will be going over all the lines on entire turkey with the marker when it is finished and dry.

Thanksgiving turkey rock


4.     Now add the tail feathers.  Using the brown paint, start at the bottom and work all around the body making each feather like a fan shape, slightly curved at the top. Now use the white paint on the top of the feathers curving the top. Let dry.  Add the features.  Paint the eyes in white, the beak yellow, and feet yellow, and the waddle red.  Let dry.


Thanksgiving turkey rock

Thanksgiving turkey rock


5.     When all the painted areas are dry, Use the Sharpie or permanent fine line marker to outline all the feathers, body, and features.

Thanksgiving turkey rock

Thanksgiving turkey rock

Thanksgiving turkey rock

6.     Highlight your turkey by making some light brown lines on the body. Add the pupils of the eyes with the marker.  You may also want to use a little thinned white paint to add some highlights on the feathers and body. (See photo)

Thanksgiving turkey rock

Thanksgiving turkey rock

Thanksgiving turkey rock


7.     Finally use some white paint to add the name on the feathers, counting the letters so that they are in the center.

Thanksgiving turkey rock


8.     Add the date and year on the back of the rock, or leave blank and let each guest write what they are thankful for.  Place at each place setting.  Your guests can take their turkey rock home as a party favor.

Thanksgiving turkey rock

Thanksgiving turkey rock

Thanksgiving turkey rock


Monday, July 24, 2017

How to easily make an adorable snowman ornament

snowman ornament


It's July, and July is the best time to start making your Christmas ornaments.  This snowman ornament is made from a recycled K-cup so it's green as well as adorable. The days are warm and lazy and the kids are out of school so there is plenty of time to create!  Get a head start on Christmas with this sweet recycled k-cup snowman ornament before school starts back and you are swamped with PTA meetings, soccer games and more.

Here at Make it easy crafts, it's Christmas in July with the easy k-cup snowman ornament.


Materials:

Two used K-cups, one black, and one white. (Filters removed and washed.)

Black Felt

Black and orange dimensional fabric paint

12” of 1/8” ribbon

Tacky craft glue

Compass

Ruler

Nail or something to puncture a hole in the tops of the K-cups

Round paper punch

White colored pencil to mark on dark felt

Scissors

Large eye darning needle (optional)

Pony Bead


1.     Insert the white pencil in the compass and make a 1 ½” diameter circle on the black felt.  In the same starting point make another circle inside the first one at a 1” diameter.  Cut out the first circle and then cut out the center circle. You will have a felt ring.  (See photo)


2.     Slide the felt ring on the black K-cup stopping at the rim.  Snowman’s hat made. Set aside.


3.     Turn the white K-cup upside down and make a hole in the center with the nail.  Repeat for the black K-Cup with the felt rim.  


4.     Place the top of the black K-cup down on the black felt and trace around with the white pencil.  Cut out.  Make a mark on the felt where the center hole is and make a hole with the paper punch.  Line up the felt with the hole on the top of the hat and glue down with some tacky glue.  Let dry.  Trim any excess felt with the scissors.


5.     Thread a pony bead on the ribbon, center so that it is in the middle with six inches on each end.  Insert both ends of the ribbon through the hole in the white K-Cup.  The pony bead will secure it to the inside. You may use a large eye darning needle here to get through the hole easier although I had no trouble doing it with just the ribbon.  Tie a knot in the ribbon one inch from the top of the white K-Cup, and then continue to thread it through the top of the black K-cup.  The knot separates both of the K-Cups so they hang independently. (See photos)


6.     Tie a knot in the top of the final end of the ribbon to hang the ornament.  


7.     Tilt the hat so you can use the black and orange dimensional fabric paints to make a face on the snowman.  (See photo) If you want, you may add some glitter glue on the top of the hat for extra pizzazz. Let the paint and glitter dry.  When hanging the hat will sit straight with the snowman dangling under.  


SaveSave