Showing posts with label Fun kid's craft. Show all posts

Wednesday, January 11, 2023

How to dress up a fun candy bar for Valentine's Day

Looking for a way to present a treat for Valentine’s Day, that is easy and allows you to make a bunch of them in minutes?  Well, dress up this fun candy bar for Valentine’s Day.  It’s a great idea for a party favor or a classroom.  Easy step-by-step tutorial. I've used the Bowdabra to create the bow for this craft. You can optionally substitute a premade bow if desired.

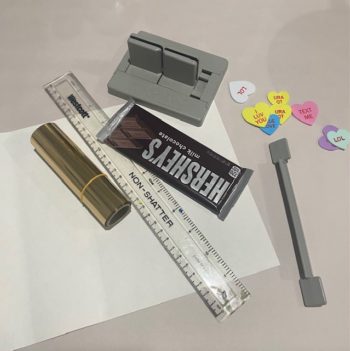
Materials:

  • Flat candy bars, square or rectangular
  • Heart scrapbook paper
  • Tacky glue
  • Scrunchy ribbon
  • Mini Bowdabra
  • Bowdabra bow wire
  • Heart-shaped foam stickers
  • Ruler, pencil, scissors

Instructions:

fun candy bar

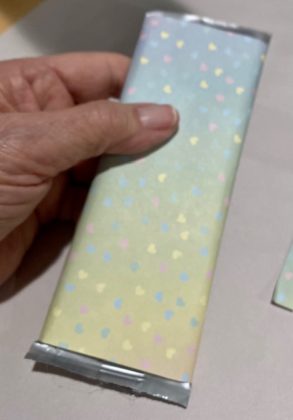
First, measure your candy bar and cut the scrapbook paper to fit around with the ends open. Glue on the bottom first, then wrap around the two sides and glue.  Your candy bar is wrapped. Set aside.

fun candy bar

First, measure your candy bar and cut the scrapbook paper to fit around with the ends open. Glue on the bottom first, then wrap around the two sides and glue.  Your candy bar is wrapped. Set aside.

fun candy bar

Next, cut a piece of Bowdabra bow wire.  Then, fold it in half and insert it into the Bowdabra.  You will have a loop on one side and two loose wires on the other side.  This will serve as your slipknot. Tuck the ends under to stay out of the way.
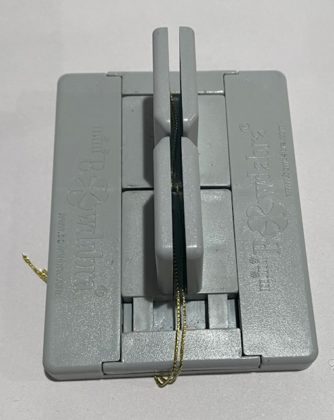
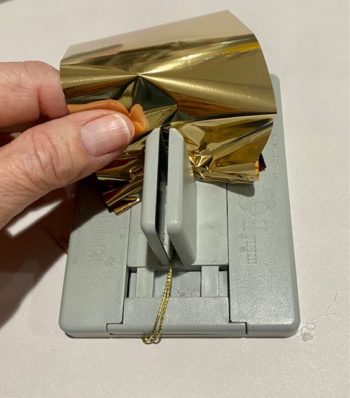
Cut about 12” of scrunchy ribbon and cut in half lengthwise.  Begin feeding the scrunchy ribbon from the top down, like an accordion. Scrunch down with the Bowdabra wand.
fun candy bar

Thread the two loose wires through the loop and pull tight while the bow is still in the Bowdabra.  Remove and separate the ends, turn to the back and tie a knot. Clip the excess wire.
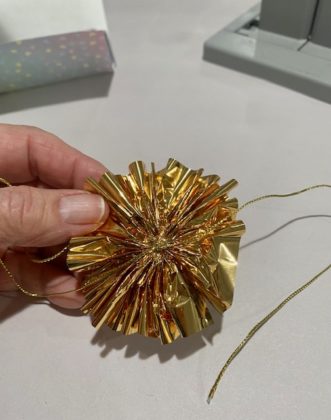
fun candy bar

Now, glue the scrunchy bow on the front of your wrapped candy bar.  Attach a foam conversation heart to the center and a couple of smaller ones on the front.
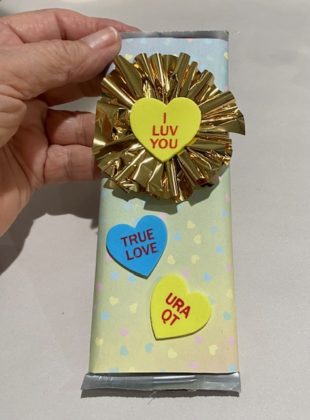
fun candy bar

Now, go ahead and make a bunch because one fun candy bar is never enough!
fun candy bar


Sunday, November 21, 2021

How to make a super easy dollar Christmas stocking extra special

Christmas stocking


I always fill stockings for my adult children. The problem is that when they go back to their homes, they take the Christmas stocking with them. So, the following year, I must come up with another generic stocking to fill.  Since, the cost of the contents is usually pricey, the stocking must be reasonable, but attractive.  I got this simple felt stocking for a dollar, but I wasn’t happy with the way they looked.  So, I created a felt mosaic buffalo plaid embellishment.  It is so easy that you could even do this with young children.


Materials:


Inexpensive felt stockings

Red felt

Burgundy felt

Black felt

Fabric glue

Cardboard to insert into the stocking while you add your felt squares.


Instructions:


Gather your supplies.


First, cut a piece of cardboard the width of the stocking and insert it into it.  This will help with stability while you add the your felt squares to your Chiristmas stocking.


Now, cut ½” x ½” squares from the red, burgundy and black felt.  Next plan out how the squares will be positioned on your stocking.


Now begin to glue each square on the stocking working horizonally.


Row 1:  black, burgundy, black, continue this pattern to the end


Row 1: burgundy, red, burgundy, continue this pattern to the end.


Repeat row 1 and 1 till you have made your felt mosaic buffalo plaid as wide as you want on your stocking. Optionally add some extra trim to the top of the stocking.


Christmas stocking


Let dry completely.  You will have a faux felt mosaic buffalo plaid Christmas stocking.


Christmas stocking

Don't stop here though.  You could also glue different ribbons on the cuff of the stocking for a very attractive look.  Add trims, cabochons, beads, or bells for a myriad of variations.  


Thursday, October 7, 2021

How to make a sweet little reindeer candy holder party favor


Kids with a little help from mom or Dad can make these little reindeer candy holder party favors quickly and easily.  With just a few supplies (some of them recycled) they are created quickly.  Make one or a few for gifts.


reindeer candy holder party favor


Materials:


  • Mini clothespins (2) 2”
  • Paper cardboard tube from an aluminum foil or paper towel roll cut to 2 ½” long
  • A thin strip of cork
  • Mini cork
  • Colored paper clip
  • Sheer white fabric bag (sold in multiples at craft stores)
  • Brown and black paint
  • Small paintbrush
  • Glue gun and glue sticks 
  • Small wiggle eyes
  • One small red pom-pm
  • Candy for filling
  • Scissors, wire cutters, Needle nosed pliers
  • X-acto for cutting paper towel roll
  • Small ribbon bow


Instructions:


First, cut your paper towel roll to the correct length. and take apart the mini clothespins.


Next, take apart the mini clothespins, and glue them onto the prepared paper towel roll piece so that it stands up. 


reindeer candy holder party favor


Working with the small cork (head.), cut a piece of thin cork in an ear shape and glue it to the back of the cork  (The thicker end) Now, glue the cork on the top of the paper roll with the shorter end facing out. 


reindeer candy holder party favor


Cut the paper clip in half and twist each piece into a pleasing antler shape. Use a nail or pin to make a pilot hole in the top of the head and attach each antler with a little glue.


reindeer candy holder party favor


Paint the entire reindeer with brown paint.  Paint the tips of each leg black for hoofs.  Let dry.


reindeer candy holder party favor


Fill the sheer fabric bag with candy or small treats and insert it into the reindeer's body.  Let the tied end show so it resembles a white tail.


To finish, glue on two eyes, a red pompom for a nose, and add a small bow under the chin.  Your reindeer candy holder party favor is ready to bring smiles and sweetness to your guests.


reindeer candy holder party favor


Monday, August 14, 2017

How to paint a fun crazy quilt rock

crazy quilt rock


I admit it.  I love quilts, but they take time and like many people have a limited amount of that!  So since leaving rocks has become a worldwide fad, I figured why not make a few quilt like rocks.  They are quickly painted and so much fun.  This crazy quilt rock is so easy and looks amazing when done!  You can leave your crazy quilt rock in a public place for someone to find, or just keep it yourself for a dĂ©cor item or a paperweight.

Crazy quilts were quite a fad in the latter part of the 19th century.  They were made into smaller quilts for framing or lap robes.  They were a way for people to use fancy fabrics and decorate them with unique stitching.  Your crazy quilt rock has all the elements but no stitching required!!!

The crazy quilt rock is so easy and is a fantastic craft for camp, girl scouts, church and senior groups, and more!

Materials:

Rock from a creek or river
Acrylic paint in desired colors
White acrylic paint for stitch lines
Pencil
Small flat brush
Line brush
Paper to protect your work surface

Instructions;

1.     First, wash and dry your particular rock.  Next, draw sections all around the rock with a pencil.  These will be your quilt blocks.


2.     Now fill in each section with a flat brush filling in each block with a different color acrylic paint. And let dry completely.


3.     When your paint is dry load a liner brush with some white acrylic paint.  Then, begin making stitch marks all around each block, varying the design of the stitches.  Try little X’s, or U shapes, diagonal lines, etc. this is where you can be creative just like they did in the 1800’s.  You can even write a message on a block such as “love”, or “peace,” etc.


4.     Let dry and your rock is ready to spread the love!

crazy quilt rock


Be sure and visit Make it easy crafts often for more quick and easy craft tutorials, printables, and recipes


Sunday, July 9, 2017

How to make an easy luggage tag, fun kid's craft


Whenever you go anywhere and fly everyone seems to have the same color luggage.  You can make a personalized easy luggage tag that sets your luggage apart from the crowd. The tag is big enough to be noticed but is also very lightweight.

This is a perfect project for kids, girls scout groups, vacation Bible school and so much more.  You make this luggage tag from foam door hangers that are very inexpensive.  It's a great way to use up all those extra little foam shapes that the kids may have not used up yet too! 

So let’s get started!


Materials:

2 foam door hangers in contrasting colors

Disappearing marker

Hole punch or nail, scissors

Tacky craft glue

Sharpie marker 

16” of flexible plastic string (used for beading)

Small foam shapes to fit in the center hole


Easy luggage tag


1)   Choose two contrasting colors of foam door hangers.  Measure 3 inches from the bottom of one door hanger marking with a disappearing marker and cut off. Do the same with the other door hanger except you will measure from the top  (the end with the hole) and cut off. 


2)   Place them together and you will have a recessed area on one end.  You will not be putting any glue in the recessed area. 


3)   Using a large hole punch or simply poke a hole with a nail in the center of the non-door hole area.


4)   Line up both side together so that the hole you punched is in the center of the door hole.  (This is the top of your tag)
  
5)   Spread some tacky glue onto the side with the door hole. Press together and let dry.  Trim the corners at an angle.


6)   Glue foam shapes in the recessed door hole areas if desired or just leave as is.   Attach a piece of flexible plastic string through the punched hole and attach to luggage.  Use the Sharpie marker to label with name and address.