Showing posts with label girl scout ideas. Show all posts

Wednesday, April 12, 2023

How to use a simple technique to make super fun spring friendship bracelets

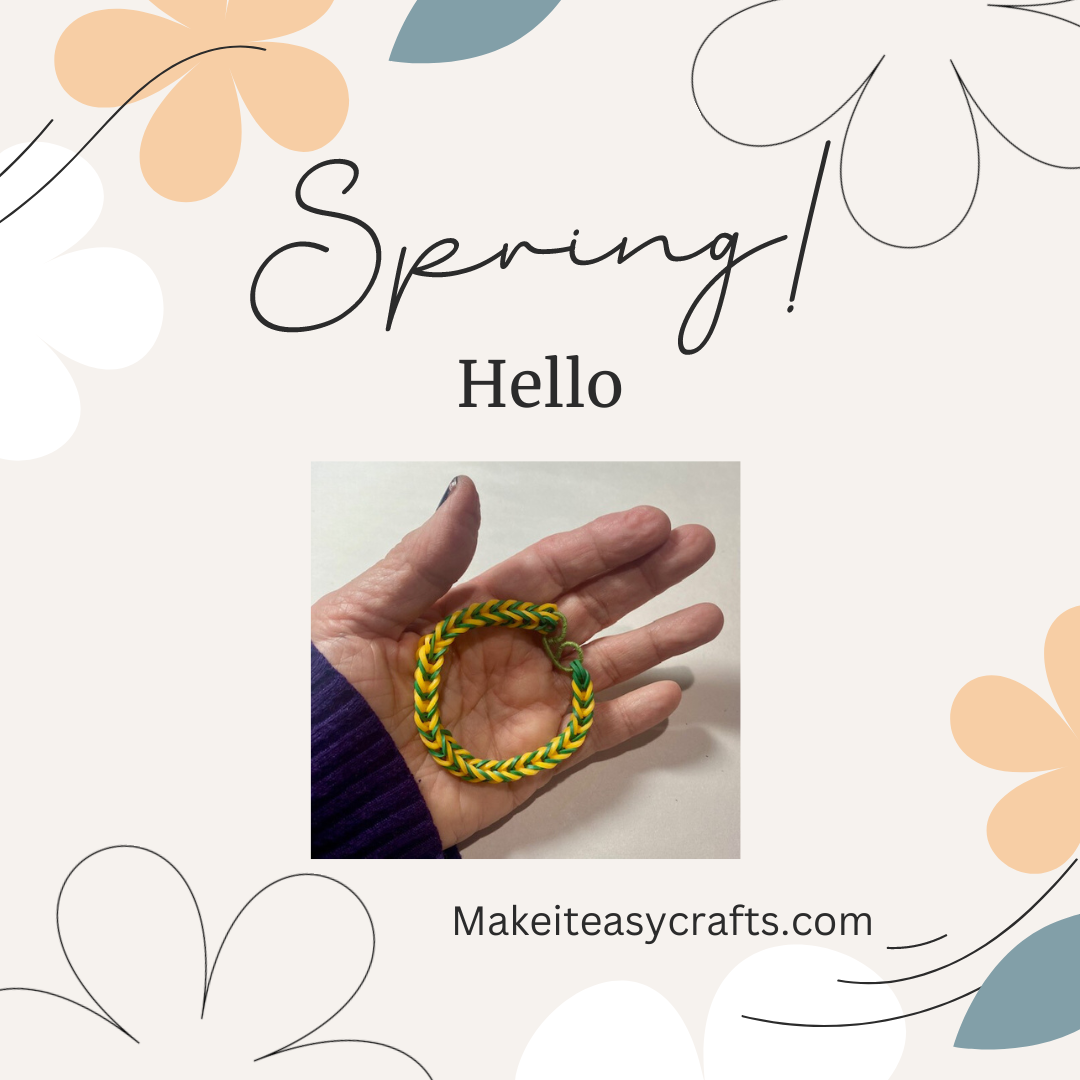
In this easy DIY tutorial, you will learn how to easily make some fun spring friendship bracelets in just minutes with just a few supplies.  

spring friendship bracelets


Materials:

Pack of Green and yellow mini rubber bands or desired two colors

Two pencils

3 inches of wrapped floral wire

Wire cutters

Needle nosed pliers

Ruler

Instructions:

First, place two pencils side by side. Next, slide a green rubber band in a figure-eight shape on the pencil. (See photo) Next, slide on a yellow rubber band, and then a green one.  You just need to slide these on without a figure eight. (See photos)


spring friendship bracelets


Now, lift the bottom rubber band and pull it over the top of the pencil. Repeat on the opposite side. (See photo)


spring friendship bracelets

Add a green rubber band and repeat step #2.  Continue adding rubber bands and pulling over the top alternating green and yellow.  You will start to see a chain forming in between the pencils.  As it grows, pull on it slightly to keep it even.

spring friendship bracelets


Keep adding bands to make the chain longer until you have a length to fit adjusting the wrist. Factor in the size of a one-inch wire curl closure.

spring friendship bracelets


Using the wire cutters cut a 3-inch piece of wrapped floral wire. Next, Insert the wire into the loose end of the chain loops.  Curl the wire end around the rubber band loop.

spring friendship bracelets


Remove the other end of the chain from your pencils and insert the uncurled end of the wire in both loose ends. Now, curl it around as you did the other side and adjust if necessary.

spring friendship bracelets

spring friendship bracelets

spring friendship bracelets


Thursday, June 25, 2020

How to recycle an old CD into stunning monogram framed art

So, I recently had my studio completely redecorated.  And since the walls were newly painted and bare, I decided to make it personal.  What better way than to recycle an old CD into a monogram to hang on the wall?  

Paint your frame in a faux verdigris style to match your green paper.  The recycled old CD pieces will catch the light with color.

This is an easy project that you can create in no time.  So, let’s get started

Note: Please be advised that Plaid Enterprises, Inc. has compensated Make it easy crafts by furnishing Plaid product at no charge in connection with this post.

recycle an old CD

How to recycle an old CD into monogram framed art

 Materials:


Old CD
Scissors
Wooden Frame
Piece of scrap green mat board or card stock to fit your frame
Tacky glue
Small sponge
Paintbrush
Paper plate or palette
Pencil 

Instructions:


First, use the scissors to cut the CD into small pieces of various shapes and sizes.  Next, draw a letter of choice on the card stock or mat board lightly in pencil.  Then, working in sections, add some tacky glue and fill in your letter with the CD pieces.  Let dry.  When it is dry you can brush a coat of ModPodge over the entire piece.  Set aside.


recycle an old CD

Decorate the frame


Cover your work surface.  Using the brush and Pewter grey paint, cover the entire surface and sides of the frame. 


Next, while the frame is still semi-wet dip your sponge in the mint green paint and lightly tap over the entire surface and sides of the frame.


Finally, rinse your sponge and sparingly pat on some gold paint and let dry.


When the frame is dry brush on some ModPodge to protect the frame and hang where desired.

recycle an old CD


recycle an old CD


Monday, August 14, 2017

How to paint a fun crazy quilt rock

crazy quilt rock


I admit it.  I love quilts, but they take time and like many people have a limited amount of that!  So since leaving rocks has become a worldwide fad, I figured why not make a few quilt like rocks.  They are quickly painted and so much fun.  This crazy quilt rock is so easy and looks amazing when done!  You can leave your crazy quilt rock in a public place for someone to find, or just keep it yourself for a décor item or a paperweight.

Crazy quilts were quite a fad in the latter part of the 19th century.  They were made into smaller quilts for framing or lap robes.  They were a way for people to use fancy fabrics and decorate them with unique stitching.  Your crazy quilt rock has all the elements but no stitching required!!!

The crazy quilt rock is so easy and is a fantastic craft for camp, girl scouts, church and senior groups, and more!

Materials:

Rock from a creek or river
Acrylic paint in desired colors
White acrylic paint for stitch lines
Pencil
Small flat brush
Line brush
Paper to protect your work surface

Instructions;

1.     First, wash and dry your particular rock.  Next, draw sections all around the rock with a pencil.  These will be your quilt blocks.


2.     Now fill in each section with a flat brush filling in each block with a different color acrylic paint. And let dry completely.


3.     When your paint is dry load a liner brush with some white acrylic paint.  Then, begin making stitch marks all around each block, varying the design of the stitches.  Try little X’s, or U shapes, diagonal lines, etc. this is where you can be creative just like they did in the 1800’s.  You can even write a message on a block such as “love”, or “peace,” etc.


4.     Let dry and your rock is ready to spread the love!

crazy quilt rock


Be sure and visit Make it easy crafts often for more quick and easy craft tutorials, printables, and recipes


Sunday, July 9, 2017

How to make an easy luggage tag, fun kid's craft


Whenever you go anywhere and fly everyone seems to have the same color luggage.  You can make a personalized easy luggage tag that sets your luggage apart from the crowd. The tag is big enough to be noticed but is also very lightweight.

This is a perfect project for kids, girls scout groups, vacation Bible school and so much more.  You make this luggage tag from foam door hangers that are very inexpensive.  It's a great way to use up all those extra little foam shapes that the kids may have not used up yet too! 

So let’s get started!


Materials:

2 foam door hangers in contrasting colors

Disappearing marker

Hole punch or nail, scissors

Tacky craft glue

Sharpie marker 

16” of flexible plastic string (used for beading)

Small foam shapes to fit in the center hole


Easy luggage tag


1)   Choose two contrasting colors of foam door hangers.  Measure 3 inches from the bottom of one door hanger marking with a disappearing marker and cut off. Do the same with the other door hanger except you will measure from the top  (the end with the hole) and cut off. 


2)   Place them together and you will have a recessed area on one end.  You will not be putting any glue in the recessed area. 


3)   Using a large hole punch or simply poke a hole with a nail in the center of the non-door hole area.


4)   Line up both side together so that the hole you punched is in the center of the door hole.  (This is the top of your tag)
  
5)   Spread some tacky glue onto the side with the door hole. Press together and let dry.  Trim the corners at an angle.


6)   Glue foam shapes in the recessed door hole areas if desired or just leave as is.   Attach a piece of flexible plastic string through the punched hole and attach to luggage.  Use the Sharpie marker to label with name and address.