Showing posts sorted by relevance for query rock painting. Sort by date Show all posts

Monday, October 9, 2017

How to paint this super fun star quilt rock

star quilt rock


Warm up to this super fun star quilt rock.  It’s easy to make this rock and then put your “warm thoughts,” on the underside and leave it for someone to find.  It’s easy to paint and kids will love to vary the colors of the quilt.  Simply follow the diagram painting all the dark sections first and then follow with the light ones.  After you have finished your quilt leave your positive message on the back!  Kindness rocks! 

Materials:

Rock
Acrylic paints, burnt sienna (dark), Yellow ochre, (light) and red.  (I’ve used fall colors but you can substitute if you wish)
Small paintbrush
Black sharpie marker
Black extra fine marker
Palette or paper plate
Pencil

Instructions:

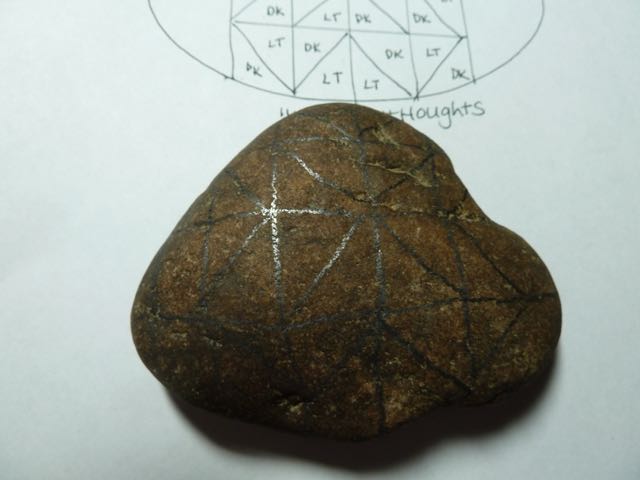
1.     First, use the pencil to mark off lines for the squares on your rock.  The lines don’t have to be perfect.  Then, make diagonal lines on the squares following the diagram.  Don’t worry about the ends since they will just be one solid color.


2.     Next, paint the underside of the rock yellow ochre and let dry.


3.     Now using the small paintbrush, paint the dark diagonal areas first and let dry.


4.     Next, paint the light color diagonal areas and let dry.

5.     Depending upon your rock you may want to add a second coat and let dry.

6.     When the rock is dry, use the wood end of the paintbrush dipped in red paint to make dots on all the yellow ochre. (Light areas)  Continue till you have added dots on all the light diagonal lines.


7.     Finally, use the black sharpie marker to outline all the lines.


8.     Use the extra fine marker to make stitch lines on the black sharpie lines. (See photo)


9.     Turn rock over to the solid side and paint your message.  After you’ve painted it use the wood end of the paintbrush to put dots on the letters.  Let it dry and leave the rock in a park, store, sidewalk and more for someone to find and make their day warmer, and brighter!


Diagram for painting

Check out some of our other rock painting tutorials like this Leaf rock!
Thanks for your visit and we'd love to hear your comments!


SaveSave

Sunday, October 29, 2017

How to easily paint a cute turkey rock table setting

Thanksgiving turkey rock


Painting rocks are all the rage these days.  Whether you leave them for someone to find or you gift them for paperweights, they are inexpensive and fun.  This turkey rock is cute and you personalize it with the name of your guest.  Leave the turkey rock at each table setting and your guest can take it home as a customized party favor and memento.

Add the date and year on the back and the turkey rock will be a lasting memento of the holiday.  You can even have the back blank and let each guest write something they are thankful for before the meal.  It’s a fun tradition for Thanksgiving.

Let's get started:

Materials:

Rock
Acrylic paint in white, brown, lt. brown, yellow, red, orange, and black
Sharpie or any permanent marker in black
Small paintbrush
Newspaper to protect your work surface
pencil

Instructions:


1.      First, paint the entire rock front and back with orange paint.  Let each side dry before painting the other and then let completely dry.  It may help to use a hair dryer to dry all the layers quickly.

Thanksgiving turkey rock


2.      Now, use a pencil to lightly add guidelines for all the shapes. The head is a teardrop oval.  The body is a larger oval.  The beak is a small diamond shape. The feet are three claws on each side of the body. The eyes are two round circles on each side of the beak.  The waddle is a long fat comma shape.  And the feathers are spoke-like fan shapes with a curved top.  You will just fill in the spaces as you would a coloring book!  Super easy.  If you don’t like your pencil lines, erase them and start over.

Thanksgiving turkey rock


3.     Use the paintbrush and brown paint to block in the head. Next, with the same brown, add a rounded shape. This is the body, which is approximately twice the size of the head.  Let dry.  (See photo)  You are blocking in the basic shapes working around the eyes, beak, and waddle. You will be going over all the lines on entire turkey with the marker when it is finished and dry.

Thanksgiving turkey rock


4.     Now add the tail feathers.  Using the brown paint, start at the bottom and work all around the body making each feather like a fan shape, slightly curved at the top. Now use the white paint on the top of the feathers curving the top. Let dry.  Add the features.  Paint the eyes in white, the beak yellow, and feet yellow, and the waddle red.  Let dry.


Thanksgiving turkey rock

Thanksgiving turkey rock


5.     When all the painted areas are dry, Use the Sharpie or permanent fine line marker to outline all the feathers, body, and features.

Thanksgiving turkey rock

Thanksgiving turkey rock

Thanksgiving turkey rock

6.     Highlight your turkey by making some light brown lines on the body. Add the pupils of the eyes with the marker.  You may also want to use a little thinned white paint to add some highlights on the feathers and body. (See photo)

Thanksgiving turkey rock

Thanksgiving turkey rock

Thanksgiving turkey rock


7.     Finally use some white paint to add the name on the feathers, counting the letters so that they are in the center.

Thanksgiving turkey rock


8.     Add the date and year on the back of the rock, or leave blank and let each guest write what they are thankful for.  Place at each place setting.  Your guests can take their turkey rock home as a party favor.

Thanksgiving turkey rock

Thanksgiving turkey rock

Thanksgiving turkey rock


Monday, August 21, 2017

How to quickly make a sweet little rock fairy house

rock fairy house


Painting rocks are fun and inexpensive.  I mean a rock is pretty much free right?  And with a little paint, you can make an amazing little rock fairy house.  You can easily paint this rock fairy house with one larger base rock and two small rocks that you glue to the roof after painting them to resemble chimneys. 

Wouldn’t you just love to open that door and go inside?  I’ve set mine up with my little painted rock gnome in a flower pot on my porch!


Rock fairy house


Materials:

Large rock for main house
2 smaller rocks for the chimneys
Acrylic paint in light green, dark pink, raw sienna, burnt umber, red, yellow, dark green, black, and white.
White Gesso
E6000 glue
Medium flat brush, liner brush, and spotter brush

Instructions:

1.     First, cover your work surface with newspaper.  Next, get your rocks, wash and dry them. 

2.     In order for the paint to show up well, use a medium brush to apply a coat of gesso on all the rocks and let dry.


3.     Next, apply a coat of light green paint on the entire large rock and let dry.  While the large rock is drying apply a coat of dark pink on the two smaller rocks. Let the paint dry.


4.     Now, using the liner brush and white paint, add horizontal lines all across the small chimney rocks.  Then, add vertical lines all along the horizontal lines to resemble bricks. Add a small area of dark brown in the center of the rock that will be on the top. (See photo) Set aside and let dry.


5.     Paint the roof tiles. Now, double load your flat brush, one side raw sienna, and the other side burnt umber.  Apply the paint in vertical strokes on the roof, reloading your brush as necessary.  Continue until you have added the tiles to the entire roof. Use the liner brush to add some black lines vertical and horizontal to accent the tiles as needed.


6.     Use E6000 glue to attach the two chimney rocks to each other and then attach to the top of the large main house rock.  Let dry.


7.     Now add the extra little details.  Use the red acrylic paint to make a round door.  Add some vertical lines with white while the paint is still wet to resemble boards.  Paint the windows. Add yellow in the windows.  Paint some flowers with pink, white, and yellow on the windowsills, and all around the edges of the house.  Add other things like butterflies, bunnies, and more flowers as desired.


8.     Let dry and display with pride! And be sure and stop by Make it easy crafts again for more free craft tutorials!

rock fairy house